


Jarlsberg® Cheese
-

Yield
4 Pounds
-

Aging Time
~2 Months
-

Skill Level
Intermediate
-

Author
Jim Wallace


Ingredients
Total price for selected items: Total price:

Instructions
We cannot provide a recipe for JARLSBERG ® cheese, as to make JARLSBERG ® cheese requires the use of protected cultures owned by the manufacturer. instead, we provide below a recipe for making Norwegian Style cheese.
-

Acidify & Heat Milk
Begin by heating the milk to 98F (37C). You do this by placing the milk in a pot or sink of very warm water. If you do this in a pot on the stove, make sure you heat the milk slowly and stir it well as it heats
Once the milk is at 98F, the culture can be added. To prevent the powder from caking and sinking in clumps, sprinkle the powder over the surface of the milk and then allow about 2 minutes for the powder to re-hydrate before stirring it in.
Allow the bacteria to work in the milk for about 45 minutes. The milk should be held at the target temperature and kept still during this time.
-

Coagulate with Rennet
Next add about 1/2 tsp (2.5ml) of single strength liquid rennet.
The milk now needs to set still for 30 minutes while the culture works and the rennet coagulates the curd. The thermal mass of this milk should keep it warm during this period. It is OK if the temperature drops a few degrees during this time. You will notice that the milk begins to thicken at about 15 minutes, but allow the firm curd to develop before cutting.
While you are waiting, make sure you sanitize the mold and cloth for the final cheese.
-


Cut & Stir Curds
Once a firm curd forms, the cutting may begin. Use a long knife to cut the surface to about 1 inch in a crosshatch pattern as shown below. Let this rest for 3-5 minutes while the whey rises in the cuts. Then you can use a ladle, spoon, or even a thin wired whisk to cut the curd into large pea sized pieces as evenly as possible. Continue stirring for about 20 minutes. This will allow the curd to release whey and firm up before the final heating.
-


Wash Curds
Now it is time to begin drying out the curds. This will be done by increasing the heat slowly to 102F (39C). The heating will be done by first removing a portion of the whey and adding back warm water over a period of 20-30 minutes.
Begin by allowing the curd to settle to the bottom of the pot and then removing 30% of the whey. Stir the curds well again. This step will remove much of the lactose from the process and limit the bacteria growth and acid production (a sweeter cheese).
Next, add back a volume of warm water that is about 1/2 of what was removed. This should be at about 140F. This water should be added slowly to the curds while slowly stirring, just enough to keep them separate and moving. The water addition should take about 20-30 minutes and the final temperature should be about 102F.
The next step will be to hold the curd at the final cook temperature while stirring for about 30-45 minutes.
The final curds should be cooked well through and should be examined to make sure that enough moisture has been removed. A broken curd should be firm throughout and the curds should have a moderate resistance when pressed between the fingers.
When this point is reached, the curds can be allowed to settle under the whey.
-


Separating the Curds
The curd is now ready to be consolidated. For this cheese we would like to start with a nice closed body and this can be accomplished by consolidating the curds under the whey with a little pressure. To do this, I remove much of the whey leaving about 1-2 inches above the curd. I then use a large piece of our Medium Mesh Ripening Mat to bring the curd mass together as in the photos below.
I then simply roll the curd mass into the sanitized press cloth, grab the cloth by the corners and quickly drop into the mold. The mold, cloth and curd mass are now immersed in the whey and using a light hand pressure, I press into the molds.
The follower can now be placed on top and the weight of a gallon of warm water (~ 8 lbs) will give it enough weight to consolidate for about 10-15 minutes. This extra step will improve the closeness of the curd in the final cheese.
-

Pressing
At the end of this "pre-pressing," the newly formed cheese can be removed from the whey placed in a draining area where it will continue to press. But first the curd should be consolidated enough to be removed from the mold and cloth, turned over, rewrapped, and placed back in the mold for further pressing. The initial weight should continue as 8 lbs for 20-30 minutes before it is turned and rewrapped.
Press weight is increased to 25 lbs now. This will continue for another 4 hours and the cheese should be turned and wrapped at 1 hour intervals taking patience in keeping the cloth smooth for a nice smooth surface in the finished cheese.
At each turn you will notice the cheese has formed a smoother surface and rests lower in the mold.
Because the bacteria is still working and acid needs to develop, the cheese needs to be kept as warm as possible (80-85F) for a further 2-3 hours and then allowed to drop to 61-64F overnight with no weight but still in the mold.
-


Salting
You should have a saturated brine prepared for salting this cheese.
A simple brine formula is: 1 gallon of water to which is added 2.25 lbs of salt, 1tbs. calcium chloride (30% solution), and 1 tsp. white vinegar.
The cheese now needs to sit in the brine for about 8 hours (~ 2 hrs per pound). The cheese will float above the brine surface, so sprinkle another teaspoon or 2 of salt on the top surface of the cheese.
Flip the cheese and re-salt the surface about half way through the brine period.
At the end of the brine bath, wipe the surface and allow the cheese to surface dry for a day or two if waxing. The surface will darken somewhat during this time. The other more traditional option is to develop a natural rind. This is simply done by brushing the cheese and wiping with a light salt brine to keep the molds away. This will need to be done daily initially but less frequently as the cheese rind dries down a little.
-


Aging
Phase 1 | This is the initial cool phase and will begin as soon as the cheese has been removed from the brine and dried off. The aging space should be 52-54F and 92-95% moisture. During this phase, the proteins will begin their initial breakdown and the cheese will begin developing its elastic texture. This is very important to provide a body for the gas entrapment in the next phase. This should last for 7-10 days but may be extended to 14 days.
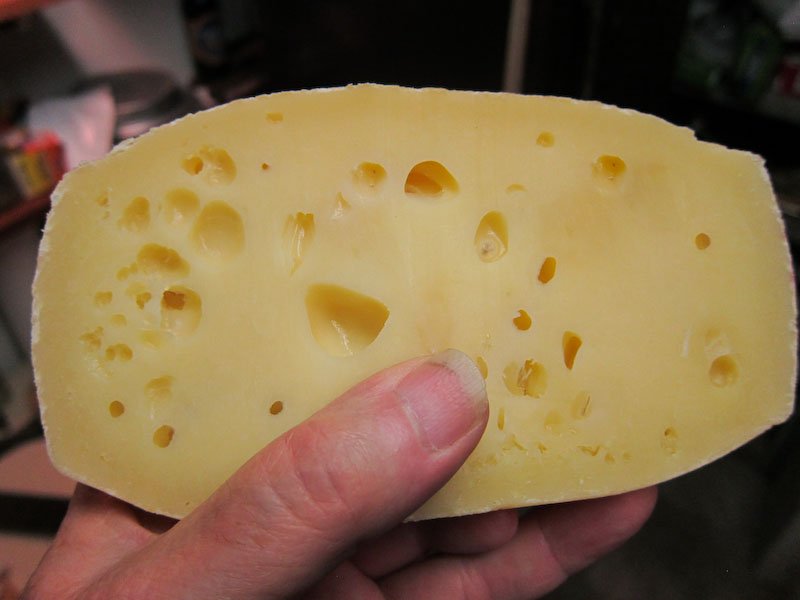
Phase 2 | This phase is to encourage the development of the gas and flavor producing Propionic bacteria. The temperature should now be increased to room temperature 68-72F and 92-95% moisture. I do this simply by placing the cheese in a covered plastic enclosure for moisture and moving the cheese to a warm place. This will need to continue for 4-5 weeks. During this period the cheese needs to be turned daily and you should notice the swelling of the cheese.
Phase 3 | Finally the cheese needs to be returned to the cold space again as in phase 1. During this period the cheese will continue to develop its flavor and texture as the fat and proteins continue to break down due to enzyme activity. The cheese should be ready at 3-4 months but may be ripened longer for more character.
Recommended Recipes
Cheese Making Supplies
Popular Products

Learn how to make a cheese cave right at home. If you want your cheese to ripen properly you have to make them a good home and take care of them like little bambinos.