


Raclette Cheese Making Recipe
-

Yield
7 Pounds
-

Aging Time
~3 Months
-

Skill Level
Advanced
-

Author
Jim Wallace


Ingredients
Total price for selected items: Total price:

Instructions
Due to the nature of this cheese, it would be difficult to make it in a smaller form. My goal here is to make it in the traditional wooden band form that can be adjusted for the amount of milk for the season. You should definitely have a bit of cheese making experience behind you before trying this one. But for those not ready for it yet, do read through for the inspiration. It is a very beautiful process and a very amazing cheese.
-


Heat & Acidify Milk
Raw evening milk is collected and sits overnight @50-60 for cream to rise and bacteria to develop, then skimmed in AM; my goal here is between 3-3.5%.
Next mornings full fat fresh warm milk is mixed together with the evening milk and heated to 90F.
If using a pasteurized milk I would blend a bit of 2% with whole milk.
Culture is then added to the milk when heated to 90F.
Culture includes:
- Lactobacillus delbrueckii subsp. lactis (1/8 tsp of MM100 or 1 packet of C21 Buttermilk culture)
This the mesophilic strain that works at lower temps for a short time but will provide enzymes in the later aging. - Streptococcus salivarius subsp. thermophilus plus Bulgaricus (both found in our Y1 yogurt culture) 1/2% of milk volume or for 7 gallons use 4.5oz of our Y1 yogurt
This combination will be the primary acid producer once the secondary temperature is reached.
A very good tip for adding cultures is to pull a quart of milk in a sanitized jar and then quickly heat to inoculation temp of 90F. Add all of the cultures to this and keep warm in a water bath and ripen for 30 min.
During this time you can be heating the main milk mass to 90F and at the end of the 30 min., the milk should be heated and your pre-ripened culture is ready to go. This essentially save you from waiting while the milk ripens. A good tip for most cheeses and saving some time in the day.
Our intent with acid development here will be to produce a very small amount of acid initially before draining the whey and then to keep the curd mass warm in the final mold for a final medium acid to develop. This process will lead to a more elastic cheese in the end and will make the cheese very supple and letting easily.
- Lactobacillus delbrueckii subsp. lactis (1/8 tsp of MM100 or 1 packet of C21 Buttermilk culture)
-

Coagulate with Rennet
The nature of the curd to be developed will be quite soft so that it can be cut into small pieces.
A smaller amount of rennet than normal is added. For this much milk (raw) I use just 2.2ml or slight less than 1/2 tsp.
After adding to the milk stir briefly in a gentle up and down motion.
In about 27 min. the milk should show a thickening (flocculation) and by 40 min. should be firm enough to cut. This will be a very soft curd compared to other cheeses, so be careful and slow with the cut and stir.
-


Cut & Stir Curd
When the curd will hold a good cut with clean edges begin the cut of about 1" vertical slices and then do again at right angles vertically. Allow this to rest for about 5 min. for the edges to firm up. The final cut will be made by using a ladle or spoon and cross cutting, or as I show here, a thin wired whisk is shown.
The initial cut size will be about the size of a coffee bean taking about 10 min., when cooked the final cut size should be a barley to small maize grain in size, trying to get the cut as even as possible over another 10-15 min.
-


Cook Curd
Once the initial cut has been made, it is time to bring the temperature to 100F, to dry the curd and remove lactose.
This can be done in one of two ways depending on what final moisture is desired.
Remember we said the cheese is made in several areas and the moisture can vary depending on cook process.
The options are:
- The curds can be cooked by slowly using direct heating to reach 100F over 25-30 min. This will make a drier curd. Stir the final curd at 100F for an additional 15 min.
- The next option is for a moister and slightly sweeter curd. This entails the Removal of 25% of whey. Then add enough 140F clean water slowly until the curds reach 100F over ~ 30 min. while stirring.*** Then Stir slowly for 15 minutes, just so that the curd does not clump.
The final curds should be cooked well through and should be examined to make sure that enough moisture has been removed. A broken curd should be firm throughout and the curds should have a moderate resistance when pressed between the fingers.
When this point is reached the curds can be allowed to settle under the whey.
-


Drain & Form Curd
Next step is to remove whey to curd level. Then using the Draining mats mentioned above, slowly consolidate curd mass to one side of the vat and lightly press into a consolidated mass.
This can then be rolled easily into the draining cloth and transferred to the mold that should have been sanitized and ready. Once in the form knead curd mass well into form before ready to press and consolidate
Note: The special wooden form shown here can be adjusted by tightening or loosening the free moving block on the outside. This will allow the cheese to always finish at the same thickness by adjusting the form diameter to accommodate the cheese mass. Please see the note here and here None of this will be needed if using the LargeMold-M2 because the follower will float above the curd mass. Diameter will always be the same but height may vary.
I place the form on a rigid board for the press step (a plastic cutting board or wood board will suffice) I use one on the bottom and one on the top, similar to my Brie and Camembert.
If using the special wood adjustable strap for the form , leave about 1-2" of curd mass above the form. This will consolidate as more ripening and press weight follows.
If using the smaller Mold-M2 for a smaller cheese, this will take car of itself once the follower is in place.
Once the curds are in the form and consolidated, pull the cloth tight around the edges and fold neatly over the top.
-


Pressing
My next step will be to place the second board on top and a weight to consolidate the curd as it continues to ripen. I begin with a simple weight of 25 lbs to start and make sure it sits square on the top board
However in order to create optimum conditions in the 80-86F range and insure the complete culture activity, I often need to create an incubator. For this I use my insulated draining table and pans of warm water then cover with an insulated pad to keep the warmth. Finding the correct place for the weight can be a challenge but I usually get it right (I just feel for the square edges of that top board). A large cooler can be used for this as well.
Allow this rest under the weight for 1 hour.
At the end of the 1 hour you will find that the curd has consolidated substantially. Remove from the cloth and form, turn and place back in the form with cloth , place the board on top and reset the incubator as above, changing for warmer water if need be. This should all rest again for another hour.
Before you add the weight this time, the form should be adjusted in relation to the cheese mass so that about 1 finger width exists between the form edge and board before adding the weight. This will prevent the cheese from forming a rim above the top edge and a nice square edge at the bottom. If adjusted properly the final cheese when fully pressed, will have the boards sitting flat on the wooden rims with nice even edges. You may need to pare away a slight edge that squeezes between the form and board.
At the end of the second hour of pressing the curd will look much more consolidated as seen below and then can be pressed with 50lbs of weight for the next 12 hours (overnight). The cheese can be allowed to drop to room temperature overnight.
The next morning the cheese can be removed from the form and cloth and should be well consolidated as seen in the photos below.
Then allow the cheese to sit in a cool room 52-54F covered with a damp cloth to reach normal brine temperature throughout .
-

Salting
You should have a saturated brine prepared for salting this cheese. I normally keep my prepared brine at 52-54F
You will find all of the details you need on brining here.
A simple brine formula is: 1 Gallon of water to which is added 2.25 Lbs of Salt, 1tbs. Calcium Chloride (30% solution), and 1 tsp. white vinegar.
The cheese now needs to be set in the brine for about 14-16 hours for an 8 lb. cheese o about 2 hrs per lb.
The cheese will float above the brine surface so sprinkle another teaspoon or 2 of salt on the top surface of the cheese.
Flip the cheese and resalt the surface about half way through the brine period.
At the end of the brine bath, wipe the surface and allow the cheese to surface dry for a day or two before waxing. The surface will darken somewhat during this time.
-


Aging
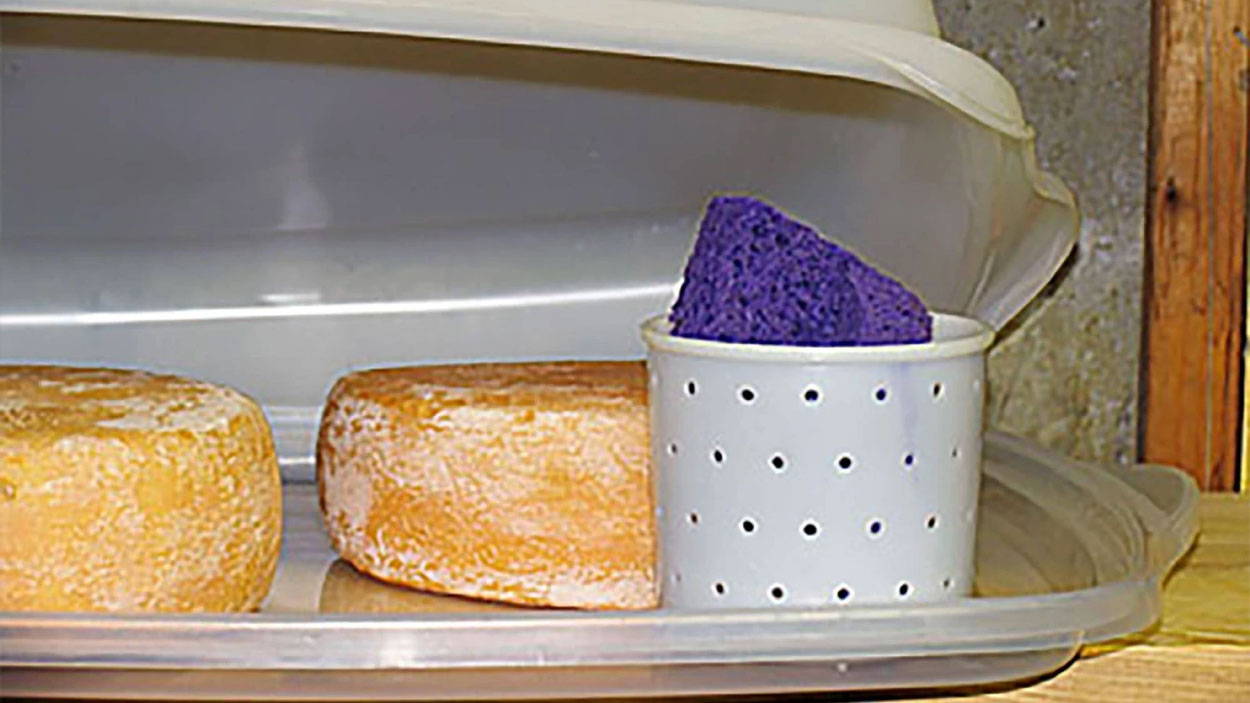
Once the cheese has been dried off after the salting stage, it is ready for the aging room. 52-54F and about 90-94% moisture will be needed for this.
My aging space here is controlled to these target values but may drop into the 80-85% moisture at times. In order to avoid the swings in moisture I use a plastic cake holder for aging this cheese as shown.
Initially, the cheese is taken out and any mold appearing in the first few days is wiped away with a dry cloth. After a few days you will note that the surface is becoming a bit greasy and a bit of slime layer is beginning to appear. You may also notice a fruity aroma like pear or apple. This is due to natural yeast that has taken up residence and begun to grow.
The Washed Rind
This greasy layer will no longer be controllable with the dry cloth we had used earlier.
A light salt wash will be needed for this. I mix daily a fresh cup of cool water and a tablespoon of salt You may also use a pinch of B.linens in this to encourage the rind growth you want .
In Europe they use a nasty looking mix of old washings for this (it looks like mud and smells worse). They call this Morge and has been found to have up to 480 different bacteria/molds in it, illegal in USA but it has worked for them for years.
I then turn the cheese over and use a brush or cloth to wipe the new top and sides to remove any dark molds appearing. I then place it dry side down for a day or so until the wash surface dries down.
Wash every day or 2 for 10 days with the salt brine indicated above and optionally containing a little white wine.
Once the surface begins to develop, wash 2x a week until the cheese is ripe, about 3-4 months.
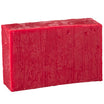
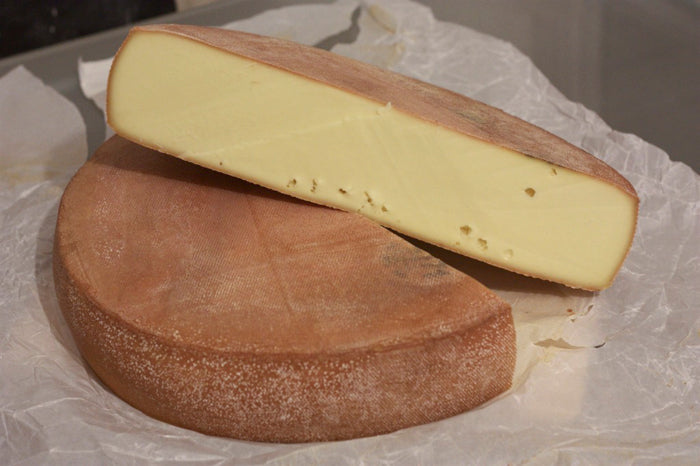
Eventually the cheese will take on a nice rosy appearance with a thin rind and the aroma will be of cellar damp and a medium to mild pungency. If the was is too frequent a thick crust may build up and if allowed to dry may exfoliate (crack and peel).
Cheese Making Supplies
Popular Products
Cheese Making Recipes
Recommended Recipes
Learn how to make a cheese cave right at home. If you want your cheese to ripen properly you have to make them a good home and take care of them like little bambinos.