


Shropshire Blue Cheese Making Recipe
-

Yield
2 Pounds
-

Aging Time
~6 Months
-

Skill Level
Advanced
-

Author
Jim Wallace


Shropshire Blue Cheese Making Recipe Info
Inspiration Behind Shropshire Blue
About Shropshire Blue Cheese
The History of Shropshire Blue
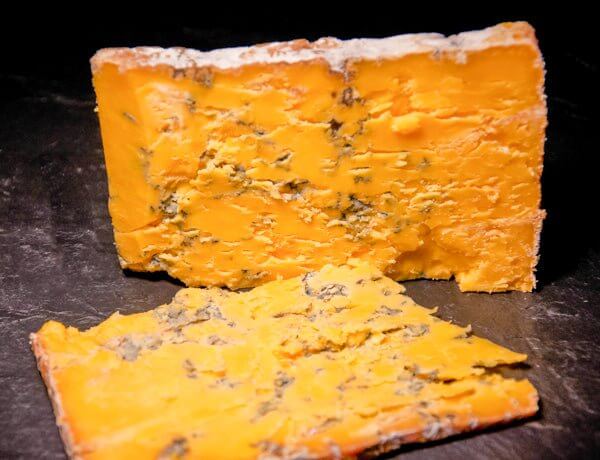
Shropshire Blue Flavor and Characteristics
Ingredients
Total price for selected items: Total price:

Instructions
How to Make Shropshire Blue Cheese
The guide below is for a cheese from 2 gallons of milk, but the photos are from a doubled batch. I find that the cheese I make here in the larger size tends to be nicer, since the rind to cheese body ratio is so much smaller and it just makes a better presentation when cut. For your first trial I suggest staying with the 2 gallon guide as written below.
I should say again, that is a cheese for the intermediate to advanced cheese makers.
Note: Start this one early in the day because there are some long wait steps as you go (otherwise you could be up into the wee hours).
-

Heat & Acidifying Milk
For a good curd, if using pasteurized milk, add 1/4tsp calcium chloride and stir well.
Add 3/4-1.25tsp (4-6ml) annatto to the milk, mix in well.
Next heat the milk to 88F (30.5C). You can do this by placing the milk in a pot or sink of very warm water. If you heat directly on the stove top, do so slowly and stir the milk as it heats.
While heating the milk, remove 1/4 cup and add P.roqueforti to it so the mold is able to re-hydrate, set this aside.
Once the milk is 88F, add the culture. To prevent the culture from clumping and sinking to the bottom, sprinkle the culture over the surface of the milk and allow it to re-hydrate for 2 minutes before stirring it in.
Note: only a small amount of culture is used in order to preserve calcium and moisture in the cheese.
Once the culture is stirred in, add the re-hydrated P.roqueforti mold and stir.
Allow the milk to milk to sit still for 30 minutes while the culture begins to work.
-

Coagulate With Rennet
Now add 1/4tsp (1.25ml) of single strength liquid rennet and gently stir for 1 minute.
Let the milk set for 90 minutes while the rennet coagulates the curd. You should keep it warm during this period. The milk will begin to show thickening at about 15-20 minutes, but leave it for the full time. The long hardening time will help the curd hold moisture in the final cheese.
Check the curd break for a good firm curd. This one should break very clean, with clear whey washing into the cut.
For those paying attention to the flocculation time and hardening factor (5x), this would be flocculation at about 18 minutes and a factor of 5, which will have a good curd at about 90 minutes.
-


Cut Curds & Release Whey
The initial cut for this cheese is very minimal. Start by cutting vertical 3/4 to 1 inch cuts in both directions as shown in the photo. There is no need for horizontal cuts with this cheese.
Let this curd set for 3 hours, keeping it at temperature while the bacteria works and consumes lactose. During this time the curd will sink to a considerable depth, as culture works and whey is released.
While waiting for the curd to release its whey and settle in the pot, prepare the draining pan/colander.
I use a food grade plastic kitchen pan and, with a hot nail, I poke many holes in the base of one and leave the other intact. This gives me the option to drain the curds either submerged in whey or free of it.
In this case, I use the drainer pan inside another kitchen pan with no holes. If using a colander for this, just size a colander that fits inside another pan to collect the whey around the curds.
Make sure both cloth and drainer are sanitized and ready for the next step.
-


Remove Whey
Next step is to remove the free whey to the level of the curd. As you can see below, the curds are very distinct long vertical pieces but with plenty of moisture retained. They are still quite fragile and will break under their own weight or if stirred.
Note the curd definition and moisture retention that has already developed at this point.
-


Drain Curds
Transfer the curds to the draining cloth and allow the warm whey being released to gather around the curd mass to keep it warm. Do this by transferring the curds to the cloth-lined colander or drainer which is held in a pot or other container to hold the whey.
I used a small stainless bowl here with a thin edge to both cut the curd and transfer to the cloth. I kept the curds as large as possible to retain the moisture.
Allow the whey to collect around the consolidating curd mass as it drains off. This provides warmth and a ready supply of lactose for the curd. Drain for about 1 hour.
As it drains, the whey will cover the curds. After an hour the whey can be removed, leaving a lightly consolidated curd mass behind.
-


Consolidate & Prep Curds
Now tighten the cloth by pulling up all 4 corners, then taking one corner and pulling the cloth around tightly, fasten the curd mass into a snug ball. Turn this over onto the knot and allow the whey to collect again.
In about an hour, the whey will rise again and can be removed for the final time.
Untie and turn the curd mass in the cloth then retie it. In about 1 hour, the curds can be removed from the cloth, allow the whey to drain away during this last draining time.
Remove the cloth and cut the curds into large 2-3 inch piecesto allow for more draining.
Keep the curd pieces warm and turn them every 15 minutes for the next hour while the final acid continues to develop.
Now allow the curds to rest overnight and the temperature to drop to about 65-75F.
Note: I was making a double batch, that's why there's two bundles of curds in one of the photos above.
-


Salting
The next morning, the curd is now ready to be broken, salted, and formed in the molds. Begin by breaking the large curd pieces into quarters. Note the nice flaky texture of the torn curd.
Note: A final pH of 4.6-4.7 should have developed by the morning
Add 2% of salt by weight of curds. Mix this in over 2-3 applications while stirring the curds well to allow the curds to slowly absorb the salt and brine created.
-


Molding & Drying
It's now time to form the curds, they will initially sit high in the mold but will drop to about 1/2-2/3 of the initial pack height after a couple of days of turning.
Because of this, you will need a tall mold. The large mold I use here has plenty of height for my double batch, for a 2 gallon batch two M3 Small Hard Cheese Molds taped together will be the perfect height. Or you can use one of our E28M Stainless Steel Cheese Mold.
To fill the mold, place it on a small board with a draining mat underneath. Fill the mold, packing firmly (the curd is well defined this point). Place another draining mat on-top followed by another board. Moisture will drain for several days, the temperature should be 60-65F during this time. If your curd is too dry, use a follower with about 4-8 lbs of weight to help consolidate the curds.
The curds will settle in the mold as shown over the first few days of turning.
At about 5 days of turning the cheese, it's tie to unmold the cheese. The curds should have consolidated nicely but the surface will show large openings and cracks. These are addressed by closing the surface with a flat bladed knife (dull edge is best) or large spatula. Dip the knife or spatula in warm water and firmly scrape it back and forth over the surface until the scrapings fill the cracks. After 5 days of draining, this is easier because the proteins have begun breaking down and the surface is much softer to work with.
The cheese surface is still moist and should be wrapped with a cloth bandage. Cut a dry cloth to the height of the cheese and wrap it around the cheese. This helps wick moisture to the surface, over the next several days it will begin to dry out. The cheese should then be placed on another cloth square to wick moisture from the bottom with another square smoothed over the top. The drying cheese should be in a cool room of moderate moisture to help dry the surface.
-


Aging
After several days, the wrapped cheese will begin to dry out and blue mold will show on the surface, as seen above. As the bandage dries out, it can be removed and the cheese can be moved to an aging space with about 85% moisture and 52-54F.
At about 5 weeks, the cheese should have:
- Begun to mellow
- Consolidated slightly, there will still be plenty of air spaces for mold to grow
- Be ready for piercing, this allows air into the cheese for the blue to develop internally
It's now time for piercing. This is done by piercing with a sanitized 1/8" sanitized skewer about 3/4-1inch apart over the entire surface top and bottom of the cheese.
In about 3-6 months the mold should have grown well inside the cheese, the surface should be dried down to a dark wrinkled surface and is now ready to enjoy.
Cheese Making Supplies
Related Products
You May Also Like


