Belper Knolle Recipe
Dried for a long period in the cave and, when it is ready, Belper Knolle is served as small shavings, much as a truffle or Parmesan would be shaved to embellish culinary wonders.
Ingredients
- 1 Gallon of Milk (Not UltraPasteurized)
- 1 Packet C20G Chevre Culture or C20 Fromage Blanc Culture
- 1.5 tsp Pink Himalayan Salt or Cheese Salt
- 2-3 Garlic Cloves
- 1.5-2 Tbs Toasted Black Peppercorns
- Calcium Chloride (for pasteurized milk)
Equipment
- Good Thermometer
- Spoon or ladle to Stir Curds
- Large Colander
- Butter Muslin
- Drying Mats
- Instructions
- Belper Knolle Info
- Reviews
- Q & A
-
Heat & Acidify Milk
If using pasteurized milk, add about 1/8-1/4 tsp of Calcium Chloride at this point. Begin by heating the milk to 86°F (30°C). You do this by placing the milk in a pot or sink of very warm water. If you do this in a pot on the stove, make sure you heat the milk slowly and stir it well as it heats. You can use a thermometer but this is so close to our body temperature that when the milk feels neither cool nor warm it is close enough.
Note: You can try this with Goat milk as well, or even add a bit of cream for a richer base cheese, which might be tasty if you want to make this as an early eating cheese.
Once the milk is at your start temperature the culture can be added. To prevent the powder from caking and sinking in clumps sprinkle the powder over the surface of the milk and then allow about 2 minutes for the powder to re-hydrate before stirring it in.
Note: Some people prefer to add culture at room temperature and this works just fine, but this allows time for any unwanted bacteria in the milk to become players in the fermentation game.
We like to start this at 86°F (the bacterias optimum working temperature) and then just allow the resting milk to coast to room temperature as it acidifies and forms the curd.
-
Develop the Curd
Now, allow the milk to sit quietly on the counter at room temperature (68-74°F) for 12-14 hours. The milk will drop in temperature during this time to that of the room. During the winter it would be best to keep the pot covered with towels or a blanket to keep from getting cool. The best time to do this is in the evening, because the curds will be ready to drain in the morning and can be draining while you are busy doing other things or at work.
As the bacteria in the culture works, the milk sugar (lactose) is converted into lactic acid which increases the acidity of the milk and eventually causes the milk to form the curd.
The rennet included in the culture pack also helps to coagulate the milk. The milk will thicken into a gel after a few hours but really needs more time to become firm. The finished curd will begin to show whey rising to the surface. When this solidified mass shrinks slightly, visibly pulling away from the edges of the container, the curds are ready to be drained. The curd at this point will look like a big block floating in clear whey and perhaps even developing cracks in its surface.
-
Drain Curds & Release Whey
Our next task will be to separate the solids (curds, soon to become cheese) and liquid whey.
We will begin by lining our sanitized colander with the cheese cloth in preparation for draining. If you would like to save the whey for cooking or other uses simply drain it all into another pot.
You are now ready to transfer the curds to the draining cloth. Note the firmness of the curd in the photos below. Simply ladle the curds into the cloth and allow the whey to drain off.
Once the curds drain for a short time the cloth can be gathered, tied securely and hung for the final drainage. This can be done for several hours and even overnight, depending on how dry you want the final cheese.
I tend to make mine just dry enough that the curds will still hold together and form into a ball. If too wet the cheese is too sticky when molding and will tend to slump after molding. If it is too dry it will be a problem staying together.
To make sure the curd has dried uniformly I also find that it is helpful to open the cloth and mix the curds together at least once or twice during the draining.
-
Add Salt & Garlic
Now the fun begins! Once the curd has dried sufficiently, it is time to blend the salt and garlic into the curds.
I use 2-3 medium cloves of garlic chopped into small pieces. I add this to my mortar along with 1.5 tsp of the Himalayan Pink Salt, then using the pestle, I reduce this to a uniform paste (The salt helps in smooshing the garlic pieces).
The drained curd will have a moist dough like look to it.
Transfer the curd into a bowl along with the salt/garlic paste, then using the back of a large spoon, begin mashing the curds and paste uniformly. Allow this to sit while you prepare the black pepper coat.
-
Grind the Peppercorns
Before you form the cheese, grind the toasted peppercorns to a medium fine size. I find that a coffee mill reserved for spices works best but you could also do this in the mortar and pestle.
Spread this out evenly on a cookie sheet (or onto your counter top if you don't mind the mess).
-
Form & Coat Cheese
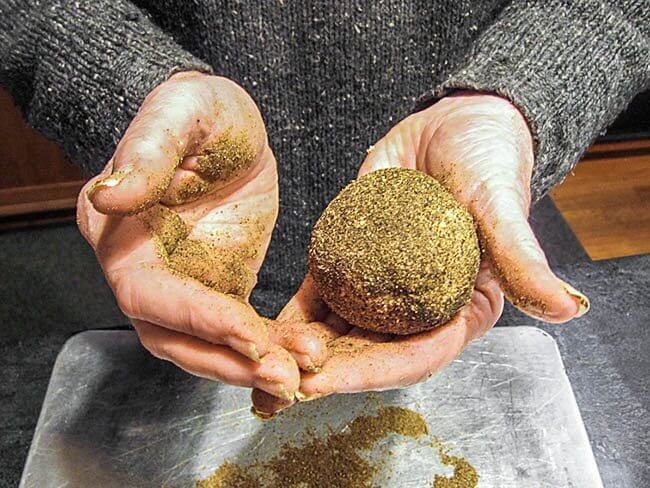
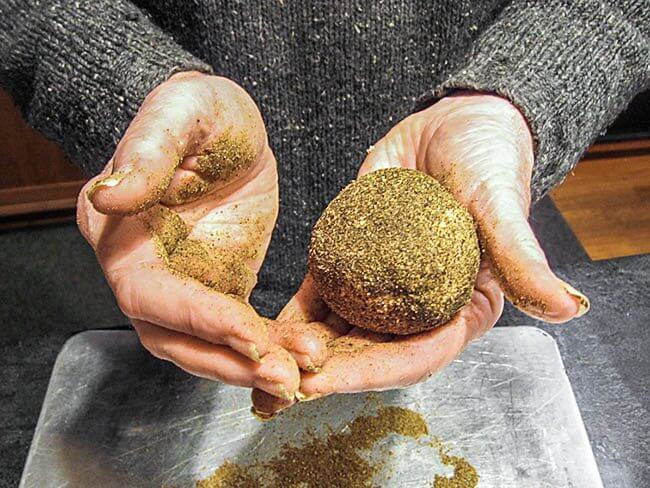
Now that everything is mashed and blended, the cheese can be formed simply by taking a small hand full of this mix and form it into a ball just as you would a snowball. Yes, it's messy!
The one gallon batch should make about 5-6 of these slightly larger than golf ball sized cheeses. The final coat is simply a matter of rolling the cheese around in the ground pepper surface you have prepared.
The cheese will be quite tender at this point due to high moisture, so handle carefully as you transfer to the drying mats
-
Drying
The cheese now needs to be dried down before it is placed in the cave. I do this in a room at about 50-60°F and a moisture of 65-70% moisture. I also use a fan set at low/medium speed to increase the rate of moisture release.
The object here is to produce a nice firm and dry crust. This will become a lighter color as it dries. The pepper will also keep this drying surface free of molds.
-
Aging
Finally the cheese can go to the cave with about 52-56°F and 75-80% moisture. This higher moisture will now help in the aging of this cheese as it continues to dry to the center and achieve a uniform moisture that will be perfect for use as thin shavings.
The final cheese should be ready in 4-6 weeks but will continue to improve in flavor for a few months.
My last batch was made Nov. 22 and was ready by Jan. 1st.
This has a rather intense flavor so I suggest serving as small shavings that can be tasted as is, or used as a garnish, much as you would Parma (or Truffle) for pasta, salads, veggies or what ever you think is good.
The flavor of the pepper can be reduced by brushing the surface before shaving.
I use a truffle shaver here, but a sharp knife will also work quite well.
Ugly Duck or Diamond in the Rough
I first found this cheese at the Bra Cheese Festival in Italy in 2009, I believe, where it was being presented shortly after it was first introduced in Switzerland.
This cheese was such a hit when I brought it home that I just had to do the research and many trials over the past year or so to get as close as I could to that initial surprising taste. It is just so different, I do not even know what to call it, so I will leave that up to you, our brave cheese makers out there, looking for a new direction.
Yes, a bit of an ugly duck but wait until you try it!
Sold from Alleyways in Italy
When I first saw this cheese several years ago in Italy at the Slow Foods Cheese Festival in Bra, I walked right past it (I mean it really did look like a little mud ball) until my second trip around. This time, the presenter in the booth was a bit more obvious, plus a number of his patrons were displaying their delight in the cheese. I just had to see for myself.
This was unlike any cheese I had ever tasted before. It was being offered in thin shavings just as a truffle (tartufo) would be shaved, and its appearance was not unlike the famous truffle I saw at the festival, being offered discretely in the small alleyways and doorways around the town, as seen in the photo below.
An Irregular Favorite
The cheese was an irregular, small roundish ball with a darkish rough coating. Not at all in line with what I have come to expect in the cheese world, but Wow! What a flavor it packed.
When passed across the face of the truffle shaver, it revealed its heart of milk and cream. This was a very unusual cheese indeed and quite the surprise, coming from Switzerland, the home of those massive Alpine wonders.
Of course, I had to bring a couple of these home in my limited bag allotment.
To say this cheese was a hit with all of my friends would be an understatement!
Our Winner Was...
I usually bring back quite an array of very special cheeses when I travel, as shown by the photo below and so, not surprisingly, this cheese returned with some pretty impressive company:
- Aged Gouda from Betty at L'amuse, one of Hollands best sources
- Etivaz and Rebibe, the largely unknown treasures from the Swiss Alps
- A Beaufort From the Savoie Alps of Bourge St Maurice
- Bitto the historical cheese from the Valtalina of Italy
- A Reblochon collected from my favorite small farm in the mountains of Savoie
- MonteVeronese from the north of italy
- A true artisan produced Camembert sourced from Herve Mons (perhaps the last of these)
- A Corsican 'Brin d'Amour' from my friend Pierre Gay's fromagerie in Annecy France.
- AND the star "Belper Knolle" shown below hiding in a pile. The tiniest cheese made the biggest splash.
Whenever I put this collection out for tasting with friends, the focus always returned to this little gem tucked into the collection at the right above and lableled as "Belper Knolle". All in all it was voted the best of the trip.
What is a "Belper Knolle"
Well, besides from being a very new cheese, it is a lactic fermented curd (meaning very little rennet, coagulation is mostly from acid development) that is drained, seasoned with salt and garlic, and rolled in crushed black pepper.
It is then dried for a long period in the cave and, when it is ready, it is served as small shavings, much as a truffle or Parmesan would be shaved to embellish culinary wonders.
"Belper" refers to the area of Belp (from Belp), where it was first produced, and "Knolle" is the German/Swiss for tuber, indicating the italian tartufo or truffel.
Now before I venture further in this, I need to mention that the Swiss producer has registered this name in the US, so do not try to use any related namings or publicity if you plan to make this for retail.
My intent here is to provide inspiration and a new direction for adding flavors to cheese as we go.
- Reviews
- Questions
- recipe
- taste
- garlic
- curd
- cheese
- salt
- pepper
- flavour
- goat milk
- mint

Glorious
Amazing, simply amazing. These little beasties are a glorious find. Super easy to make and after only 2 months, such a fantastic flavour. I think I upped the amount of garlic a bit (I love garlic) and it was worth it. This is the innocent looking cheese that bites back...in a good way.

Dragon Egg Truffles Are Awesome!!!
I decided to rename these critters. The day they were “laid” all fresh and soft, I had to slap the kids’ hands away -they got a taste of one and were addicted (you know how hard it is to keep 5 children away from their new-found goodies?!?). Today, I “hatched” them after a month or so of incubation. Incredible. Almost a symphony: started with a sharp bite, building to a an epiphany of mellow, buttery ******, followed by a long, meandering decrescendo leaving warmth fading to a soft hum. I tweaked the pepper rub in 10 truffles to make 5 Swedish Dragon Eggs (with the addition of juniper berries) and 5 Indonesian Dragon Eggs (adding black Cardamon). In the evening, a happily discovered a worthy pairing to the truffles: ruby chocolate! Here’s the pic, with a photobomb by the Canestrato born a couple days ago.

**** Gems
These are easy to make and have proved consistent over the two batches that I made so far. There is, as everyone has said, a huge hit of flavor in a very small taste. But what great flavor! The first batch I made as per the recipe (with goat milk). But,on the second one I added finally ground dried mint to the cheese body along with the garlic and salt. The combination of the mint’s coolness is The combination of the heat from the pepper and the coolness make a lovely contrast. I thought of this, because there is a Palestinian yogurt soup that I make, that combines a lot of pepper with mint, as flavoring ti the tartness of the thick labni (drained yogurt). It works the same way for this lactic cheese and it lovely with tabouli salad or an avocado drizzled with olive oil.

Amazing flavour
One of the first cheeses I made. Easy, a bit messy, and turned out great. Nice after about 3 weeks, but so much more flavour after another month aging. I was surprised how much they shrink, and will make them bigger next time.

Wow, this is great!
I just tried one of the seven Belper Knolles I made from this recipe after about 2 weeks of aging because I couldn't wait :) Oh my goodness- garlicky, peppery savory goodness. I can't imagine how good they will be in a couple of months. I was afraid when I was making them that the curd was too dry and they wouldn't come together. They came together perfectly after adding the garlic and salt and mixing thoroughly. I dried them in my cool garage in front of a fan for 5 days (they perfumed the whole garage!) then put them in the cooler. They are aging beautifully. What a fun recipe!