


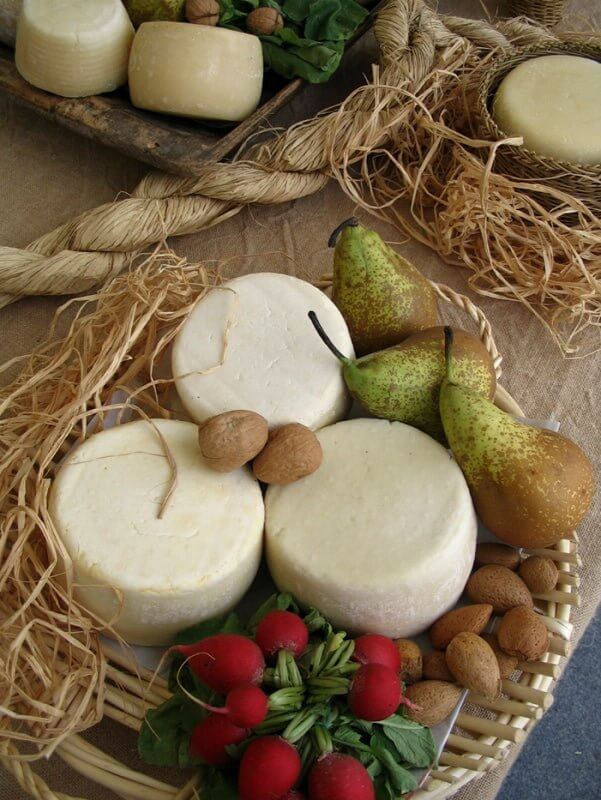
Caciotta Recipe
While traveling in Italy, this is one of the most common forms of cheese found on the Italian table. This cheese can be eaten fresh as a table cheese or as an ingredient in a favorite dish. The most noted presence is in the Pienza/Siena region of south central Tuscany but is also found, in various forms, throughout Italy.
-

Yield
2 Pounds
-

Aging Time
~2 Months
-

Skill Level
Intermediate
-

Author
Jim Wallace


Caciotta Recipe Info
Caciotta Inspiration
About Caciotta Cheese
Making and Using Caciotta
Caciotta Styles and Techniques
Ingredients
Total price for selected items: Total price:

Instructions
-

Acidify & Heat Milk
Begin by heating the milk to 98°F (37°C). You do this by placing the milk in a pot or sink of very warm water. If you do this in a pot on the stove, make sure you heat the milk slowly and stir it well as it heats. The higher temperature will be more in line with a happy temperature for the Thermophilic bacteria.
Once the milk is at 98F the culture can be added. The lower culture amount is in character with the slightly less acid final cheese.
To prevent the powder from caking and sinking in clumps, sprinkle the powder over the surface of the milk and then allow about 2 minutes for the powder to re-hydrate before stirring it in. Then allow the milk to sit quiet for 45-60min and maintain the temperature.
-

Coagulate with Rennet
Next add about 2.5ml (1/2 tsp) of single strength liquid rennet.
The milk now needs to sit quiet for 20 minutes while the culture works and the rennet coagulates the curd . The thermal mass of this milk should keep it warm during this period. It is OK if the temp drops a few degrees during this time.
You will notice that the curd begins to thicken at about 8 minutes but allow the full time for coagulation and check for a nice clean break before cutting. If you find that your curd thickens or forms earlier, then use slightly less rennet in the next batch.
While waiting for the coagulation the forms and draining cloth should be sanitized and laid out on the draining area, ready to receive the curd.
-


Cut Curd & Release Whey
Cut the curd as soon as it has firmed well.
Cut curds into walnut size pieces to maintain a higher moisture in the final cheese. It is essential to be very gentle in the cut and stir so as not to break the curd further. I normally cut the curd vertical in both directions first and then wait 5 minutes before the horizontal cutting. Also, the stirring should be very slow, just enough to keep the curds moving and separated for releasing the initial whey.
After cutting the curd should be stirred another 10 minutes. At this point check the curd for excess moisture. If needed the temperature can be optionally raised to 102°F for the next 15 minutes of stirring. If not needed simply maintain the 98°F temperature for the entire time.
Total stir time is 25 minutes.
The final moisture determination will be a rather subjective decision and will depend on milk quality and process. It may take a couple of trials to better determine the point at which whey should be drained. The final moisture will be determined by milk quality, cook temperature, and rate/time of stirring.
-


Remove Whey & Form Cheese
Once the curd has reached your final evaluation point in the previous step, it is time to prepare for the curd transfer. Note that the curd is still rather large and when broken shows a lot of moisture still inside as in the photo shown here.
Begin the molding by removing about 40% of the whey until the curd begins to show. Then give the curds a nice gentle hand stir to discourage matting in the vat.
Your mold lined with cloth should already have been sanitized and in place at this point.
Transfer the curd to the mold and pack it lightly. You will need to pack (but not too much) the mold well above the top surface and wait as the whey drains to add more to get all of the curd into the mold.
It is at this point that any additions you care to make are added in layers as the curd is transferred. Any herbs or fresh ingredients should be well dried or blanched to discourage contaminants from developing.
NOTE: If using raw milk, your yield may be higher so that you may need a slightly larger mold or more than one mold to accommodate all of the curd. If using fresh ewes milk for this, you will definitely need more molds due to the higher yield.
-


Final Acid Development
Once all of the curd is transferred into the drain cloth and mold, the cloth is neatly folded over the top. It should then be flipped in the basket every 15 minutes and on the 2nd turn it should be turned in the cloth and returned to the basket.
If the form and cheese are left at room temperature it will quickly begin to chill and need to be warmed to keep the bacteria cultures warm and working happily. If this is not done, the bacteria will slow or even stop and the fermentation of the curd is not completed resulting in problems for the final cheese.
To avoid the cooling curd problems I prepare my steamer or 'Stufatura.' I prepare this by providing a larger pot or insulated cooler with a draining plate supported several inches above the warm water level that will be added to keep the temperature in the 90-100°F range. When the forms with cheese are ready, I simply place them on the draining rack and add enough hot water to maintain the temperature. 120°F water tends to cool quickly to 100°F and maintain this temperature.
The pot is then covered and the cheese is held here for at least 1-1.5 hours while the cheese finishes its lactose conversion to lactic acid. I check this at 20-30 min intervals to assure the temperature is correct and also turn the cheese in its form at the same time.
In effect this will complete the lactose conversion and thus keep the cheese from any late acid development which will lead to a sour and crumbly cheese defect.
-

Final Acid Development (cont.)
I continue to turn the cheese in the basket form every 30 minutes while in the warm chamber. The longer it stays warm the less sweet the final cheese.
At about 1hr remove the cloth and at about 1.5 hrs move the cheese to a room temperature draining area to let them gradually cool.
The cheese can then be left at room temperature until evening when it should be moved to a cool environment of 55-60°F to prepare for the salt brine.
By this time the cheese should be well consolidated with a nice tight surface and the imprint of the basket molds.
Because of the high moisture and warming work done in the 'Stufatura', there is no need for any pressing or press weight.
-

Salting
The next morning you are ready to brine this cheese.
You will need a saturated brine prepared for salting this cheese, find all of the details you need on brining here.
A simple brine formula is:
- 1 gallon of water
- 2.25 lbs of salt
- 1tbs. calcium chloride
- 1 tsp. white vinegar
- Bring the brine and cheese to 50-55°F before using.
The cheese now needs to be set in the brine for about 2 hours.
The cheese will float above the brine surface so sprinkle a small amount of salt on the top surface of the cheese. Flip the cheese and resalt the surface about half way through the brine period.
-

Aging
At the end of the brine bath, wipe the surface and move the cheese to the aging space at about 52-55°F and 85-90% moisture. The high moisture of the cheese and aging space will be very good for mold growth so the cheese needs to be turned and wiped daily. The wipe will be with a cloth dampened with a 6-8% strength brine to remove the mold, then air dried briefly before returning to the aging space.
After about a week to 10 days the cheese will soften as the high moisture encourages the enzymes to work on the protein structure.
At about 2 weeks to 2 months the cheese will be ready for eating.
Cheese Making Supplies
Related Products
You May Also Like


