Crescenza Recipe
Ingredients
- 1 Gallon of Milk (Not UltraPasteurized)
- 2 oz Fresh Yogurt from Y1 Yogurt Culture - Add 1/64 tsp C70 Geotrichum Candidum, if storing finished cheese longer
- .75 ml (just over 1/8 tsp) Single Strength Liquid Rennet
- .75 oz Cheese Salt
- Calcium Chloride (for pasteurized milk)
Equipment
- Good Thermometer
- Knife to Cut Curds
- Spoon or ladle to Stir Curds
- 2 M134 Pont-Levesque Cheese Mold
- 3 Draining Mats
- 3 6"x6" pieces of Rigid Board or Plastic for flipping cheese
- Instructions
- Crescenza Info
- Reviews
- Q & A
A Recipe for making Crescenza in your Kitchen
The secret of this cheese is balancing the acid development with the correct moisture level in the cheese to have it ripen properly. You can choose to make it very moist and soft or a bit drier for firmer texture and a little longer aging.
-
Acidify & Heat Milk
Begin by heating the milk to 100°F (38°C). You do this by placing the milk in a pot or sink of very warm water. If you do this in a pot on the stove, make sure you heat the milk slowly and stir it well as it heats.
Once the milk is at 100°F, add the calcium chloride (1/4tsp) if using pasteurized milk.
-
Add Salt: The next step is rather unusual for most cheese, but for this cheese all of the salt will be added before adding any culture. Actually this is a bigger dose of salt than normal (about 2.5-3% at final cheese weight) but some of this will run off with the whey and the final cheese will retain the proper amount of salt (~2%).
For 1 gallon of milk this will be about 0.75oz of salt. Make sure this is well stirred in before adding the culture. The functional aspect of adding this now is that the culture, being somewhat salt sensitive, will work slower and thus produce lactic acid over a much longer time. Among other things, this slow acid will also slow the whey drainage and thus preserve the final moister of the cheese.
-
Add Culture: Now the culture can be added. Here I use about 1.5% of culture volume to milk volume. For 1 gallon this will be about 2 oz. of yogurt made from the Y1 Yogurt Culture. If you will be storing your finished cheese longer also add 1/64 tsp of C70 Geotrichum Candidum.
Once the bacteria is added a short rest of about 30 min. will allow the bacteria population to grow to a size suitable for the larger batch of milk.
Tip: I set a clock to 12:00 when I add the culture, so that this will give me my time reference for the entire cheese making session. This allows me to take the time info for reference in my make notes for each batch.
-
Add Salt: The next step is rather unusual for most cheese, but for this cheese all of the salt will be added before adding any culture. Actually this is a bigger dose of salt than normal (about 2.5-3% at final cheese weight) but some of this will run off with the whey and the final cheese will retain the proper amount of salt (~2%).
-
Coagulate with Rennet
Our next step is to add about 0.75ml (slightly more than 1/8tsp) of single strength liquid rennet. This should be diluted in about 50-60ml of cool non-chlorinated water.
The rennet should then be stirred in well with a brief up and down motion of the spoon/ladle for about 30-60 seconds to establish a complete distribution throughout the milk.
The milk now needs to sit quiet for 60 minutes while the culture works and the rennet coagulates the curd . The thermal mass of this milk should keep it warm during this period. It is OK if the temp drops a few degrees during this time. You will notice that the milk begins to thicken at about 18 minutes but give this the full time for a good firm coagulation. This is part of the process that controls the higher final moisture that does not readily drain from the cheese form.
Try to keep the milk at the correct temperature during the coagulation time. This is best done in a sink of water that is maintained a degree or so above the target temperature.
While waiting for the coagulation to complete, make sure you have sanitized the forms and draining mats. The arrangement will be from the bottom up:- Stiff board to make it easier to flip the cheese mold and curd
- Draining mat to allow the draining whey to flow away
- Cheese mold
- Set aside an aditional stiff board and draining mat for easier flipping of the curd later
-
Cut Curds & Release Whey
-
First Cut: Once the curd has formed, it can be cut to release the whey.
Cut a vertical cross hatch of about 2-3" in size. Do not stir after the cut.
This will be allowed to rest for about 30 minutes while the cut surfaces heal slightly and some whey is released along the cut lines and above the cut curd. The whey should be a nice clear yellow/green.
-
Second Cut: This is the phase at which you can determine the moisture of the final cheese. The larger cut at this point will retain whey for a higher moisture cheese. The cutting at this point needs to quite gentle so as not to disturb the first curds cut any more than needed. Remember small pieces yield a drier cheese.
The size we want here is somewhere between (5/8-7/8") a hazelnut (drier) and a walnut (moister). The cut can be made with a combo of knife and spoon. Minimal stirring should be done at this point. What we should see in the final cut is a nice plump piece of curd containing a good amount of moisture. The stir should be kept to a minimum at this point, just enough to keep them separated.
When you have achieved the final curd cut size, they should be allowed to settle with an occasional gentle stir every 5 minutes or so to keep the curd mass from consolidating. This should take 10-15 minutes.
As you can see by the above description that there is a little subjective decision making in this cheese, depending on what you want. A few trials with good note taking along the 'whey' should get you what you like the most for your Crescenza.
The important thing is to keep the cutting and stirring gentle and to a minimum to avoid breaking these very fragile curds.
Once the final curd is ready and the curds have settled we can remove the whey from the surface.
Note: There is no cooking phase to this curd handling, the curd is simply cut and stirred briefly but gently. Then allowed to settle under the whey while acid develops and more whey is released as described above.
-
First Cut: Once the curd has formed, it can be cut to release the whey.
Cut a vertical cross hatch of about 2-3" in size. Do not stir after the cut.
-
Mold Curds & Drain Whey
The curds can be transferred carefully to the molds along with their remaining whey as shown here.
The curds need to be kept warm 75-78°F for the next 4-6 hours to encourage the free whey to drain AND the culture to keep slowly converting lactose to lactic acid and hence more whey to be released. In Italy this is called the 'Stuffatura' or steaming phase. This is very important to a successful Crescenza cheese.
First Turning: The form can be flipped as soon as all of the curds have been transferred by placing the 3rd mat/board on top of the draining form thus making a sandwich of these with the mold. The mold is then quickly flipped thus forming a nice consolidated new top surface.
2nd Turning: Allow this to continue settling for about another 60 minutes before flipping again. As noted in the pics below, the draining curd will be much lower in the molds. Make sure the cheese stays warm during the draining.
3rd Turning: The cheese can be turned a third time in another 60 minutes and the cheese will sit lower yet in the form, the difference in height being the whey that has been released.
Following this the cheese can be allowed to rest overnight in the mold.
-
Finishing
The next morning the molds can be removed and the final cheese will be about 1.25-1.5" in height. My guide for final moisture is about 18-20%. This means that the weight of the final cheese is only18-20% of the milk used.
The final cheese with the form removed will be VERY moist and still quite jiggly, almost like pudding, however it does have a pretty firm structure as shown in the pics below. Although this is a very moist cheese it is still quite easily sliced.
There is no salting of the final cheese because all of that salt was added to the milk at the beginning. The cheese needs to move to fridge temperature at this point.
There is still a substantial amount of whey containing lactose and the cheese will continue to produce acid until the cheese reaches fridge temperatures in another 6-8 hours.
-
Storing
In the fridge, the cheese should be placed in a covered plastic container with a mat to allow any draining whey to run off (remember its still working until it reaches the fridge temperature). Turn the cheese and remove any residual whey as it collects.
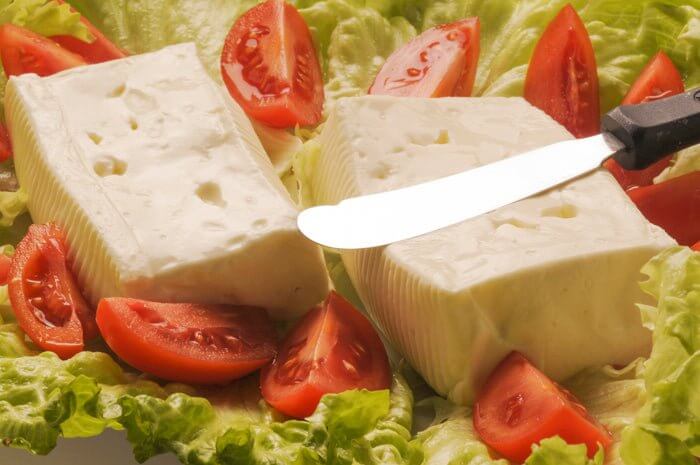
The cheese should be ready to eat in 3-5 days, but will continue to soften over time. It is VERY spreadable. You will also see the cheese spread and even crack at the surface as it ages. This should probably be consumed within 7-10 days but I have not found that to be a problem here.
Note: Crescenza comes from the Italian ‘crescere’ which translated means ‘to grow’ and refers to the spreading of the cheese as it ripens and softens more. This also may refer to the tendency of the cheese to swell (like rising bread) and even split when left at warmer temperatures.
Stracchino di Crescenza
As the warm spring winds melt the glacier that is New England, our thoughts here turn to fresh milk and fresh cheese. This Italian cheese, Stracchino di Crescenza, is a wonderful addition to all of the new garden bounty that will soon be on our tables for the next several months.
This cheese, also known simply as Crescenza (and sometimes just Stracchino), is a staple in the Italian kitchen, and I personally think it is probably the ultimate cheese in expressing the natural flavor and aromatics of a good quality milk. Crescenza is rather short lived due to it very high moisture, but that is normally not a big problem once you taste it.
Wonderful, Fresh Cheese
In Italy, the cheese comes from the store in small plastic tubs (to contain its very moist self) or in a VakPak. It is so moist it just wants to 'ooze' out of itself. This is part of the joy of this cheese. It is even moister than the moistest Boconccini, yet it still retains enough structure to be sliced, and yet be easily spreadable.
Many say that it has a mild flavor, but with a good quality milk it is a showcase for the wonderful fresh flavors and aromas from the farm.
This, combined with the balance of lactic flavor from the culture and that wonderful mouthful of moisture, marks it as one amazing cheese in our kitchen lately.
My favorite description for this cheese comes from an online piece in " Italy Magazine" by Carla Passino :
"It tastes as pre-dawn light should: soft beyond softness, enveloping, barely sweet. And just after I have taken in the gentle aroma of milk, just after it coats my mouth, Crescenza shows its mettle with a persistence that speaks of yogurt and grass. Its a triumph of mildness, a proof that less is indeed more, a celebration of barely-there flavours, which cling to the tastebuds with the tenacity of a dying breed."
If this doesn't sell you on making cheese I am tossing in my cheese hat.
Crescenza is best served at room temperature or cooked in a recipe.
It spreads nicely on crackers, crostini or fresh bread with fruit. It also works well melted on grilled sandwiches and in cream sauce over pasta. For something different, use Stracchino in common recipes like macaroni and cheese, quiche and omelets, either by itself or mixed with other cheeses.
Perhaps just add a little olive oil and cracked pepper or favorite herb mix, maybe small bits in your salad as you would with chevre, even adding it to your eggs or polenta just before the final stirring.
In Italy it can be found on the table just plain or spread on a fresh baked slice of bread. It might also show up under the folds of a focaccia as small little melted pillows. But best of all, just eat it!
Yesterday for lunch, it was the cheese for my Turkey sandwich.
A Bit of History
The cheese has been produced in northern Italy in the Provinces of Lombardia, Piedmont, and Veneto. There are no records, but the cheese is thought to have been made ever since the migration of cows began from the valley to the alps and back again. When they returned to the valley, the cows were tired and the milk was richer from their efforts. Also during the winter months, the cheese was made in villages and production to table could be simply a matter of days. There was no big effort to dry the cheese and preserve for any long time period.
The name 'Stracchino' is derived from the Italian word 'stracca', which means 'tired' in English. It is said that the cheese made from the milk of tired cows moving seasonally up and down the Alps, is richer in fats and more acidic in nature.
The origin of the name Crescenza comes from the Italian ‘crescere’, which translated means ‘to grow’ and refers to the spreading of the cheese as it ripens and softens more. This also may refer to the tendency of the cheese to swell (like rising bread) and even split when left at warmer temperatures.
Variations in Style
- Traditionally this was only made in the winter months when the cows came back to the valleys but eventually this became a year round production. In Italy, it is still possible to find a few of these traditional producers today. Many of these smaller scale productions still maintain a seasonal variation:
- In summer the cheese tends to be a bit sturdier and holds it shape better and the fat will be higher.
- In winter the cheese shows to be a creamier version and yet a bit leaner.
- These are often found in shops as large cheeses that are portion cut to order.
- Much of today's cheese is no longer made seasonally, but year round, and the operations have become more commercial and sold in supermarkets in plastic wraps, much of it approaching fat free from herds that never see the pasture.
- Today in the USA, there are a few producers that do produce good examples of this cheese. Among those to look for are Bellweather Farm and BelGioso Cheese.
- Making this cheese at home for yourself will give you the opportunity to use the best quality milk you can find and control the moisture and final outcome of the cheese. I have always found that you can make a much better cheese than you can usually buy commercially when spending the time to source exceptional milks.
- When allowed to age, Crescenza develops an addictive pleasant tanginess and creamy softness.
- The basic process for making this cheese is essentially the same as making Taleggio and Gorgonzola, the difference being more moisture being removed and longer aging for these other two.
The Evolution of my Crescenza Guideline
I have always been in love with any cheese that expresses the natural quality of milk, and this cheese was no exception.
Much of what I have tasted in Italy, however, has been a bit bland due to the large scale industrial production and the wholesale sourcing of milk from large herds. BUT, I just had to wonder what this would be like when made from the best quality milk. As I began looking for process details, I first ran across several published guides produced here in the USA that gave me an idea of process but when I began checking with my Italian sources I began seeing some very big differences:
- The milk was heated more initially and there was no sequential cooking of the curd. The Italian recipes also had minimal stirring and a larger final cut size.
- The Italian advice was to add all salt to the cheese milk before adding the culture!? ... This will essentially slow the acid development over a much longer period and hence limit the whey running off (this cheese is all about final moisture).
- My American guides all pointed to using an aromatic Mesophilic culture, whereas all of the Italian sources advised using a Thermophilic culture and specifically a European style yogurt culture with a balance of thermophilus and bulgaricus. This is what gives the cheese that beautiful soft texture due to the focus of the bulgaricus on reducing proteins in short order.
So with the info gathered I have spent several months getting this cheese guide to where I want it. This was time well spent and judging by my tasting communities enthusiasm, another very worthwhile project .
- Reviews
- Questions
- cheese
- milk
- recipe
- Picture
- curds
- times
- Italy
- Quality
- generation
- flavor

my favorite cheese
I always had crescenza in the summer growing up in Italy (we call it stracchino). Spread on fresh bread with tomatoes and olive oil or a slice of prosciutto it's simply the best. I could never find it here in the US so I had to try this recipe. It took me a while to nail the perfect block shape. I have to say, the reeds don't really work for me, not even with boards and everything, the curds kept escaping and spilling and it killed me to waste so much deliciousness every time. But now I found the perfect combination of containers. I first drain in regular molds for about an hour then transfer to the point-levesque resting on plastic sandwich containers (see picture). For flipping I place another container on top of the mold, press between my hands, and flip -- this way nothing gets spilled. I'm so happy I finally have the cheese I want without wasting a drop. I also found the perfect milk at the local natural grocers: whole milk batch-pasteurized, which preserves all the nutrients and fats for the perfect flavor. Thank you for this wonderful recipe!

Great info and details but ...
I appreciate very much all the details and the rational behind each step and ingredient. Yes it is traditional Italian and looking at the final picture I would say that whoever made it, he/she did a wonderful job. I t looks the perfect farmhouse Stracchino you can buy in Italy. Looking at my pic (attached) instead , it looks far from to be perfect. Unfortunately I have never been able to make a clone of the stracchino I was used to eat in Italy. I have 2 issues: acidity and texture/moisture. Most of the times the acidity is too high, I also never got the right texture .... sometime crumbles, most of the time looks like cream cheese. I tried different kind of milk, also to add whipping cream, I plaid with different kind of probiotic yogurts (recently I am doing Y1 Yogurt), I use pure (without additives) Sea Salt. I am very frustrated... Since my curd looks perfect, I believe that my problem is about the drainage of the curd. I think the direction in the recipe are in this case a little bit confusing because the section "Drain Whey" states: "The curds need to be kept warm 75-78°F for the next 4-6 hours" then after the second turn "settling for about another 60 minutes" then "The cheese can be turned a third time in another 60 minutes" and finally "the cheese can be allowed to rest overnight in the mold". How many hours is "overnight" after third turn? With my last batch I followed these directions literally but the outcome was again not very good (too acidic and too low hydration.... I think). Here below are the specifics I got 1 lb and 10 oz of stracchino (pH = 4.10 !!!!!!) with a final moisture (based on my calculation) of 32% by weight. I used: 1 gal of milk Kalona (pH= 6.6), 2 oz of Home Made Y1 Yogurt (pH=4.26), 1/16 tsp of Double Strength Rennet in 40ml of spring water, 0.75 oz Cheese Salt (NaCl), 1/4 tsp CaCl liquid @30% Temperature during curd formation, cut, rests was kept @ 90-100F First 2 hours of drain @ ~70F - First Whey was pH=5.42 Overnight (~8 hours) @ 65-60F - Overnight Whey was pH=4.56 Final Stracchino kept in the fridge 4 days has a pH of 4.10. I believe it should be at least 4.8 and maybe 4.6 is still ok .... but 4.10!!!!! Please help me to find out where is my problem. Carlo
So good!
This cheese is delicious, and not hard to make. You can use it to make Foccacia de Recco, or just eat it as is. I will say, you need to find an unhomogenized, low temp pasteurized milk to get good results. I tried a low temp pasteurized, homogenized local milk, and it did not work.
A new favorite
I was intrigued by this recipe and I'm very glad I tried it. This will be my third make and it's slightly addictive. I'm using a second or third generation of the yogurt and that seems to mellow out the cheese more, even makes it a little sweeter than my first make. It probably helps that I have access to fresh, raw milk from a local farm for both my yogurt and cheese. The cows aren't on grass yet, but the quality of milk was referred to several times so I will report back when we get that first grass-fed milk.
Great cheese
I made this so I could make focaccia di recco. It turned out to be one of the best cheeses I've made so far - we loved it. It is also not a lot of effort to make so I think this will become a regular in our house. Thanks for the great recipes!