


Halloumi Cheese Making Recipe
-

Yield
1 Pound
-

Aging Time
None
-

Skill Level
Beginner
-

Author
Jim Wallace


Halloumi Cheese Making Recipe Info
Grilling Halloumi
The History of Halloumi
About Halloumi Cheese
Making and Serving Halloumi
Ingredients
Total price for selected items: Total price:

Instructions
A Recipe for Making Halloumi
Although Halloumi is traditionally made with ewe's milk and added cow's milk, I will be making it in this recipe with 100% cow's milk. You can easily substitute your own mix of milk if you like.
I will also be making the cheese with 3 gallons of milk for the photos (because we like it so much) but will give the recipe for a 1 gallon batch below to make your first trial easier. The ingredients can all be increased proportionately for larger batches.
-

Heat Milk
Begin by heating the milk to 86-88°F (30-31°C). You do this by placing the milk in a pot or sink of very warm water. If you do this in a pot on the stove, make sure you heat the milk slowly and stir it well as it heats.
Once the milk is at your target temperature, the optional culture can be added. The culture will quickly be destroyed as the milk and curds are heated to the higher temperature but they will then provide special enzymes for ripening if the cheese is preserved for a short time.
If adding lipase and/or calcium chloride, these can be added now.
Stir briefly to incorporate well into the milk.
-

Coagulate with Rennet
Now add about 1/4 tsp. of single strength liquid rennet diluted in 1/4 cup of water.
Total coagulation time is 30-40 minutes but you will begin to notice the milk beginning to thicken in 15-20 minutes. Since there is little to no ripening time and acid development for this cheese, more rennet than normal is being used.
It is OK if the temp drops a few degrees during this time.
As with most cheeses, a firm curd is essential to the rest of the cheese making process. In the photos above a long knife is used to start the break and then slowly lifted to see the curd split naturally. What you are looking for here is a nice smooth split. No small pieces should be evident. The whey should not show as too clear (cutting too late) or too cloudy or droopy (cutting too early). The last photo shows what the fresh break should look like. Always look at the fresh whey collecting in this fresh break.
-


Cut Curds
The curd can now be cut to .75-1.5 inch squares in a vertical manner. Allow it to rest 3-5 minutes to heal and then using a long spoon or ladle, cut horizontally into even sized cubes.
-


Cook Curds & Remove Whey
Stir gently, increasing the heat slowly to 100-106°F (38–40°C) during 20 to 30 minutes (higher temp for a drier cheese).
Then keep at this temp for another 20-30 minutes with intermittent stirring (every 3-5 minutes).
When this point is reached, the curds can be allowed to settle for about 5 minutes under the whey.
The cooking of the final cheese in hot whey is integral to the making of Halloumi, so we will begin by filtering off the whey from the curds until you can see the curds below. I do this using a sanitized colander and just scooping the whey out with another ladle, bowl, or cup.
When the whey has been separated and transferred, slowly heat the whey to 185-195°F (do not let it boil).
-


Form the Curds
The dry curds can now be transferred to their form for draining. A light hand pressure will help the consolidation of curd and, if making more than 1 form, they can be stacked and reversed for a little weight.
While the whey is heating, the curds may continue to rest with a little weight. Either stacking of the forms or a 1-2 lb. weight for a single cheese will do.
Make sure you turn them at 15-20 minute intervals to form a well consolidated cheese.
-


Bonus: Anari/Ricotta
It's easy to make Anari/Ricotta from the whey, just follow the steps below.
The whey should be stirred gently while it heats. Once the temperature increases to 150°F, add 1/8 tsp of citric acid per gallon of milk to the whey. This will increase the yield of Anari/Ricotta.
When the temperature reaches 165-170°F add about 1 tsp of salt and a pint of milk to the whey. The milk will increase the richness of the Anari/Ricotta you skim off.
As the whey reaches 185-195°F, stop stirring and allow the Ricotta to rise to the top for about 10 min. This curds can then be skimmed off into small cheese mold to drain.
Now you will have a nice batch of Ricotta along with a clear whey that can be used to heat the Halloumi.
-


Heat Halloumi in Whey
After heating the whey and making Ricotta, the cheese should be well formed into nice rounds about 1.5-2 inches thick as you see in the pictures above.
It's now time to give the Halloumi its true character by heating it in the whey for 30-40 minutes. Keep the whey temp at 190-195F for the time it takes to cook all of the pieces of Halloumi. Using a ladle or basket to keep the cheese off of the bottom of the heating pot (to prevent sticking), lower the cheese into the whey. The cheese will initially sink to the bottom but as the cheese cooks, it will eventually float to the surface.
When the cheese floats, it is ready to be removed. I cool the cheese for a few seconds in cold water and then lay it on a draining mat to drain and cool a bit more.
-


Finishing & Salting
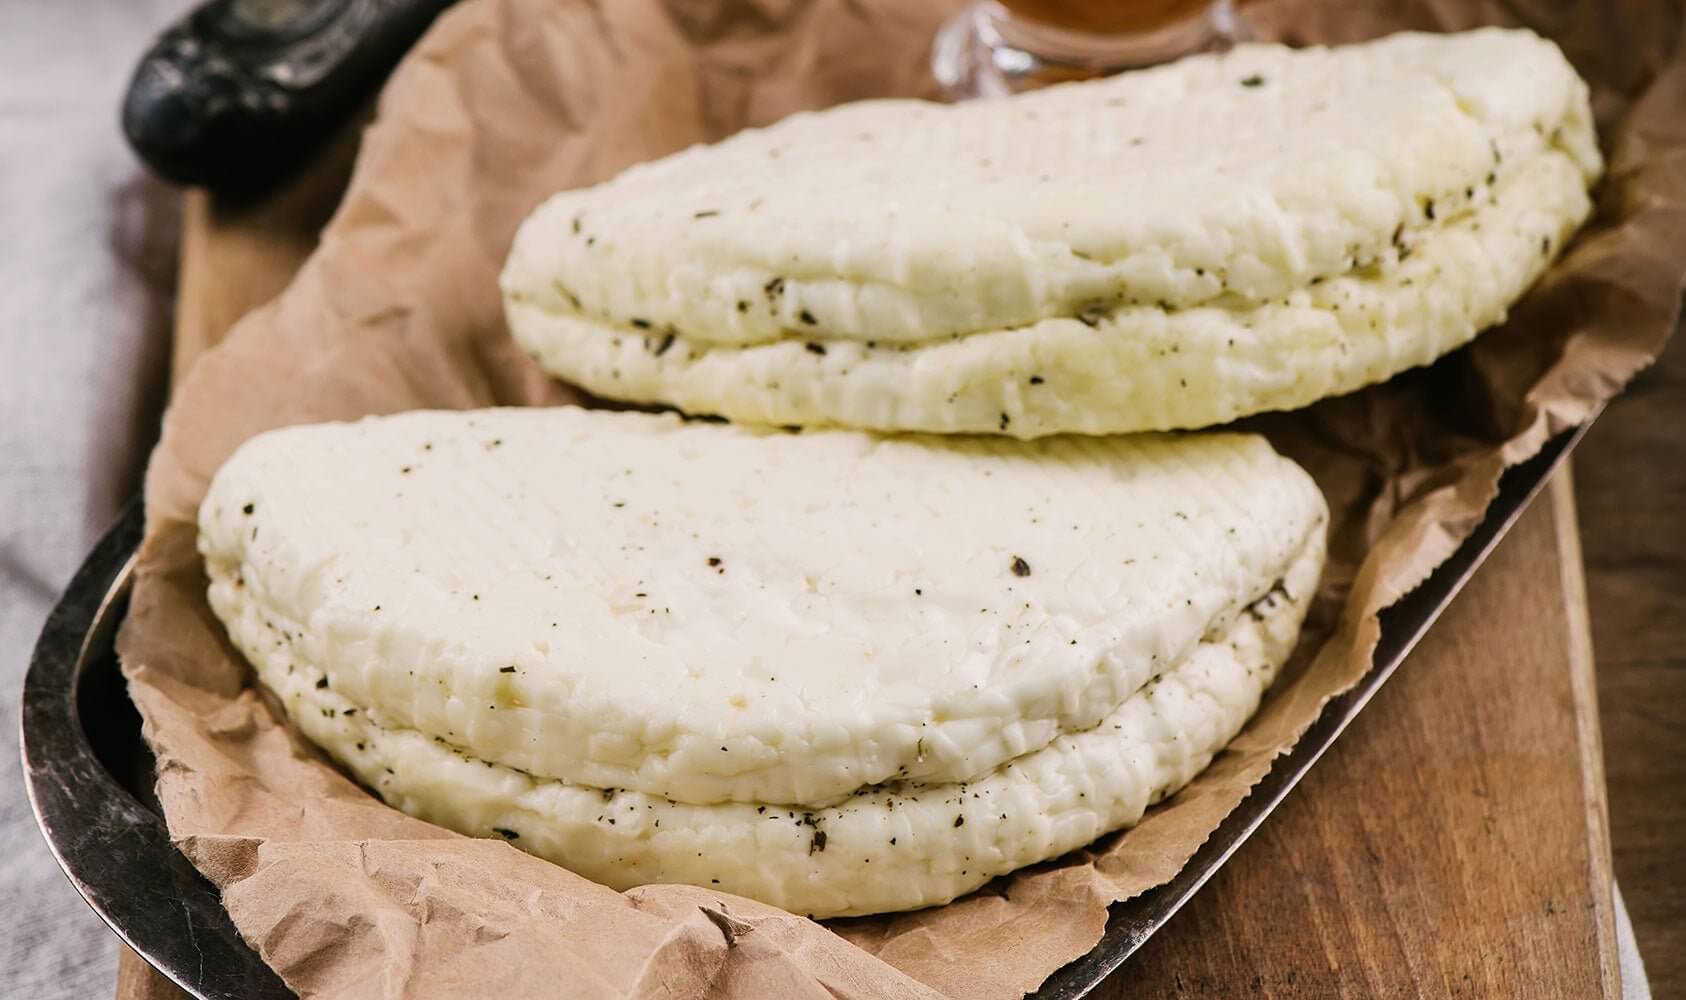
As the cheese cools and while it is still warm, I flatten with a slight hand pressure to form a larger and flatter disc of cheese.
To finish the cheese sprinkle with:
- Salt - about 1/2 oz. of cheese salt sprinkled over one side of the cheese disc. .. this equates to only about 3% salt addition but traditionally up to 5% and more would be added for preservation in the hot Mediterranean climate.
- Mint - enough mint to cover the cheese surface. This is traditionally dried but I see no reason not to use fresh if the cheese will be consumed fresh or even if you are adding other herbs to taste.
The cheese can then be folded into a crescent and pressed slightly as it cools
The finished yield should be about 1 pound of cheese and 1/4-1/2 pounds of Ricotta/Anari per gallon of milk
-


Use Fresh or Aged
At this point you will have your finished cheese and after 3-5 days, it is ready to be used. It should be kept refrigerated due to the lighter salting I have applied here or if you are looking for a more traditional "Mediterranean Style" cheese with higher salt, then increase the salt to about 5%. The higher salt will keep well at room temperature for several days.
To use the cheese, our favorite way is to "GRILL" the cheese and caramelize the surface for a really rich flavor with a soft and warm interior. The cheese will take a very high heat without melting and will acquire a wonderful texture and flavor. It will withstand several minutes on each side. This can be done on the outdoor grill or in a pan on the stove.
You can also use this cheese by stuffing with other wonderful things such as peppers and grilled vegetables or cut into cubes and used in kababs etc as well as cold in salads.
Another more traditional method of storing is to pack cheeses tightly in covered jars or containers, and cover with 8 to 12 percent brine. They can then be aged for a few weeks up to several months. These cheeses will be rather high in salt but can be used much like Feta in dishes that would normally be salted (but just omit the salt).
Cheese Making Supplies
Related Products
You May Also Like


