Manchego Cheese Making Recipe
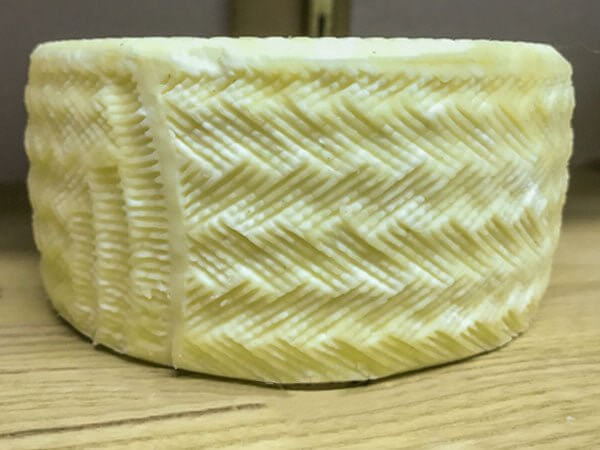
It's traditional basket weave pattern makes it a unique and beautiful cheese. The intricate pattern is easily created with a special Manchego cheese mold.
This cheese really is a show stopper in both beauty and flavor. We can not wait to see photos of your own Manchego.
Ingredients
- 4 Gallons of Milk (Not Ultra Pasteurized)
- 3/8 tsp MA 4002 Culture
- 1/2 tsp (2.5 ml) Single Strength Liquid Rennet
- Salt
- Calcium Chloride (for pasteurized milk)
Equipment
- Good Thermometer
- Knife to Cut Curds
- Spoon or Ladle to Stir Curds
- Manchego Cheese Mold
- Cheese Press or 10-25 lb Weights
- Cheese Mat
- Instructions
- Manchego Info
- Reviews
- Q & A
A Recipe for Making Manchego
The recipe below is for a 4 gallon batch of 100% ewes milk even though some of the images are from a more recent make session of a larger batch.
This could also be made from a mixed milk of goat and ewes milk as was quite common a few generations ago, I still see this done on some farms in Spain.
It could even be tried with a full Cow milk but the yield would be less since the solid components in Ewes milk are so much higher. If using goat or cows milk the rennet may need to be increased slightly (try ~20% more).
The important thing is to focus on the individual concepts of the process and take good notes. Future batches can be modified for an even more costomized cheese.
Note: This is a guide for intermediate to advanced cheese makers with some experience.
Also there is a lot of technical info in this guideline so read it through a few times before you begin. The finised cheese will make it well worth your time.
-
Acidify & Heat Milk
As mentioned the milk used for this guide is 4 gallons of freshly milked ewes milk from an Amish farm in PA.Begin by heating the milk to 72F. You do this by placing the pot of milk into a larger pot or sink of very warm water. If you do this in a pot on the stove make sure you heat the milk slowly and stir it well as it heats.
CheeseGeek Alert: The cultures MA4001/4002 (they are pretty much the same) is often called 'the Farmstead culture'. This is because it represents the base of bacteria normally found in a farms raw milk. This would include both meso and thermo style cultures plus the meso would contain both the main acid producers (lactis & cremoris) PLUS the AROMATIC portion made up of the bacteria responsible for a bit of gas production and the buttery flavor components.
This would be the base bacteria in almost all raw milk (raw milk would still have a lot more complex native culture mix though).
The AROMATIC portion is why we use the lower temperature. We start the milk at about 72F to give these cultures their more preferred temperature range so that they can compete against those that like more tropical conditions. This will allow them to strengthen their population base before the other culture bacteria kick in and thus levels the playing field so they all can contribute their character to the final cheese. The aromatic culture only needs about 15-20 min. head start at this lower temperature though.
Once the milk is at 72F the culture can be added. I find that about 3/8-1/2 tsp works well depending on the milk being used.
To prevent the powder from caking and sinking in clumps sprinkle the powder over the surface of the milk and then allow about 2 minutes for the powder to re-hydrate before stirring it in.
The ripening of the milk needs to be done in 2 temperature steps:
- The milk needs to be kept at 72F for about 15-20 min
- Next heat the milk to 86F using direct heat or very hot water added to the water bath. Do this temperature increase quickly while stirring slowly then hold the milk at 86F for another 30 min
During this two stage heating, the culture will begin doing its work. It will be very slow initially but will soon kick into a more rapid rate, converting lactose to lactic acid.
While waiting for the milk to ripen, it would be a good time to sanitize your molds and draining surfaces for the final stages of the process. The molds I will be using here for another batch are a 2-3 gallon plastic mold made for the commercial Manchego industry in Spain and a traditional plaited strap of 'Esparto' grass that can be coiled into a round form and tied off for cheeses of varying sizes. Both will leave the traditional pattern on the cheese. The photos were from an 8 gallon batch portioned between the 2 molds at a ratio of 1:3.
-
Coagulate with Rennet
Once the milk has had a chance to ripen as described, then add about 2.5ml (about 1/2tsp) of single strength liquid rennet and stir the milk slowly for about 1-2 minutes.
The milk now needs to sit quiet for 30 minutes while the culture works and the rennet coagulates the curd.
You should notice the milk beginning to thicken (floculation) at about 15 minutes but do wait the full 30 minutes before testing the curd set.
This will be a relatively soft curd because it would be more difficult to cut to the small size described in the next section.
Remember to always check the curd firmness before cutting. Extend the time if needed and make note of this. Adjust the rennet amount in future batches if needed to hit the targets above.
The thermal mass of this milk should keep it warm during this period. It is OK if the temp drops a few degrees during this time. You can add heat once the curd has been cut and you can stir slowly.
-
Cut Curd & Release Whey
Manchego is a very compact cheese to accommodate the varying degrees of aging. Therefore the curds need to be cut quite small. When done they should be about the size of small maize to barley grains.
Begin cutting by using a long knife to cut vertical only in both directions to about 3/4 to 1" sections and let rest 5 minutes while the cuts heal. This is a common procedure in cutting any higher fat milk to control loss of butterfat. It simply breaks the curd mass into small sections as we reduce the curd size. You should see whey rising in these cuts and to the surface in that time.
Your next cut will be to reduce the grains to about 3/8-1/4 inch and the cooking phase will reduce the size further to the maize/barley grain size. This reduction should take about 5 min.
All stirring should be slow and gentle in a down and up motion, just enough to keep the curds separate and moving.
-
Cook Curd
Now it is time to begin drying out the curds. This will be done by increasing the heat slowly to 98F-102F depending on the milk (higher fat needs a bit more heat). The heat needs to be increased slowly at about 3F every 5 minutes at the beginning. The total cooking time will be 40-50 minutes and may be extended if the curds are still soft. The dryness will be related to aging time. Drier curds for longer aging and more complex flavor (keep aging time short in the first few batches to avoid failure disappointment after long aging).
The final curds should be cooked well through and should be examined to make sure that enough moisture has been removed. A broken curd should be firm throughout and the curds should have a moderate resistance when pressed between the fingers. When a handful of curds are pressed in the hand and released, the curds should easily separate with a bit of thumb pressure, not stick together.
When this point is reached the curds can be allowed to settle under the whey
-
Remove Whey
Once the curds have settled to the bottom, the whey can be removed down to about 2 in. above the curd mass.
The curd mass can now be collected to one side of the vat into a compact roundish form with a little hand pressure. I use a piece of medium draining mat to facilitate the gathering. Once it is gathered I use a perforated stainless plate and a gallon of warm water as weight (about 8 lbs.) to consolidate the curds under the whey. This only needs to be about 15 min.
Pressing under the whey functions to remove many of the mechanical holes in a cheese by sqeezing much of the collected whey out without allowing air to fill the spaces. The resulting cheese is much more compact as shown in the picture here.
-
Forming & Pressing
At this point we have a consolidated curd mass ready to be transferred to the mold.
If the mass is a bit irregular and not quite perfect fit for the mold, relax, its not stone and is very plastic still. You can fit a square peg into a round hole as shown in the picture below.
I take my large mass and cut 1/4 of the wheel for a small mold then bring the remaining 3/4 into a round form to fit the large mold plaited 'Esparto' grass mold. A bit of weight and time will put it all right again.No draining cloths should be needed for this if the vat pressing gives a good solid curd. I normally just move the cheese as formed into the forms. The 'Esparto' grass form actually drains better than cloth though. Perhaps if using the larger plastic forms a cloth may help as shown in a following series of pics.
Weight for the cheese will begin with firm hand pressing to get the curd mass tucked into the mold tight and will remove most of the residual whey in the curd mass. Once this is done a 10-15 lb. weight for the smaller cheese and about 25 lbs for the larger one. This is in line with dairies in Spain where they use a final weight of about 4-5 times the initial cheese weight.
The pliable nature of the warm cheese does leave a bit of a collar that sneaks out around the edges and needs to be trimmed off with a sharp knife. Some folks tend to do this right out of the mold but I find doing it post salting dries out this thin piece and makes it easier to get a clean cut.
The key to pressing is consolidation AND forming a nice tight rind with no holes or folds for mold to get into the interior. The patterns of traditional forms was tight enough that the irregularities on the surface were not a problem.
If your cheese is still not closing on the surface post pressing, then they either:
- need more weight/time in the press
- were too dry and changes should be made in your process for a moister curd to press
After about 7 hours under weight and an overnight rest, the finished cheese shows how nicely it takes the pattern of the mold.
-
Salting
The cheese can either be dry salted or brined. I have done both. I actually prefer the dry salting.
For dry salting: I use about 2% of the pressed cheese weight in salt and salt the top and sides 1st day. I allow this to dissolve and soak into the cheese on the second day and on the 3rd day turn the cheese and repeat this on the other surface and sides again. I repeat this so that each surface gets 2-3 doses of salt so it can take a week or two to complete. It tends to form a firmer and more durable rind for aging because it tends to draw moisture from the cheese more quickly.. The brining should be done in a cool room (below 60F) and medium moisture to prevent cracking
For Brining: you should have a saturated brine prepared for salting this cheese.
You will find all of the details you need on brining here.
The cheese now needs to be set in the brine for about 3-4 hours. per lb. of pressed cheese
The cheese will float above the brine surface so sprinkle another teaspoon or 2 of salt on the top surface of the cheese.
Flip the cheese and resalt the surface about half way through the brine period.
At the end salting in either case, wipe the surface and allow the cheese to surface dry for a day or two moving to the cave. The surface will darken somewhat during this time.
-
Aging
I suppose you could wax this cheese but please don't tell me if you do. The same goes for the plastic coat they tend to paint on in the cheese factories in Spain. But personally, I feel this defeats the purpose of making such a beautiful cheese by hand.
For aging the cheese I am a HUGE fan of Natural Rinds. Either allowing natural molds to grow for a protective surface or for the brushed rinds that are oil rubbed.
However in Spain I found in visiting talking to cheese makers in their caves that they never brush their rinds. They just allow the natural molds to grow on the surface for weeks or months and then rub the mold surface into the cheese with a bit of oil. They only do this a few time during the 2-3 months or more of aging.
If you ever wondered why the Spanish cheeses are Grey/Black, rubbing the mold in rather than brushing it off is the reason. It does create a very dramatic and beautiful surface with the traditional pattern. There is no reason why you shouldn't taste this either. The rind is where everything dries out a bit and becomes concentrated and this is the interface where everything in the cheese comes and goes during aging. Sometimes you see the cleaned blond/buff colored rinds, these have been brushed clean during the process of aging.
One one of my most recent batches the mold was allowed to grow quite extensively. Periodically it was rubbed into the surface with oil,this cheese aged for about 2.5 months, when I just couldn't resist tasting it any longer.
The aging for this cheese will be done at my standard 52-54F but will require a bit higher moisture of 85-90%.
The time frame depends on the dryness of the cheese but in Spain they are either semi-aged at 60 day fully-aged at 90 days or special-aged up to a year or more, very spicy.
There is also a Fresco style found in the Mercato that is very young and like butter though.
-
Bonus: Butter from Whey
Making Butter from Whey:
Because higher fat cheese is so much more likely to release butterfat when cutting I always save the whey in sanitized buckets and allow them to sit cool overnight.
The next morning I skim the butterfat and make butter from it by then the culture has given me a nice tangy cultured butter.
From the batch photographed here I made a nice 1 pound ball of butter.
Manchago is the Most Recognized Cheese from Spain
Manchego was traditionally made from native sheep milk pastured on the high central Plateau of Spain.
It's probably the single most known cheese coming out of Spain (but that's just because we are not familiar with the other terrific cheeses from Spain).
I often ask my workshop attendees to name for me, 3 Spanish cheeses and that almost always ends at Manchego.
Manchego comes from an area that is so hot and dry much of the year, that only this special breed of sheep can coax the nutrition from the dry grasses.
Not surprisingly the breed of sheep used to make the cheese takes its name from the land as 'Manchego'.
It was the Muslim community who inhabited the land from the eighth through the eleventh centuries and dubbed it region Manya, which meant "land without water”.
If visiting Spain you will also find many other cheeses similar to Manchego, such as Zamarona (made in a different region and breed of sheep), as well as the many Manchego-like cheeses I see made from ewes milk but outside the classified Manchego region. They all show the typical zig-zag markings of the traditional plaited 'Esparto' grass forms, a well expected signature for this style of cheese.
In my travels through the cheese lands of Europe I do taste a lot of cheese but I must say that some of my favorites are those made from Ewes Milk. Unfortunately where I live here in western Massachusetts there is little milk to be found ... lots of sheep but all for fiber and milking is not something the farms will do. So when I make these it is normally a long trip well up into Vermont for any milk. August 2016 I taught a workshop in PA where they brought in some ewes milk from a local Amish farm for this.
This will be the first guideline using Ewes milk exclusively and I am hoping to do a few more in upcoming months with sheep milk and mixed sheep/goat
Learm More About Manchego
The Manchega sheep’s milk has higher fat and protein than other milks as well as more solids (and less water) than cow or goat milk and this tends to be a very unique and different texture from that of cow or goat milk.
Manchego can be made from either pasteurized or unpasteurized milk. The raw milk produced on small farms is considered to be an artisanal cheese.
For those not familiar with Manchego it is a hard buttery tasting cheese with a silky texture from the higher fat of ewes milk. In the mouth it reveals the creamy richness of sheep milk and a flavor that lingers on the tongue.
It has a compact interior but quite brittle like cheddar which will break and crumble if bent.
It shows a rind with the cross hatch marks to represent the traditional plaited grass molds. Most of these are now made of plastic but this distinction is important and probably some of the best branding of any cheese in the world.
The surface tends to be a dark cream color for the younger commercial cheese but a grey/black surface in the more traditional and longer aged cheeses.
The aging process is conducted in high humidity natural caves for a minimum of 60 days.
- Fresco: when aged for two weeks there is very little aging character. This is more of a fresh cheese
- Semi-curado: when aged for three months, this is mild and smooth with a nutty, creamy texture
- Curado: when aged for six months, it becomes spicier as it ages
- Viejo: when aged for one year, this is more solid and crumbly with a sharp, intense, and somewhat peppery flavor
In April of 2016 I spent most of the month in Spain, beginning with the Spanish National Cheese Festival in Trujillo 'La Feria del Queso' and then visiting cheese makers in several cheese making regions in the west and south of Spain.
The focus for this trip to Spain was multifold:
- I had understood that much of the cheese making in Spain is still done in very traditional ways even being carried into the smaller commercial operations I visited. Such things as using the traditional 'Esparta' grass straps as forms, using traditional 'vells' for rennet (photo on the right), and pressing by hand with light weights or using stone weights for pressing. These were things I found to be quite common and a mutual respect for this traditional production was very evident in my travels.
- I had come to realize that Franco's Spain made small scale artisan cheese making on the farm illegal and did not recover from this until the late 1980s. So farm scale cheese making only existed as a clandestine affair for a long time. Therefore traditional cheese making in Spain today is a true snapshot of what cheese making was like 50-60 years ago before the gross commercialization of cheese.
- I had taken several workshops with Enric Canut and gotten to know him at the University of Vermont's VIAC program.
Enric is considered to be one of the most knowledgable promoters of Traditional Spanish cheeses and their history and an incredible resource. I love the traditional forms that used to be used for making cheese and the beautiful designs imprinted by them. A plaited grass strap had been used up through the early 20th century in much of Spain and I wanted to find someone still producing them, something I was quickly told I would not find but my persistence won out in the mountains of Grazalema. - Spain has maintained its pastortal highways known as the 'Dehesa'. These are open pastures that are off limits to all but the herds moving seasonally for richer grazing. These are still marked off and can be seen as empty spaces on todays maps.
- In talking to many of the shepards they are not used as much these days but I still saw much of this traditional sheparding on a daily basis in the La Mancha region of south central Spain. I really wanted to talk with the shepards and learned more about this, its past present and future.
The History of Manghego Cheese
Manchego cheese making has taken place in this region for thousands of year. Archeologists have found evidence of Manchego cheese production from before the time of Christ when the Iberian peninsula (continental Spain essentially) was still in the Bronze Age.
Other references appear in Cervantes 17th century novel of Don Quixote, Sancho Panza and tilting at windmill fame (still evident on the landscape as shown above).
The early producers of the area were milking the ancestors of what is now the Manchega sheep breed. They have evolved over the centuries to survive the very arid conditions with harsh grazing conditions. These conditions actually account for higher fat than we might expect in the final cheese and hence the richer flavor of Manchego.
The La Mancha plains were also a focus of political dispute for centuries between Northern Christians and Southern Muslims, who fought for control of its pastures.
The Muslims who inhabited the land from the VIII through the XI centuries dubbed it Manya, which meant "land without water”.
Eventually, that would translate into Mancha, the name that is used today.
King Alfonso VI conquered and united the region in the XII century and forced the Muslim inhabitants to retreat to the Andalucía region of modern day Spain.
The resultant lack of political stability led, by the end of the century, to the organisation of the area's stock farmers into co-operatives, which in turn brought a stronger regional identity and political and economic power to the agricultural inhabitants.
By the 1600s the efficient use of pasture land led to the decline of stock-farming and the rise of land farming.
By the middle of the 1800s wool production was in decline and as a result cheese and meat production grew.
So much so that by the beginning of the 1900s cheese production dominated the economics of the region primarily with the Manchega sheep supplying the milk. As it grew, the demand for the cheese increased to the extent that larger coops and commercial enterprises developed. However, the demand for Manchego has resulted in industrialisation of production and consequently to a great extent, a loss of quality.
Beginning during the Franco period post WWII, traditional cheesemaking throughout Spain suffered a severe set back when the government directed all milk to the large industrial cheese makers. It was not possible for small farms to make and sell their cheese. Fortunately a few brave soles went underground with their milk and cheese and some of the procedures survived this dark period but it was not until the late 1980s and well into the 1990s that small scale farmstead cheese making has shown as a true revival.
Since 1984, Manchego Cheese has been classified as a Denominación de Origen (DO) cheese in Spain. It is also a Protected Designation of Origin (PDO) cheese in the European Union. These classifications require Manchego to be:
- Produced in the La Mancha region of Spain
- Made from the whole milk of Mancha sheep
- Aged in natural caves for a minimum of 2 months
- Made in a specifically sized barrel-shaped mould, with a cross-hatched rind
The Traditions of Cheese Making in La Mancha
Cheese that has been made for centuries comes with its own list of traditions that made it what it is today and I found that the people in Spain still hold these traditions in the highest regards whether it be their Jamon, Queso, Vino, or other products related to the land.
The people I met in Spain, whether living urban or rural, all seemed to show a great respect for the past.
My research in Spain had been inspired because I feel it is important that we tie these wonderful animals, the land that supports them and the people that make their incredible products together for a more sustainable picture of what sustains us.
When it comes to the cheese and especially the Manchego I found that there were several things of note:
- The traditional breed of Manchega sheep, mostly because they have adapted to the arid region. These sheep are quite recognizable by a prominant high ridge above their nose.
- The pastures that are recognized as the 'Dehesa' are marked out and shown even on modern digital maps. They were originally mapped out for moving the animals to higher and more nutritious pastures hundreds of years ago. Traveling through La Mancha I would see the sheperds moving the flocks both early and late each day. This land is also where the famous 'Black Footed Pigs' known for their famous Jamon still graze on acorns. These pasture highways are so respected even today that the huge city of Madrid stops traffic and allows this Transhuminance or migration of thousands of sheep through its main city streets every year.
"For the past 22 autumns, shepherds have led herds through the city, exercising the right to seasonal livestock migration routes that existed before Madrid grew from a rural hamlet to the great city it is today. Increasingly, these routes have been threatened by urban sprawl." NBC News Oct. 25, 2015
In the Spring these pastures are alive with wild flowers but whither up into the dry grass of summer where only the Manchega sheep do well on this. This is a logical and natural way of of using this land which makes it totally sustainable into the foreseeable future. - Finally the process of making the cheese, although it is changing with commercial pressure still has full respect of the consumers. The rennet was originally produced on the farm either from the natural stomach linings of the sheep and in some areas where the sheep were not butchered frequently, the use of the Cardoona (thistle) flower was used as a source of enzymes for coagulation.
Also for pressing cheese, a simple rock was all that was required. I still see this method quite often on the traditional farms. No need for an expensive press and weights for the past generations.
Even the forms that were traditionally used in Spain showed an incredible amount of craftmanship. They were traditionally plaited as long straps from a native grass called 'Esparto'. These were then formed into a circular form to accommodate the amount of curd from the milk which was then hand pressed into these form. Not only does the grass wick moisture from the cheese, but it imprints a zigzag pattern on the sides due to the way they are plaited. This is perhaps one of the oldest example of 'Branding' a product I have seen. I was told that the forms I was seeing at first were old antiques and not used today or even available. I did eventually find a shop owner that had a village elder make a few every year for her and she was thrilled that an American knew what they were.
Of course, this is how it was done traditionally; in large production Manchego production today they no longer use an esparto grass mold but a plastic molds that is designed to imprint this traditional pattern on all Manchego cheese.
- Reviews
- Questions
- cheese
- gallon
- rennet
- flavor
- kurds
- cave
- Picture
- landscape
- fat content
- 3g make

Great instructions
This was my first “hard” cheese. The instructions were very detailed. I used one gallon of raw sheep milk to make a small one and reduced some of the cultures and rennet. Came out fantastic! I didn’t have the patience to age it very long, so this one is only 3 weeks old.

Great Flavor!
This cheese came out so great! It's sort of soft in flavor as well as texture, with a little bite from the rind. I did the traditional olive oil rub for the rind molds and the flavor is on point! I made this as a request from a friend. Now I don't know if I can part with it! Another one to add to my arsenal! As usual, the recipe is easy to follow and it's so cool to have the history along with!

Good every time
What a great cheese! I have made three so far and know Manchego will be a regular for me. I am sending a photo of a 2.5 month old cheese made with high fat/protein Nigerian Dwarf milk. My latest cheese is almost ready to use as a fresco Manchego. I am looking forward to trying it next week.
So far so good
I accidentally bought the 2g mold. Argh! I always do 3-4g makes, so I thought that would be a problem. It wasn't. This mold will hold ALMOST the curds from a 3g make. I used raw goat milk, 3g. I was told by the farmer that the goats were giving about 5% fat content. I got almost all of the curds in there. Perhaps about 5% didn't fit. The cheese is now a tall one - portrait mode instead of landscape :) Picture below is after salting and 4 days in the cave.
Staple cheese and most flexible
Ever since making the first manchego, this has been a staple in my cheese cave. It seems I'm making a manchego at least every three months. It's so versatile and delicious at any age! The last manchego (4 gallons of milk - 1 raw and 3 store) aged for 5 months with only a small recipe modification - I added a 1/2 tsp mild lipase powder. The resulting cheese has an incredibly rich and flavorful body, reminiscent of some of the grana cheeses. It held its texture well, being firm but not chalky. The natural rind required very little maintenance after the first month and it needed an olive oil rub only twice thereafter. It held its own as a table cheese, but really shone when paired with charcuterie.