


Pont l'Eveque Cheese Making Recipe
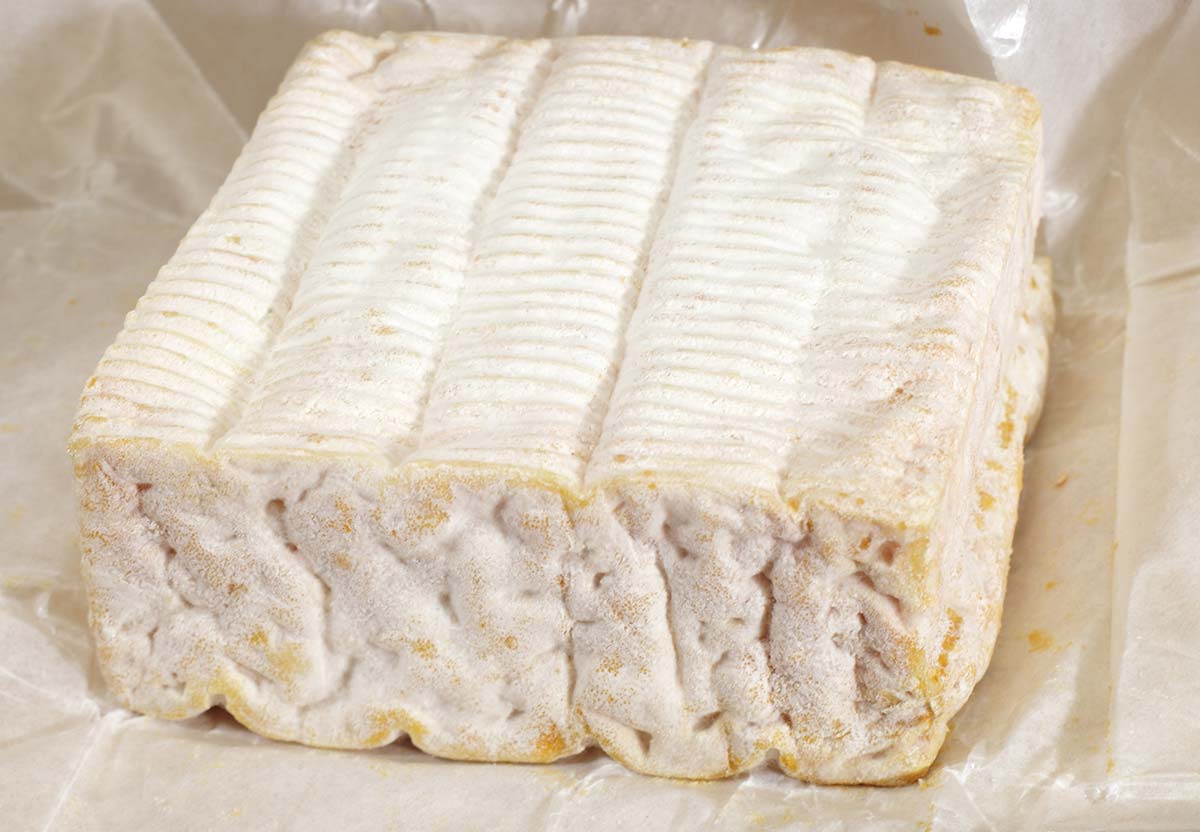
Once you cut into it, you will find the edges have broken down more than the center, giving you a contrasting flavor of that sweet gooiness of Camembert near the edges and a firmer and brighter acid as you approach the center.
This is a great flavor combo in the mouth which allows you to focus on the milky goodness of this amazing cheese.
-

Yield
2 Pounds
-

Aging Time
~1 Month
-

Skill Level
Advanced
-

Author
Jim Wallace


Pont l'Eveque Cheese Making Recipe Info
Pont l’Évêque Overview
History of Pont l’Évêque
How Pont l’Évêque Is Made
Pont l’Évêque Styles and Aging
Ingredients
Total price for selected items: Total price:

Instructions
A Recipe for Making Pont l' Eveque
This cheese is a fun challenge for home cheese makers. If learning about making washed and bloomy ring cheese appeals to you, this is a great place to start. By combining a washed and bloomy rind, the flavor and texture profile developing in Pont l' Eveque is quite different from a cheese that's only washed or bloomy rind.
-

Acidify & Heat Milk
Begin by heating the milk to 90F. Do this by placing the milk in a pot or sink of very warm water. If heating directly on the stove, heat the milk slowly and stir well as it heats.
Once the milk is at 90F the culture, geotrichum and b. linens can be added. To prevent the powder from caking and sinking in clumps, sprinkle the powder over the surface of the milk and then allow about 2 minutes for the powder to re-hydrate before stirring it in.
The milk now needs to be kept at this target temperature until it is time to increase for cooking the curds. Hold the milk with culture quiet for the next 60 minutes to allow the culture to begin doing its work. It will be very slow initially but will soon kick into its more rapid rate of converting lactose to lactic acid.
Note: Traditionally, raw milk was allowed to set 24-48 hrs with no culture added, thus the entire ferment depended on natural bacteria.
Today, the milk is used fresh and culture added.The MA4002 is a farmstead culture and contains the major meso/thermo typical in raw milk on the farm. It is best to use a good quality fresh (less than 24 hr) raw milk for the terroir cultures normally in milk as well, but if you can not find it, the pasteurized milk will work. The other two culture additions are the mold cultures for surface ripening this cheese during aging.
-

Coagulate with Rennet
Now add single strength liquid rennet and stir it gently in an up and down motion for 1-2 minutes.
The milk now needs to sit quiet for 45 minutes while the culture works and the rennet coagulates the curd. You will begin noticing the milk thickening at about 10 minutes, but give it the full 45 minutes and check to make sure you have a good curd set before cutting. This is a longer hardening time than normal but makes a very firm curd.
Once the curd has firmed you should note a small amount of whey forming at the surface as shown in photo here and perhaps even the curd puling away from the pot.
The thermal mass of this milk should keep it warm during this period. It is OK if the temp drops a few degrees during this time.
During this time, make sure that your draining surface (either mats or cloth) are sanitized and laid out. I have found bamboo place mats and use about 3 of them overlaid on my drain surface for this much curd and it works well. If you can not find these, then a good draining cloth will work.
Everything needs to be sanitized first. I use a big pot of water simmering at about 145F for this.
-


Cut Curd & Release Whey
Once the firmness of the curd is confirmed, cut vertical only 3/4-1Ó in a checkerboard pattern. No horizontal cut.
Allow the curds to rest for 15 minutes.
You should notice a substantial amount of whey rising, this should be ladled off down to the curd surface before the next step.
-


Draining the Curds
Now it's time to drain the curds before transfering them into cheese molds. To do this, I use a flat ladle and cut the curd mass about 1-2 inches deep and carefully move the curds to a draining surface. I like to use a bamboo mat as a draining surface but a piece of cheese cloth will also work.
This step is a very different than most other mold ripened cheese.
Next, roll the curd in the drain mats to encourage curd drainage, until much of the free whey has run off. This may take a few trials to determine just how dry the curd needs to be.
- Too little whey removal may lead to problems in the aging room, with late ferment from residual whey.
- Too much whey removal may cause too dry a body and a lack of consolidation, as well as difficulty getting the proper bloom to develop on the surface with molds.
-


Forming the Cheese
At this point, the curds have given up enough of their whey to compact nicely in the molds. Here I use the square Pont l' Eveque molds, but the Camembert molds may also be used.
The forms should be placed on draining mats before filling. Then, transfer the drained curds in large pieces from the draining surface to the mold and press lightly in place. They should retain enough moisture still to consolidate.
Note: If the curds do not consolidate well you will need to adjust your draining procedures and time in the next batch.
They should then be turned in the forms at about 15 minutes, and then at 15-30 min intervals for the first hour or so. At the end of this time, you should find that the surfaces have formed a nice even compact appearance, showing the imprint of the draining surface. If there are still openings at this point the draining was likely excessive and next session should involve a bit less draining.
The forming and turning on the initial make day should remain at room temperature.
During the day, they should shrink in the forms as shown in the pics here.
Remember to keep the cheese warm (at least room temp of 72F) because the culture still needs to continue working at converting lactose and increasing acidity.
-

Drying the Surface
On the following morning move the cheese to a space with good moisture (ideally 72F and at least 75-80% moisture). The cheese mold can be removed at this point. If the room is not moist enough. cover the cheese with a damp cloth.
Traditionally, this chees would be dried for 4-5 days, but I find 2-3 days is plenty.
Note: Do not add any salt to the cheese yet.
During this time, turn the cheese at least 2-3 times a day. While drying, I like to place a cloth under the cheese to wick moisture away, be sure to replace any damp cloth with dray cloth once or twice a day. The moisture being released will become less and less.
When the surface begins to change, the cheese is ready for salting, this is typically aroudn the 2nd or 5th day of drying.
Note: The surface of the cheese will be quite slippery/slimy. This is because the yeast and geotrichum combo have developed and begun to reduce the acidity, preparing for the surface growth to come.
This step is called leavening (as in bread making) and functions to help Geotrichum Candidum, yeast, and mold appear, a phase called leavening. You may be asking where the yeast came from since you did not add it, but yeast is everywhere and this is simply volunteering from your environs. At this point you should note a wonderful fruity aroma, something between pear and apple, thanks to the yeast.
-

Salting
The young cheese can now be dry salted, use roughly 2% by weight of curd.
I add the salt in 2 stages, half at the initial salt and the other half when cheese is flipped and salted again, but only the top and sides each time. Salt is spread evenly over the top and then rubbed onto sides. Of course less applied to the sides, since the sides get treated twice.Move the cheese to a cool room, temp 52-60F, while residual whey and brine release slows.
-


Aging
The cheese is now ready for aging ideally at 52-55F and 90-95+% moisture (I use covered plastic trays for this here). The salting will have removed much of the initial surface yeast and mold growth and stabilized the surface. It will continue to give off a salty whey as the brine moves into the cheese so place these on a dry cloth to wick it away.
After 3-4 days, the salt should have stabilized throughout the cheese and you should note the surface growth developing again.
Once you note this slimy surface (often referred to as mucosa, get the picture?), it is time to wipe it away. All the time that this is developing the cheese is becoming less and less acid on the surface because these surface bios are secreting alkaline enzymes to neutralize the cheese (similar to Camembert).
You should make up a 6% brine with about 1 cup of cool water and a tablespoon of salt (some folks like to add the Geo again at this point for insurance but I don't). This is used to wash the surface and remove all surface growth for the second time. The surface yeast and molds will grow back swiftly in a day or so, but to a greater degree and you should note the cheese beginning to dry off. If the cheese remain sticky after 2-3 days repeat the above.
Once the surface grows back and becomes a bit drier, you are good to enter the final aging stage, where the surface growth does all the work. They will grow and produce enzymes that in turn migrate in towards the center where they function to change the protein from an opaque curd to that beautiful soft translucent cheese we all want to see.
Remember to place these on mats as the surface grows and turn them 1-2 times a day. If the surface growth is excessive, less moisture may be required and make sure your temperature has not increased.
The temperature and moisture needs to be maintained:
- too cold or dry and you are producing a rock with no character
- too warm and you will accelerate the process with a somewhat swampy/stinky result
- too wet it will become a nasty science project
- remember to take daily notes on what is happening, look, feel, and smell as you go.
What you want to see developing is a nice surface of cream to white molds. If everything is going well thanks to your diligence, the rind, that first appears white, becomes orange colored thanks to the action of yellow/pink/orange pigment, the carotenoids (coriniforms). The paste softens and wonderful flavors can develop.
Some makers will do several salted washes after the ones mentioned above but I tend to do occasionally a couple of clean cool water washes only if needed and then use a soft brush every few days to control the rind.
The evolution of this cheese surface I find fascinating. It is a true study in ongoing biological communities where each one prepares for the next.
The cheese should be ready in about 6-8 weeks depending on aging conditions and personal preference
Cheese Making Supplies
Related Products
You May Also Like


