


Queso Fresco Cheese Making Recipe
-

Yield
2 Pounds
-

Aging Time
None
-

Skill Level
Beginner
-

Author
Jim Wallace


Queso Fresco Cheese Making Recipe Info
Quesco Fresco Video
History of Queso Fresco
Variations of Queso Fresco
More About Queso Fresco
Ingredients
Total price for selected items: Total price:

Instructions
Queso Fresco Cheese Making Recipe
This is a quick and easy cheese to make at home in your kitchen. Its fresh flavors go with so many things, both sweet and savory.
This recipe is for 2 gallons of pasteurized whole milk.
If using raw milk, the culture can be reduced by 25-30% and rennet by about 20%.
-


Heat & Acidify Milk
Begin by heating the milk to 90F (32C). You do this by placing the milk in a pot or sink of very warm water. If you do this in a pot on the stove, make sure you heat the milk slowly and stir it well as it heats. Add 1/4 tsp calcium chloride if using pasteurized milk.
Once the milk is at 90F, the culture can be added. To prevent the powder from caking and sinking in clumps, sprinkle the powder over the surface of the milk and then allow about 2 minutes for the powder to re-hydrate before stirring it in.
The milk then needs to be kept at this temperature for the next 45 minutes while the bacteria culture begins to do its work.
-

Coagulate with Rennet
Then add just under 1/4 tsp (1 ml) of single strength liquid rennet, diluted in about 1/4 cup of water. Stir gently for 1 minute.
The milk now needs to sit still for 40 minutes while the culture works and the rennet coagulates the curd. The thermal mass of this milk should keep it warm during this period. It is OK if the temperature drops a few degrees during this time.
You should begin to see this milk thicken slightly at about 12-18 minutes but wait until you see a firm curd forming (about 45 minutes). You should be able to tell if a good curd has formed by inserting a knife blade horizontally and at an angle and lifting up until you see the surface split. If this is a clean break, with no fragments breaking along the line, then you are ready to cut. If the whey is very cloudy, it is not ready and you should wait a few minutes before trying again. If the whey is very clear, you may have cut too late, so try checking on the curd firmness earlier with the next batch.
-

Cut Curds & Release Whey
Once a firm curd is produced, it is ready to cut. The pieces should be cut to a size of 3/8 to 5/8 inches, depending on how dry you would like your cheese. The smaller cut size will produce a drier cheese.
Once the proper cut is made, allow the curd to set still for 5 minutes so it will firm again from the cut before stirring.
-


Cook the Curds
Now it is time to begin drying out the curds. This will be done by stirring the curds, very slowly at first, while bringing the temperature back to 90F (32C). The total stirring time will be 60 minutes, and may be extended slightly if the curds are still soft and wet.
If the cheese is too wet, late acid will develop and the final cheese may weep whey. If you would like a drier cheese, you can raise the temperature to 93-95F at the beginning of the stir.
Initially, the curd will be very soft and needs to be very carefully stirred.
As acid is produced and whey is released, the curds will begin to shrink from the combo of acid development, heating, and stirring. The curd will become smaller and can be stirred more for dryness.
The final curds should be cooked well through, and should be examined to make sure that enough moisture has been removed. A broken curd should be firm throughout, and the curds should have a moderate resistance when pressed between the fingers.
When this point is reached, the curds can be allowed to settle under the whey.
-


Remove the Whey
You can remove the whey from the surface after the curds have settled. The dry curds can then be stirred for complete separation and transferred to a colander lined with butter muslin. They should be allowed to drain for 30 minutes and a gentle stirring will make sure that the whey drains off.
It's important to drain the soft cheese in a place where the temperature stays close to 72°F (usually the kitchen):
- If the temperature and room moisture are excessive, you may have problems with yeast, with a resulting gassy curd and undesired flavors.
- If the temperature is too low, draining may be problematic. The yield from 1 gallon of milk is usually 1 to 1.5 pounds of soft cheese, depending on the type of milk you use and the desired consistency of the cheese.
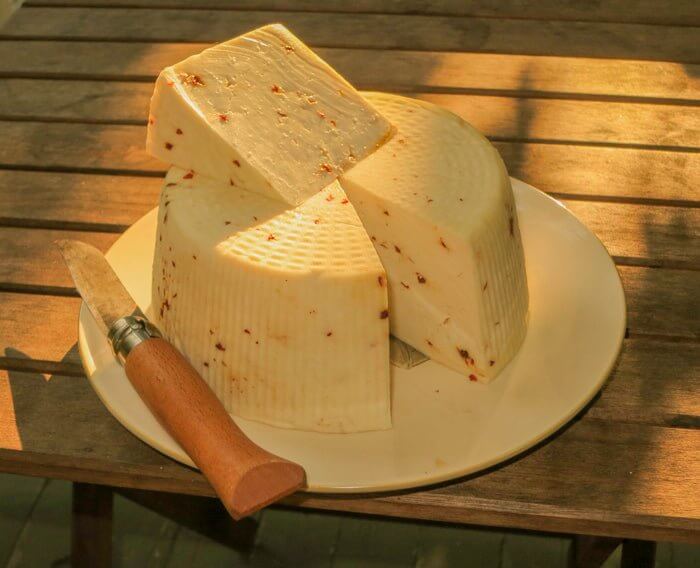
If you would like any additions in your cheese, chop them up, if you did not prepared them earlier. Here, I added a smoked jalapeno pepper cut up very fine. This will add a nice touch of smoke and a little spice to the cheese.
At the end of the draining time, add your additions (chili, herbs, spices, etc.) and mix in thoroughly. Adding them earlier to the wet curds will result in much of the flavor running off with the whey.
-

Salting
I like to dry salt the curds because I want the salt to slow the bacteria working at this point to avoid an over-acid cheese. Add 3% by weight for a final salt in the cheese of 2.5 %. This will amount to about 1 oz. of salt for a yield of 2 lbs. This will be a bit more salt than a cheddar, but this is a recipe coming from more equatorial regions and the salt tends to be higher.
-


Forming & Pressing
Once the curd has been salted:
- gather the curd up in the draining cloth
- transfer to the mold
- fold the cloth evenly over the top
- apply the light weight
For proper pressing, begin lightly and slowly increase the weight to a moderate level:
- 30 minutes at 3-5 lbs
- 60 minutes at 8-12 lbs
- 4-6 hours at 25 lbs
After the initial whey release, the rate of whey running off is simply a matter of drops and not a stream of whey being released. This is a good rate of whey removal during pressing and will slow even more as the residual free moisture is released. You should see tears of whey weeping from the form very slowly. When this stops, you can increase the weight slightly. The cheese should be removed from the press, unwrapped, turned, re-wrapped, and put back to the press at the above intervals to assure an even consolidation. At each turn, you will notice the cheese has formed a smoother surface and rests lower in the mold.
-


Aging
Not much to say on aging except: Do not Age this cheese, just eat it.
This is a fresh cheese and should be consumed within a week. Wrap it in waxed paper and keep it from drying out. Fridge temperature is best, but it probably won't last very long before it's gone.
After the final pressing, remove the cheesecloth and let the cheese rest for a day in the cave/fridge before using it for snacking or cooking (the proteins will mellow a bit during this time).
Cheese Making Supplies
Related Products
You May Also Like


