


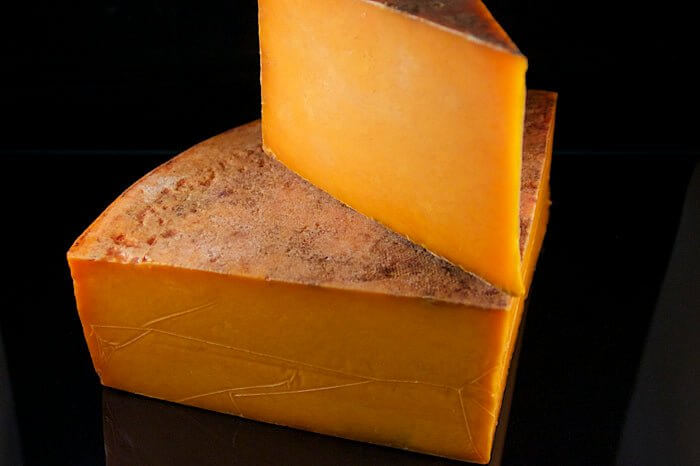
Red Leicester Cheese Making Recipe
The proper name for this cheese is Red Leicester, or Leicestershire, but it comes out sounding like 'Red Lester.'
-

Yield
6 Pounds
-

Aging Time
~2 Months
-

Skill Level
Advanced
-

Author
Jim Wallace


Red Leicester Cheese Making Recipe Info
About Red Leicester
History of Red Leicester
The Revival of Red Leicester
Why Red Leicester Is Red
Ingredients
Total price for selected items: Total price:

Instructions
A Recipe for Making Red Leicester
This is a great cheese to make if you've already tried out a few others, like cheddar.
I highly recommend making a large batch with 4-6 gallons of milk and bandage wrap for aging. This cheese can also be waxed but it's just not the same.
To make a smaller or larger version simply alter the ingredients proportionately. The press weight will be proportionate to your surface area.
-

Color, Heat & Acidify Milk
Begin by adding 2 tsp (10ml) of Annatto Cheese Color. Mix the annatto well until it blends into the milk.
I found out the hard way that annatto needs to be fresh. I had some a year or two old and it did not color well. When using fresh, the color popped. The way I use it here is to add it to about 1/2 cup of milk, stir it in well, then add it to the milk in your pot and stir well. You will find that initially it seems light, but remember that this will bind to the fat and solids, and as the whey is released, it will become darker and darker, until post-pressing it should be a full red/orange.
If using Calcium Chloride, wait about 5 min before adding it to the milk. Most cold stored pasteurized milk needs it. Use about 1/4 tsp per gallon of milk.
Now heat the milk to 85F. Do this by placing the milk in a pot or sink of very warm water. If you heat your milk directly on the stove, make sure you heat the milk slowly and stir it well as it heats.
Once the milk is at 85F, the culture can be added. To prevent the powder from caking and sinking in clumps, sprinkle the powder over the surface of the milk and then allow about 2 minutes for the powder to re-hydrate before stirring it in.
The milk now needs to be kept at this target temperature until it is time to increase for cooking the curds. Hold the milk with culture quiet for the next 60 minutes to allow the culture to begin doing its work. It will be very slow initially but will soon kick into its more rapid rate of converting lactose to lactic acid.
-

Coagulate with Rennet
Now add the single strength liquid rennet and mix in carefully.
The milk now needs to sit quiet for 45 minutes while the culture works and the rennet coagulates the curd. You may notice the curd thickening at about 15-20 minutes, but allow it to sit quiet to develop a clean break. The thermal mass of this milk should keep it warm during this period. It is OK if the temp drops a few degrees during this time.
During this rest is a good time to make sure you have gathered and cleaned/sanitized your draining pan/colander, drain cloths, and forms to be used for pressing as well as setting them up in an area to accommodate the draining whey.
-


Cut Curd & Release Whey
Once the curd has been tested for a clean break (the proper firmness), then the next step is to cut the curd into small, even pieces to separate the whey from the curd mass. The cut size and time/speed of stirring, as well as cook temperature, will determine the final moisture in the cheese. One of the big differences between this and a cheddar process is that the curds are cut much smaller.
The finished cut will be about 1/4" in size. To accomplish this, I begin with what I call the pre-cut, much like I see in Parma or in the Alpine chalets, but they do it with their main cutting tool followed by the final cut to size.
- First the curd is cut in a vertical checkerboard with about 3/4-1" spaces, then allow this to rest for about 5-10 minutes until some whey is seen in the cuts. This tends to give the cut surface a little time to harden for a more efficient cut to the smaller size.
- For the final cut to 1/4", I use a tool patterned after the Italian Spino (mine is essentially a large whisk with thin wires and a long handle) but you could use a combo of horizontal and vertical curd knives if you had them (giving you some options here).
This is used after the brief rest following my pre-cut. The final cut needs to begin very slow and even, paying attention to all parts of the curd mass (especially the corners). Stop cutting when you have the size you need, followed by a brief rest to allow the newly cut pieces to firm up, but do not allow them to consolidate because they need to float freely at the cut size during the stir and scalding session which comes next.
-

Cook Curds
Now it is time to begin drying out the curds. This will be done by increasing the heat slowly to 95F. The heat needs to be increased slowly at about 3-5F (1C) every 5 minutes at the beginning. The total cooking time will be 45 minutes, and may be extended slightly if the curds are still soft.
The final curds should be cooked well through and should be examined to make sure that enough moisture has been removed. A broken curd should be firm throughout and the curds should have a moderate resistance when pressed between the fingers.
When this point is reached the curds can be allowed to settle under the whey.
Note that compared to Cheddar, the Red Lester curd:
- is cut smaller
- is cooked to a lower temperature
- is not cooked as long
All of these variations make the cheese quite different from cheddar in the end, moister and a bit more crumbly.
-


Drain Curds
Once the curds have been cooked and settled briefly, remove the whey down to about 1" above the curd mass. The dry curds can now be transferred to a drain pan/colander lined with butter muslin. They should be allowed to sit in the whey for 10-15 minutes and a gentle stirring will make sure that the curd mass can consolidate with minimal spaces between them.
After this brief rest the curd is ready to be drained, but needs time remaining warm to continue the conversion of lactose to lactic acid. Drain the remaining whey and pull the cloth tight wrapping the cheese into a consolidated block for its final rest. Traditionally these blocks would have been much larger and had their own thermal mass to keep warm. With a smaller cheese I accomplish this by placing a gallon of warm water and a board on top of the resting curd bundle.
If you cut a small piece of curd at this point you will notice that the taste is still somewhat sweet (lactose)
Over the next 2-2.5 hours do the following:
- In 30 min turn, cut in half, then stack, rewrap and return weight, more warm water will help.
- Then In another 45-60 minutes repeat the above details. At each stage you should note the pieces becoming flatter and the structure changing to a more elongated structure when you break them.
- In another hour repeat the above steps but it will be hard to re-stack the uneven pieces; just wrap them in the cloth and reapply the weight. the curds should now seem a bit tougher when tearing.
The taste will begin to change to a neutral or even slight acid note (lactose > lactic acid) . If you have a pH meter that can measure the curd pH go no lower than a pH of 5.3 otherwise go by the taste. Too sweet or too acid and the cheese will be problematic in ripening.
-


Breaking & Salting
Once the above rest is complete, reduce to 3/4Ó pieces and add salt.
The salt will be about 2% by weight expecting about 1/2% to run off as brine.
My yield for this cheese was about 6.25lbs for the 6 gallons of milk which show more moisture than my normal cheddar (about 6 lbs) and makes me happy as to how this final make went.
This makes for 2 oz of salt or about 57 grams if you speak metric. Add this in 2-3 doses and mix in well for each dose.
-


Forming & Pressing
The curds can now be transfered into a cloth lined cheese mold and be placed into a cheese press.
For pressing begin very light and slowly increase the press weight to a moderate level:
- 2 hrs at 45 lbs
- 12hrs at 90 lbs
- 12-24hrs at 150 lbs
The rate of whey running off begins as a fine stream while the initial flush takes place and quickly turns into a matter of drops and not a stream of whey being released.
This is a good rate of whey removal during pressing and will slow even more as the residual free moisture is released.
The form should show tears of whey weeping from the form very slowly. When this stops you can increase the weight slightly.
The cheese should be removed from the press, unwrapped, turned, rewrapped, and put back to the press at the above intervals. To assure an even consolidation.
At each turn you will notice the cheese has formed a smoother surface and rests lower in the mold.
The cheese needs to get all of those little cracks and niches closed and sealed for a proper aging to work
Note the color intensifying as the coloring is concentrated in the curd structure with moisture removal.
-


Bandaging
Bandaging is the traditional method of finishing this cheese with a cloth protection for aging. You could wax but the end result would be quite different after aging. The cloth makes the surface much more breathable. Once the cheese has undergone a successful pressing it is time to apply the cloth binding.
The bandaging is simply a cloth covering to bind the cheese and protect it during the months of aging. Molds will grow on the surface but the cheese is totally protected and when the bandage is removed the cheese is clean and ready to eat.
The bandage is simply a light cloth that is cut for the shape of the cheese and applied with a slight coat of melted lard for adhesion. For the cloth a light muslin will do fine.
I prepare my cloth by cutting circles about 1" bigger than the cheese diameter for overlapping. I normally cut about a dozen of these at a time.
I also cut a large piece of cloth that is about 1-2" longer than the circumference of the cheese. From this I cut 2 sections that are about 1" bigger than the height of the cheese.
When ready to bandage melt a small amount of lard. Normally I render my own but for demonstration purposes I just use store-bought here. Begin with One of the circles first. Dip it into the melted lard and wring as much out as possible. Spread the circle of cloth across the top of the cheese and then smooth from the center out making sure there is overlap to the sides.
Repeat this for the opposite surface and the side. Make sure the cloth adheres and any air is pressed out.
You now have one fully covered cheese but I have discovered that cheese mites can get through a single layer so always do a second layer to make it all quite bulletproof.
Once it is all covered, place it back into the press and press at full weight for 12 hrs.
When you remove from the press, the cloth should have become embedded in the cheese surface. At this point any excess lard should be on the surface and can be scraped off. Very little lard should be on the finished cheese if you do this and what remains goes with the bandage when removed.
Your cheese is now ready to age.
-


Aging
Once the cheese is protected it is ready for your aging space. Notice that the 2 layers of cloth now hide the true color of the Red Lester. It's white again and you will not see that colorful cheese again until you cut into it AND it will then be darker yet as it dries a bit more in the aging.
The cheese can then be placed into your aging space at 52-56F and 85-90% moisture. This is moister than my cave so I age under a plastic cake carrier but open every day or so for fresh air which is needed in aging. The cheese can now be aged for 6-9 months (or longer for stronger character) and it will ready for your table.
You will probably see a healthy mold develop over time but this is not a problem because it only grows on the cloth. If it gets too heavy, reduce the moisture and let it dry a bit, with a final brush to remove some of it. You may see a proper progression of a white low form mold followed by various patches of grey. If you have a well established cave you may even see some yellow and red patches in time.
It's fun to watch this living community of molds develop.
The cheese is shown at 2 weeks and then again at 4+ weeks in the last two photos. Note the thick mold surface closing up the cloth in the last photo here. All of this mold will dry up and be removed with the cloth when ripe revealing a clean cheese rind
Cheese Making Supplies
Related Products
You May Also Like


