


Saffron Infused Cheese Making Recipe
-

Yield
5 Pounds
-

Aging Time
~6 Months
-

Skill Level
Intermediate
-

Author
Jim Wallace


Saffron Infused Cheese Making Recipe Info
Saffron Infused Cheese Inspiration
Inspired by Piacentinu Ennese
History of Saffron Infused Cheese
Flavor, Texture, and Spice
Ingredients
Total price for selected items: Total price:

Instructions
This recipe is best for someone who has some experience with home cheese making.
However, for beginners, read on because this is a great cheese that will introduce you to several new concepts in cheese making.
I suggest you read through the entire process before you begin. Especially to grasp the concepts of a second cooking.
This recipe is for a 4-5 gallon cheese because it ages better in the larger size. If you would like to make the smaller 2 gallon size, just cut the ingredients down by half.
-

Acidify & Heat Milk
Begin by heating the milk to 80F, then add 1/4 tsp of each culture (AromaB and ThermoB). If using raw milk, the culture can be reduced by 25-40%. To prevent the powder from caking and sinking in clumps, sprinkle the powder over the surface of the milk and then allow about 2 minutes for the powder to re-hydrate before stirring it in.
This lower ripening temperature for the milk and both cultures will be optimum to allow the 'aromatic' portion of the AromaB to begin working most effectively. This will provide a little gas production to produce a more open texture in the final cheese.
Allow the milk to ripen quietly for 60 min. at this temperature.
-


Prepare Saffron & Pepper
Whie the culture is ripening the milk, prepare the saffron (~ .6 to 1g) by toasting slightly, then grind about half of the toasted saffron to a powder. Leave the rest as whole strands and set aside to add directly to the curds with peppercorns later.
When ground saffron is ready, add it to about 1/2-1 cup of your warm milk. This will begin to pull the color from the saffron and will be added to the milk at the end of the first 60 minute ripening time.
Toast the peppercorns and set them aside (leaving them whole) to add to the curd later when molding.
Also, during this rest period, get another pot of water on the stove and heat it to just off the boil. This will be used to heat the curds again once they have been cut.
When the milk has ripened for the 60 minutes, add the saffron infused milk to the main milk batch and then bring milk up to 95F (for ThermoB) before rennet addition. This higher temperature will now be optimum for the ThermoB culture blend and yet still allow the acid producing portion of the AromaB to do its work as well.
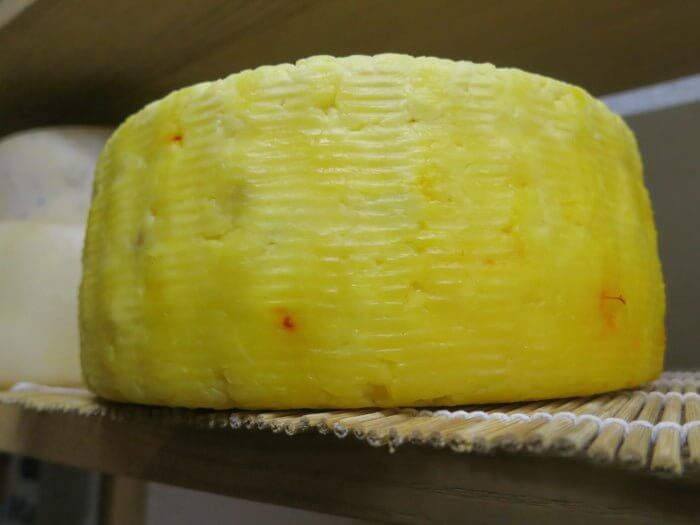
Once the saffron infusion is added to the milk it will change from a pale white to a light golden color. As the process continues and whey separates from the curds, the color of the curds will darken a bit more and then when the cheese dries in the cave it will change again to a bright yellow color.
The milk now needs to be kept at this target temperature until it is time to increase for cooking the curds. Again hold the milk with culture quiet at this higher temperature for the next 30 minutes to allow the culture to begin doing its work. It will be very slow initially but will soon kick into its more rapid rate of converting lactose to lactic acid.
-

Coagulate with Rennet
Once the milk has been ripened, add about 2ml (slightly less than 1/2tsp) of single strength liquid rennet.
The milk now needs to sit quiet for 45 minutes while the culture works and the rennet coagulates the curd. You should notice that the milk begins to thicken at about 18 minutes but continue to wait for the full time. The thermal mass of this milk should keep it warm during this period. It is OK if the temp drops a few degrees during this time.
-


Cut & Stir Curd
When full coagulation time is up, make sure you test the curds for a proper firmness before cutting. If the curds are soft give them another 10 minutes to firm.
This cheese is typically a medium to early ripener, so the curd will be a bit larger to hold more moisture n the final cheese. The final cut will be to a maize(corn) to hazelnut size.
Begin 1st cut by making a series of vertical cuts about 1" apart, and then again at right angles, so as to form a checkerboard in the surface, leaving a mass of 1" columns of curd. Then allow this to rest for about 5 minutes while whey begins to rise in the cut.
The 2nd cut will be to break the cut columns into the smaller pieces ... smaller pieces for a drier cheese and longer aging. For this cut you can use a flat ladle or spoon to cut them horizontally. I use a tool based on the Italian 'Spino' which looks much like a large whisk with thin wires... actually that is what mine is with a long handle added to it. Remember to go slow at this point because the curd is still quite fragile. Once the 2nd cut is complete allow it all to sit for another 5 min. while the fresh cuts heal a little.
Next stir for 5-10min until curds firm and float freely. Then allow the curds to settle and remove about 1-1.5 gallons of whey (leave about 2" above the settled curd), then give the curd a gentle stir before allowing them to settle to the bottom.
-

Cook Curd
The next step will be to begin drying out the curds by removing some whey and adding back hot water.
Begin by removing some of the whey (about 1-1.5 gallons) and transfer this to a another pot and begin heating this for Ricotta (yes, you are now making two cheeses!)
Next begin adding simmering water (180-185F) to the curd a little at a time to increase the curd temp evenly over the next 10-15 minutes for a cook temperature of 102-104F (If using raw milk target a final temperature of 95-102F would be better). Compared to other cheeses of this style this is a shorter cook period and it will be reflected in an earlier ripening cheese with more moisture.
As you add the hot water continue to heat the whey you removed for making ricotta. As the temperature of the cheese curds reach their final temperature, the final curds should be examined to make sure that enough moisture has been removed. A broken curd should be firm throughout and the curds should have a slight resistance when pressed between the fingers.
Let the curds settle and remove all of the whey down to about 1 inch above the curds and transfer it to the ricotta pot.
Now add about 1/2-1 tsp salt to the whey now heating in the ricotta pot remember to stir this frequently as it heats. Using a heavy bottom pot will help keep it from scorching.
Note: Is this image you can see the curds for cheese in the larger pot and the whey for ricotta in the smaller pot. As the curds are heated, more whey is moved to the ricotta until only about an inch of whey remains above the curd, in the alrger pot.
-


Forming & Pressing
The curds are now ready to be transferred to the form which should be ready with its cloth and sanitized. I have also divided the saffron up into four groups (1 for each layer to be added) because it will be so hard to handle later with wet hands. This way I can distribute each group evenly over a layer of curds.
Begin by placing a layer of curds into the mold followed by a layer of peppercorns, another layer of curds, a layer of saffron , another layer of curds, etc. until its full. Finish with a final layer of curds. This may take a little logistical work to get it even throughout the cheese but I think you get the idea. It is also best to keep the layer additions away from the edges. Peppercorn near the edge tend to leave openings for mold to enter the cheese and maintenance becomes more work.
The curds should now stay warm due to their thermal mass but ladling some warm water over them will help if the cheese room is cool. Normally for the larger traditional cheeses, the weight of the cheese would be enough pressing weight but since we are making a smaller cheese, I add the weight of 1 gallon (about 8 lbs.) of warm water to consolidate the cheese body. After 20 minutes I remove the cloth and turn the cheese in the mold. We are not finished yet but the cheese can rest for the next hour or so until we take care of our ricotta. The thermal mass of the cheese should keep itself warm for awhile gradually cooling 104F>>>95F as it rests and consolidates. Meanwhile we will tend to the Ricotta.
-

Whey Ricotta
By now the whey for ricotta should be running about 170F, if not turn the heat up and stir until the correct temperature is reached. At about 170F the whey proteins are just getting ready to come into play but we need the acidity to be increased by using a little citric acid.
The acidity can now be increased with the addition of Citric Acid. Adding about 1/4-3/4 teaspoon of Citric acid dissolved in 1/4 cup warm water. The more acid you add, the greater yield your Ricotta will bring you but the richness will be a bit leaner. If you add too much acid, the proteins will clump and sink to the bottom or even just not form at all.
Once you add the acid you will see the small flecks of proteins beginning to form together. Minimal stirring at this point now as you heat to 185F. If you stir too much the air will be driven from the protein clumps and this will sink to the bottom and cook into hard little bits.
Once the whey reaches 185F, turn off the heat and allow the proteins to rise to the surface (the air trapped within should bring it up). Let it rest for 10-15 minutes until you see a nice cap of Ricotta floating. The ricotta molds should be sanitized and ready for the ricotta.
Using a slotted spoon or ladle, gently transfer the ricotta to the molds on a draining surface and set them aside to cool.
As soon as they drain they should be refrigerated and be used within a week.
-


Cook Molded Cheese
Oh but we are not done yet. The cheese still needs some attention. It still has some work for the culture to do. Traditionally, the hot whey was used for this after removing the Ricotta. By the time all of the Ricotta had risen to the top and been transferred to the baskets, the whey temperature has dropped to 165-170F, perfect for heating our cheese.
Return to the cheese resting in its form and turn it one more time into the basket, then take the cheese in the basket and drop it into that hot whey.
Leave it sitting in the whey for another 3 hours. During this time the cheese will slowly heat through and rise to about 108-112F before cooling slightly while the whey cools to about 112-120F at the end of the 3 hours. This leaves the cheese in a condition where the Thermophilic bacteria are happiest so they can finish their chores (converting lactose to lactic acid). Its an ancient method practiced in southern Italy and Sicily for probably several hundred years and part of the reason the cheese has the textural character it does.
At the end of this time the cheese is removed from the whey and turned in the basket and allowed to reshape itself on the draining table for another 15 hours, turning once in the basket after about 2-3 hours.
During this time, the culture is still working.
-


Salting
The morning after making this cheese it should be ready for Salting. Traditionally this would have been a dry salting process but I prefer to simply brine it here using a saturated brine at about 2 hours per pound of cheese.
The cheese will float above the brine surface so sprinkle another teaspoon or 2 of salt on the top surface of the cheese. Flip the cheese and re-salt the surface about half way through the brine period.
At the end of the brine bath, wipe the surface and allow the cheese to surface dry for a day or two before moving it to the aging room. The surface will darken somewhat during this time.
Note: If you would rather dry salt the cheese, begin with about 3% salt (by cheese weight) and apply the salt to top and sides over the next 2-3 days until it as formed its brine and been absorbed by the cheese.
-


Aging
This cheese traditionally develops a natural rind. For a cheese as firm as this one, the task is as simple as providing the proper temperature, moisture, and airflow. The cheese should be placed into your aging space at 52-56F and 80-85% moisture.
The cheese can now be aged for about 3 months but will develop more character as it ages up to about 4-5 months.
As mold begins to appear use a medium bristled dry brush or cloth to remove the mold as it forms. Initially this should be checked every day or so. As the rind dries down, mold is less of a problem and the frequency of maintaining it becomes less. A light surface application of olive or mineral oil will keep the surface easier to maintain
Cheese Making Supplies
Related Products
You May Also Like


