


Toma Ossolano Style Cheese Making Recipe
With a good quality milk, raw if you can get it, you can make a wonderful cheese patterned after this historic cheese.
-

Yield
4 Pounds
-

Aging Time
~3 Months
-

Skill Level
Intermediate
-

Author
Jim Wallace


Toma Ossolano Style Cheese Making Recipe Info
Toma Ossolano Origins
About Toma Ossolano Cheese
The History of Toma Ossolano
Cultural Heritage of Toma Ossolano
Ingredients
Total price for selected items: Total price:

Instructions
A Guideline for Making Toma Ossolano
This cheese is from the far north of Italy in the province of Piemonte (Piedmont). Our target cheese is one called Toma Ossolana, also known as Ossolano d'Alpe or Grasso d'Alpe (the fat one from the Alps).
These cheeses have been made for hundreds of years in a traditional style in the alpine zone bordering Switzerland, and are still made today by regional cheesemakers whose ancestors crossed the Alps at the end of the 12th century and brought their culture and cheesemaking skills along with them.
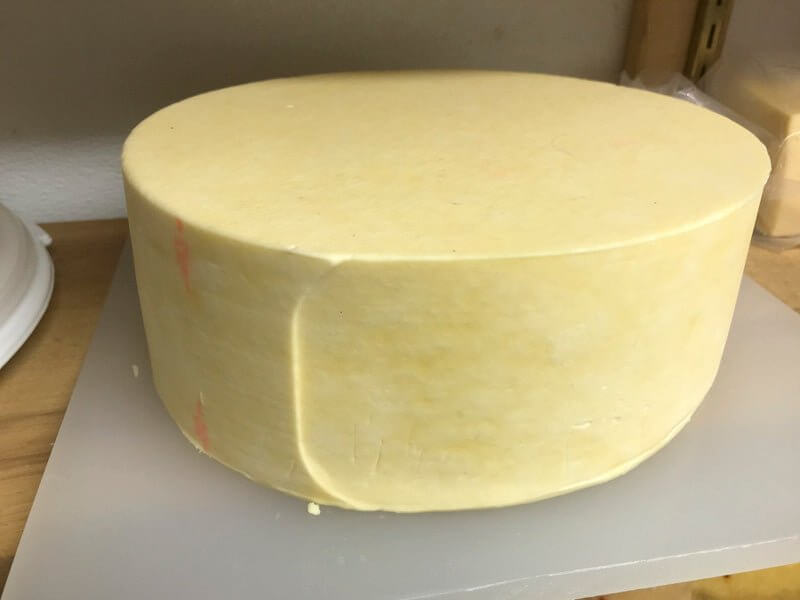
I made a 6.5 gallon cheese, which finished at about 7.5lbs in the photos below. However I scaled this down for a 4 gallon batch, within the recipe. Less than 4 gallons would not ripen as well, due to a higher rind to cheese body ratio. A larger batch can be made by scaling up the ingredients listed to correspond to milk volume. The traditional cheese is normally about 10-12 lbs.
-

Heat & Acidify Milk
Begin by heating the milk to 95F (35C). You do this by placing the milk in a pot or sink of very warm water. If you do this in a pot on the stove make sure you heat the milk slowly and stir it well as it heats
Once the milk is at 95F, the cultures listed above can be added. The culture used here is a mesophilic/thermophilic culture combo. The meso for early acid production and the thermo will begin working after the cooking and then both will influence the aging changes.
To prevent the culture from caking and sinking in clumps sprinkle it over the surface of the milk and then allow about 2 minutes for the it to re-hydrate before stirring it in.
The milk now needs to be kept at this target temperature until it is time to increase for cooking the curds. Hold the milk with culture quiet for the next 60-90 minutes to allow the culture to begin doing its work. It will be very slow initially but will soon kick into its more rapid rate of converting lactose to lactic acid.
During the wait for ripening is a good time to sanitize the mold and drain cloth and prepare the draining space. I use an adjustable traditional wooden hoop here with drain cloth. These forms have an adjustable diameter but all cheese has the same height.
-

Coagulate with Rennet
Once the milk has set for the ripening time, add the single strength liquid rennet. The milk now needs to sit quiet for 30-40 minutes while the culture works and the rennet coagulates the curd.
The milk will begin to thicken at about 15 minutes, but allow it to coagulate to firmness.
It is always best to check for a firm coagulation and if it seems to need longer allow it to go as much as 50% longer. The next time you make the cheese, adjust the rennet amount if needed (more rennet for a quicker set).
The thermal mass of this milk should keep it warm during this period. It is OK if the temp drops a few degrees during this time, you can heat it back to temp after cutting.
-


Cut Curd
Once you have determined that the milk has set well, it is time to cut the curds smaller. This is the first step in reducing the curd moisture.
Cut the curd mass as evenly as possible to about pea to rice sized pieces, and then allow the cut curd to rest for 5 minutes, so that the cut curd surfaces can heal. Cut slowly to avoid breaking the curds excessively. 5 minutes is good for the cutting. For the cutting, I begin with a long knife and make large vertical cuts and then I use my modified whisk (fashioned after a tool called the Spino in Italy) here to do the smaller cut size.
A knife for vertical cuts and a flat draining ladle also work for the horizontal cut. Then stir slowly for 10 minutes, to allow the curd surfaces to firm up more. The rest and stir are important to prepare for the cook phase that comes next. Without it, the curds would break further and lose too much moisture.
-


Cook Curd
Now it is time to begin drying out the curds. This will be done by increasing the heat slowly to 105F (40.5C). The heat needs to be increased slowly at about 3-4F every 5 minutes at the beginning. The total cooking time will be 20 minutes.
Once the curds have reached the final temperature continue stirring for another 20-30 min and this may be extended by up to 50% if the curds are still soft. The moisture of the curds at this point will determine the texture and aging time of the final cheese. Only experience will guide you on this, so take good notes on everything to this point.
The final curds should be cooked well through and should be examined to make sure that enough moisture has been removed. A broken curd should be firm throughout and the curds should have a moderate resistance when pressed between the fingers. When this point is reached the curds can be allowed to settle under the whey
-


Drain Whey & Form Curd
Remove the surface whey down to about 1-2” above the settled curds.
Consolidate curds under the whey before pressing:
Once the curds have settled, begin to gather the curds from the sides of the vat/pot and gather in the center to form what is called the Toma (it's just a large mass of curds about to become a cheese). I use a long piece of draining mat to pull the curds together as shown in one of the pictures here
Using a moderate amount of hand pressing, consolidate all of the curds into a single compact mass. By pressing the curd mass under the whey there should be minimal openings in the final cheese.
Form cheese by hand on the pot/vat bottom first to get a nice consolidated mass with few holes using hand pressure and then rolling on the bottom to get a nice smooth consolidated mass while under the hot whey. This tends to force any air pockets out as you compact the curds in the mold (using moderate hand pressure). The functionality of this step is to remove as much air from the curd mass before pressing.
The consolidated curd mass can then be transferred to the form lined with butter muslin.
Without much trouble you should be able to get all of the curds transferred with a slight mounding at the top. This will recede as the pressing continues.
-


Press Curds
Since the young cheese is still warm and has already had a lot of whey pressed out, the pressing should begin very light, then increase to a moderate level.
Begin pressing with 8-10 lbs of weight initially for about 30 minutes. The rate of whey running off is simply a matter of drops, not a stream of whey. This is a good rate of whey removal initially.
Once the amount of draining whey slows, increase the weight to 25 lbs. The cheese should be removed from the press, unwrapped, turned, rewrapped, and put back to the press every 1-1.5 hours to assure an even consolidation. At each turn you will notice the cheese has formed a smoother surface and rests lower in the mold.
Try to keep the cheese warm during the pressing. The larger the cheese, the easier it is to keep the residual warmth in. The total pressing should take 5-6 hours and the weight can be removed when the rind shows a good tight and smooth consolidation
Post-press, leave in warm place75+F overnight to make sure the ripening and lactose conversion are complete.
If you have a pH meter or the pH strips from our website, the final pH will be about 5.5 when weight is removed, but will drop to 5.2 by morning. This long slow acid development will play a big part in the final texture of the cheese.
Allow this to sit overnight. The final cheese should be 5-5.5 lbs.
A higher moisture than normal for a typical mountain cheese and can be ready for the table in 3-4 months.
-


Salting
You could brine the cheese for about 3 hrs per pound, but I prefer to do a slow dry salting beginning with about 1.75-2% of salt per pound of cheese. I apply this in small doses over 2-3 days, first one side, then let the salt dissolve and soak in. Then flip and repeat. The salting should take place in the aging room at 50F and 80-90% moisture.
At the end of the salting, wipe the surface and allow the cheese to surface dry for a day in a cool area (65-70F) and with free movement of air. Do not let it darken or begin to crack.
-

Aging
Left to the elements of the aging room, the cheese will develop its own collection of molds. This may be fine, but can be avoided by developing a natural brushed rind or a washed rind
In each case a specific mold/bacteria develops to protect the cheese.
Traditionally they tend to simply do a dry brushing for a wild crust (this needs to be done every 3-4 days initially once it begins). However, I have chosen to do a washed rind like many other Alpine style cheeses for this one as described below (the perks to making my own cheese).
Washed Rind: Prepare a wash for this phase, a day or so before you finish in the warm room. To make the wash: A cup of water, plus one tablespoon of non iodized salt. Stir well and add another pinch of both Geo and B.linens (just for insurance since you already added it to the milk) as noted above. Store this in a sealed jar in the fridge until use.
This cool phase begins with a cool water wipe to remove some of the greasy surface. Then move the cheese to a covered plastic box with an aging board cut to size on the bottom.
The boards tend to harbor the complex of washed rind bios over time.
Note: Never wash your boards with detergent; just hot water scrub and dry in the sun.
Begin using the wash on just the top surface and sides. You only need a small amount on a sanitized cloth for this. I usually pour a few tablespoons of the prepared wash on the cloth so that I do not have to mix fresh each time. Allow this surface to dry slightly and then place it washed side up in the box. Allow this to rest in the aging space for a day or so and then turn it over and do the other surface.
Repeat this every 3-5 days as you see a white film of mold developing. The surface will become damp or tacky but do not allow it to get swampy or wet. Within 10 days you should notice a slight pinkish/orange surface developing. If done properly no blue, dark, or fuzzy mold should grow. That is the beauty of the washed rinds. It took the monks to figure this out.
I keep my cheese inside a covered cake tray to keep the moisture high for the washed rind here.
How long should the wash go for? This depends on the character you want. I normally wash the entire cheese clean in a light brine at about 4-6 weeks of surface development. Too much surface aroma competes with the sweet flavor of the cheese . Once I clean the surface, I move the cheese to a cooler space (42F) for extended maturation of another 2-3 weeks. It can go much longer, depending on character desired. If mold does reappear a quick wipe with a brine dampened cloth should easily remove it. Continue to turn the cheese every 3-5 days during aging.
You could wax it, but I prefer to check on it every week or so and wipe any bloom I see off with a clean dry cloth. The waxing tends to diminish the potential character of the Toma Ossolano.
Cheese Making Supplies
Related Products
You May Also Like


