


Washed Rind Monks Cheese Making Recipe
In his effort to support these cheeses, Jim Wallace applied his own adjustments to give us another of his unique and fabulous recipes.
Help keep the history of monastery cheeses alive by sharing this sweet, washed rind cheese with your friends and family, it is sure to be a favorite.
-

Yield
2 Pounds
-

Aging Time
~2 Months
-

Skill Level
Advanced
-

Author
Jim Wallace


Washed Rind Monks Cheese Making Recipe Info
How Monks Shaped the Art of Washed Rind Cheese
The Disappearing Legacy of Monastic Cheeses
Ingredients
Total price for selected items: Total price:

Instructions
Recipe for A Washed Rind Monks Cheese
This guideline is my version of a wonderful age old process. I have added a washed curd phase early in the process, by removing enough whey to slow the acid development and to leave a slightly moister and sweeter cheese.
-

Acidify & Heat Milk
For the culture choice (MM100 or MA4002), they both contain a combination of a Mesophilic aromatic style culture which will be the first to work.
However, the MA4002 contains a Thermophilic component that will aid more in softening the final cheese.
Note: Heating and acid development will be a two stage program here because the primary culture is one that does best in producing tiny amounts of gas, and its characteristic aromatics, at a lower temperature:
- Heat to 75F
- Then add the culture, geotrichum, and b. linens. To prevent the powder from caking and sinking in clumps, sprinkle the powder over the surface of the milk and then allow about 2 minutes for the powder to re-hydrate before stirring it in.
- This is then allowed to rest quietly for 30 min.
- Finally, heat to 88F, over a 10 minute period.
- Then hold quiet for another 45 minutes at 88F.
The milk should be kept at this target temperature until it is time to increase for cooking the curds. The cultures will be very slow initially, but will soon kick into a more rapid rate of converting lactose to lactic acid. The surface ripening mold and bacteria will not become active until the cheese is salted.
During this time, make sure your molds and draining cloth are sanitized and ready for the final curds.
-

Coagulate with Rennet
Once the milk has ripened for the time above, bring it back to the 88F temperature, if needed, and add 1ml (approx 1/4 tsp) of single strength liquid rennet.
The milk now needs to sit quiet for 40 minutes while the culture works and the rennet coagulates the curd . The thermal mass of this milk should keep it warm during this period. It is OK if the temp drops a few degrees during this time.
-


Cut Curd & Release Whey
Once the firm curd mass has formed, it is time to cut, and release the whey.
Begin this cut with a vertical cut spaced about 3/4-1"" apart, and then at right angles, another vertical set of cuts. The cuts will look like a checkerboard when done.
Allow this to sit quiet for 5 minutes, while these heal and the whey rises in the cuts.
Then begin slowly cutting the mass into about 1/2- 5/8 inch pieces, trying not to break them any further. Do this as evenly as possible. When done, allow the curds to settle for 5 minutes.
Next, begin stirring the curds very slowly for about 10 minutes. After the 10 minutes, allow the curds to settle again.
-


Wash Curds
The whey now contains a substantial amount of lactose, which the bacteria can use to produce acid. Since we would like a sweeter cheese here, we are going to remove a substantial portion of the whey/lactose, and replace it with warmer water to increase the curd temperature and help in releasing more whey from inside the curds themselves. In other words, we are drying out the cheese.
Begin by removing about 30% of the milk volume in whey. The more you remove the sweeter the final cheese will be.
Next, begin to slowly replace the volume of whey removed with water, heated to about 125-130F, over the next 10-15 minutes. The final temperature should be about 95F.
At this point the diluted but warmer whey will aid in drying out the curd to the proper degree for placing in the form.
Continue stirring this for another 25-40 minutes, until the curds feel drier and will consolidate loosely in the hand. It may take a few trials to get this just right, since it is best determined by experience, so make good notes on temperature and stirring times as you go. This is a very subjective measure and depends partially on what you are looking for in your cheese. In essence, that IS what cheese making is all about.
When this point is reached, the curds can be allowed to settle under the whey.
-


Form & Press Curds
Once the curd is ready, remove the whey down to about 1"" above the settled curd mass. The sanitized forms should be ready on a draining surface to allow the whey to run off. Give the curds a quick stir to free them up in the small amount of whey left and begin to transfer all of the curds to the waiting form.
Fold the cloth over the surface and turn the curd mass over in the mold. A small amount of weight should be added here. About 4-5 lbs per cheese. I am using a gallon of warm water for my double batch with a weight just over 8 lbs for the two. They should be turned and rewrapped again at 30 min. Make sure they have a smooth layer of cloth under the follower to provide a smooth surface.
I also add a couple of pans of warm water to keep the temperature up to keep the bacteria happy and working. They are still reducing the milk sugars at this point and need to work for another 5 hours in the warm conditions. The cheeses should be unwrapped, turned and rewrapped about every hour until evening.
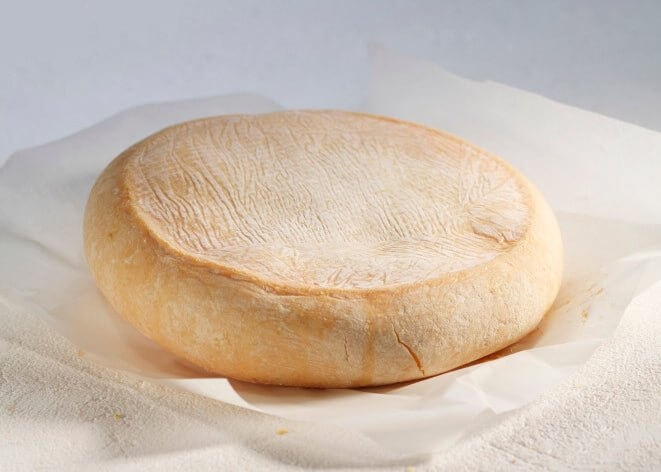
Finally, they can then be removed from the form and cloth, and be allowed to rest overnight for a cooler rest at 68-70F.
Note: At each turn the cheese will have dropped lower in the mold and the surface will become smoother,note the small holes in the side in the last picture of the final resting cheese.
-

Salting
You will need a saturated brine prepared for salting this cheese, find all of the details you need on brining here.
A simple brine formula is:
- 1 gallon of water
- 2.25 lbs of salt
- 1 Tbs calcium chloride
- 1 tsp white vinegar
- Bring the brine and cheese to 50-55¡F before using.
The next morning they should be brined for 1.5-2 hrs per lb. depending on the final moisture and density.
Once brined, wipe the surface and leave to drain at 60F for 8-12 hrs before moving to the aging space.
-

Aging
The final cheese in form is kept at 60-65 for 2-4 days to allow aromatic culture components to produce a bit of openness with gas. You should notice some yeast and surface molds begin to develop (recognized by a slight yeasty/fruit-like smell and greasy feel).
You can then move to your aging space and drop to 52-54F and maintain a moisture of 85-90% for aging.
I usually place them on wooden boards for this.
Also prepare a light brine with 1 cup of cool clean water and 1tbs. of salt plus another pinch of geotrichum. This will be about a 6% brine. Let it rest overnight.
-

Washing the Rind
The next day you can begin developing the conditions for the washed rind.
Begin by turning your new cheese over and dampen a small clean cloth in the light brine and wipe the new top surface and side only. Then place back on the board with the washed side up.
You will continue doing this every day or two (depending on mold growth) for about 2-3 weeks.
You should notice a somewhat rosy/pinkish surface developing.
Once you have reached this point your protective mold/bacteria surface is ready.
You will need to simply turn the cheese every day or two for another 4-6 weeks. If the surface becomes dry, simply wipe with a cool clear water damp cloth. No more salt.
The final cheese will be ready when you can feel the interior softening somewhat like a Brie or Camembert. The longer you wait the stronger the flavor. However, if it goes too long it will give off ammonia smells and the taste becomes bitter.
So as you can see this timing is very subjective.
Cheese Making Supplies
Related Products
You May Also Like


