


Bleu d'Auvergne Recipe
If you have some cheese making experience, you may want to give this intermediate level cheese a try. The result will be a stunning addition to your cheese board.
-

Yield
5 Pounds
-

Aging Time
~3 Months
-

Skill Level
Advanced
-

Author
Jim Wallace


Bleu d'Auvergne Recipe Info
Bleu d'Auvergne Origin
History of Bleu d'Auvergne
Bleu d'Auvergne Taste & Texture
Making Bleu d'Auvergne
Ingredients
Total price for selected items: Total price:

Instructions
A Note on Batch Size
I would recommend that you not make this cheese until you have made a few other cheeses for the experience. It really needs to be a 4-5 lb. cheese or larger to increase the ratio of curd mass to surface area needed to develop a good blue.
For a smaller version, the changes to scale down from 5 gallons to 2 gallons are listed below:
- 2 gallons of milk (Not UltraPasteurized)
- 1/16tsp MM100, 1/32tsp TA061, 1/16tsp P.roqueforti culture
- Liquid Rennet (1/8tsp)
- Colander and butter muslin to drain the curds
- Small Cheese Mold (the curd may initially mound over the top but will settle with the light weight suggested here)
- For a 2 gallon recipe I suggest a 4-5 lb. weight, only enough to settle the curds, not enough to consolidate them. For a 5 gallon batch no weight is needed.
- Salt non-iodized medium grain
-

Acidify & Heat Milk
The P.roqueforti needs to be rehydrated in 1/8 cup of boiled and cooled water before heating the milk.
Begin by heating the milk to 90°F. You do this by placing the milk in a pot or sink of very warm water. If you do this in a pot on the stove make sure you heat the milk slowly and stir it well as it heats.
Once the milk is at 90°F all of the cultures can be added (including the re-hydrated blue mold). To prevent the powder from caking and sinking in clumps sprinkle the powder over the surface of the milk and then allow about 2 minutes for the powder to re-hydrate before stirring it in.
The combination of Mesophilic (MM100) and Thermophilic (TA061) cultures are a joint effort in that the meso will do most of the acid development while the thermo will play a major role in the protein changes during ripening. The target temperature for ripening is intended to address the needs of both cultures.
Once cultures are added, the milk should be maintained at this temperature for 60 minutes before adding the rennet.
-


Coagulate with Rennet
Next add about 2ml of single strength liquid rennet (slightly less than 1/2 tsp).
The milk now needs to sit quiet for 90 minutes while the culture works and the rennet coagulates the curd . The thermal mass of this milk should keep it warm during this period. It is OK if the temp drops a few degrees during this time.
You should notice the milk beginning to thicken at about 18-20 minutes (flocculation) but the full time for a firm curd is about 90 minutes from the time rennet is added.
This is a much longer coagulation than most other cheeses but this extra time will allow for more moisture to be bound into the curd structure (similar to Camembert). The creaminess of this cheese is due to holding this moisture into the aging and finished cheese. This higher moisture is important for the internal ripening and texture changes during ripening.
While the coagulation is taking place a draining area should be sanitized and prepared.
- For a small 2 lb. curd mass, this can be as simple as a large colander lined with cloth.
- For the larger cheese I am making in the photos here, I use a large tray set at an angle to drain well and lined with draining cloth.
-


Cut Curd & Develop the 'Grain'
Our objective here is to separate the curds but retain as much moisture in the curds as we can while at the same time forming a good surface that will keep the curds from consolidating too much on molding. The end result will be a lot of small openings between the curds for the blue mold to work its magic.
The curd surface is initially cut into large cubes to retain the final moisture for this cheese.
- cut to 1/2-3/4" then rest 5 min, the larger size will retain more moisture and provide larger openings internally for the finished cheese
- stir intermittently over 20 mins, stirring just enough to firm the curd surface and keep the curds from consolidating
- drain 20% of whey and then stir gently 10-15 min
- repeat the 20% whey removal and gentle stir for 10-15 min.
The intermittent stirring in step #2 is intended to keep the curds separate but not dry them out too much The last two steps (#3&4) of whey drainage and stirring are intended to firm the curd surfaces while maintaining the internal moisture. This 'Grain' development is very important for this cheese and perhaps one of the most challenging parts of this recipe.
The final curds should be still plump and springy and should be examined to make sure that the curds have a light skin on the surface and remain somewhat heavy in the hand. They should not slump together excessively (too wet) or seem to firm throughout (too dry).
When this point has been reached the curds should not be allowed to settle under the whey but be transferred to a draining cloth
Note: There is no cooking of the curds for this cheese because we are trying to maintain a high internal curd moisture. Increasing heat is one of the methods used to dry curds out and not part of this program but the target temperature does need to be maintained until draining the curds.
-


Remove the Whey
The dry curds can now be transferred to the draining area lined with butter muslin. Do not allow the curds to mat and consolidate after the final whey removal/stir in the vat. It is best to give them a brief gentle stir before transferring to avoid this.
Once transferred to the draining surface, they should be allowed to drain for 10-20 minutes and a gentle stirring will make sure that the whey drains well and the curds remain separate.
It is important to avoid any deep piling of the curds during draining because they need to be kept separate as they drain and not allowed to consolidate.
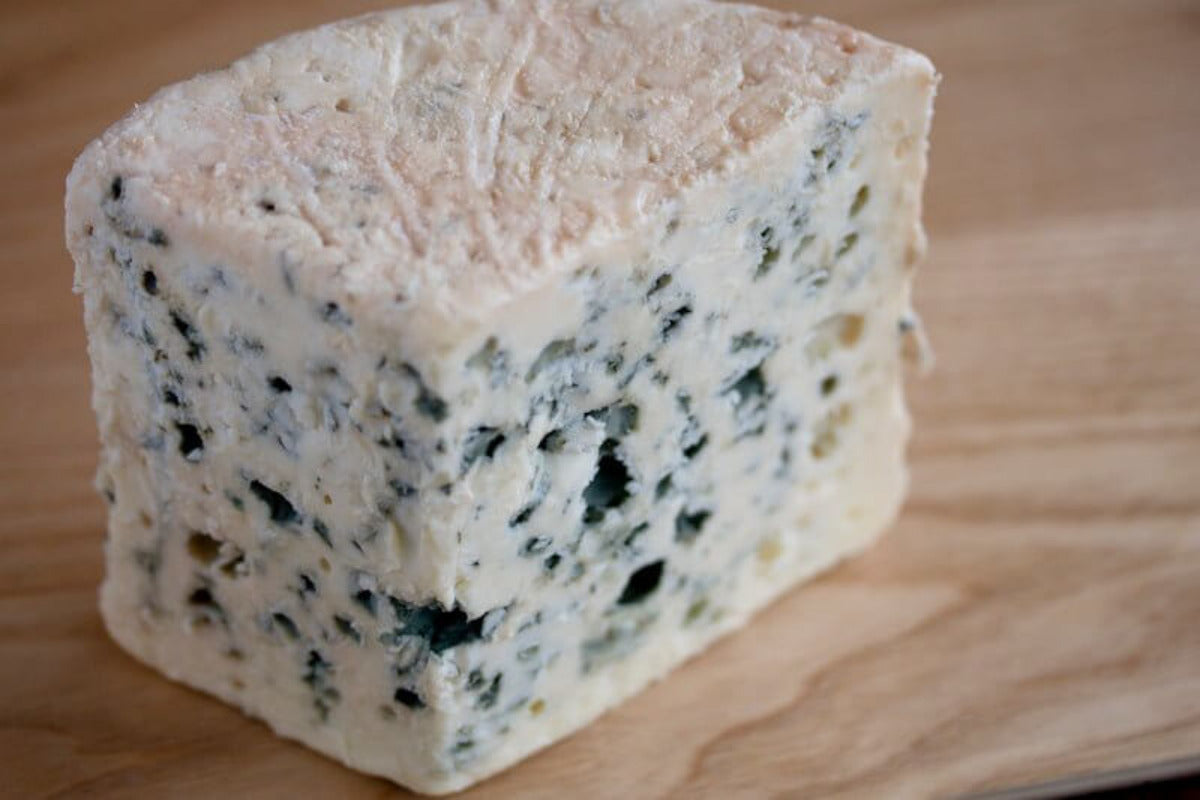
This developed curd structure will form the small openings in the cheese body that are essential for the blue mold to develop and do its magic while aging, because the blue requires an aerobic environment. As it grows it will produce enzymes to work on the proteins and fat of the cheese leading to the soft texture and aroma/flavor character of this cheese.
When this cheese is made commercially, they transfer to a perforated moving belt that allows the curd to drain as it moves them toward the molding forms as shown below.
-


Form the Cheese
Once the curd has drained it can be moved to the molds. It will initially have a very open texture but the cheese still retains a good supply of lactose and as the bacteria continue to convert this to lactic acid, the curds will shrink, release whey, and begin to consolidate somewhat. Many opening should be left throughout the cheese body though.
There is no weight required on the larger cheese here because the cheese weight will be enough to form a tight surface. The cheese needs to be turned as soon as the curd begins to consolidate a bit (15-20 minutes) and then flipped every 30 minutes for about 3-4 hours as the acid continues to develop. Keep the cheese at room temperature during this time
NOTE: if making the smaller 2 gallon cheese, you may need a bit more weight to consolidate the surfaces. 4-5lbs should be sufficient for about 4 hours.
To assure an even consolidation and whey drainage, this turning is important. At each turn you will notice the cheese has formed a smoother surface and rests lower in the mold.
When flipping I use a cheese mat and rigid board (plastic or wood).
-


Form the Cheese (cont.)
As shown in the photos above you can see the surface consolidation and level of the cheese after flipping several times.
The cheese should be kept at room temperature until evening to allow the final acid to develop. It will continue to weep whey during this time.
Then move it to a cooler space to rest overnight (if possible the aging space at 52-54°F).
When flipping I use a cheese mat and rigid board (plastic or wood) Note the surface consolidation and the level of the cheese after flipping several times.
-


Salting
This Blue cheese will also be salted over a period of 4-5 days with dry salt. It receives less salt than most other blues and this tends to result in a slightly milder flavor in the finished cheese.
To begin the salting I weigh out 2.5% of the cheese weight in salt. The final weight of my cheese is about 6.5 lbs therefore the amount of salt required is 2.4oz by weight.
Here I simply weigh out the salt and spread it on the cheese surface In larger productions they use big salt bins and layer as much salt on as the cheese will hold as shown in the picture above at right.
I salt by using about 30% of the salt to the top surface, spread it evenly to the edges and then rub as much as I can into the sides. The sides get less salt but they also get treated twice as much. allow 8 hrs to form its own brine and be absorbed by the cheese. Then the cheese can rest overnight and the next morning it is turned and the other side treated the same as the first day. On the third day the remaining salt is split between the two surfaces and the surface will have become hardened by the salt extracting moisture at the surface.
The dry salt will form a brine and be absorbed by the cheese.
Over the next week, the surface will soften as the salt penetrates the cheese and interior moisture migrates to the surface.
Over the next week turn the cheese daily and maintain a high moisture of 90-95% and temperature of 46-54°F. During this period the proteins will begin to transform. I manage the higher moisture by using a tray with plastic cover. A large cake preserver works great.
-


Aging
In about 1 week the initial protein changes of the cheese will be well under way and it is time to punch holes to aerate the cheese for mold growth. If luck is with you, thee should be many small openings internally from the care preserving curd structure through the draining process. If not you may only see blue developing in the holes that you punch. I use a skewer to make these holes about 1 inch apart over both the top and bottom surface and extending about 2/3 the way into the cheese.
Once this is done, you will need to turn the cheese daily to even out the air flow. At about 3 weeks you should see signs of blue mold growing internally and a bit on the surface.
If the surface remains too moist you will see a rose to orange colored surface developing and if less moisture, a slight white drier surface mold will develop as shown in the two photos below.
In a well controlled aging space the cheese can be stored on their edges for better air flow. These are usually turned about a quarter turn every day.
The cheese should be ready in about 60-75 days depending on how you define ready.
As I mentioned earlier, this cheese may take a bit of patience to get right but once you do, it will be well worth your time.
Cheese Making Supplies
Related Products
You May Also Like


