


Mustard and Ale Cheese Making Recipe
This is a wonderful guideline for intermediate cheese makers and beyond. If you're new to cheese making we recommend starting with a Gouda or Colby, washed curd cheese before making this cheese, to become more familiar with the process.
If you would like to make a smaller 2 gallon batch, simply reduce the ingredients proportionately and use a Small Hard Cheese Mold.
-

Yield
5 Pounds
-

Aging Time
~2 Months
-

Skill Level
Intermediate
-

Author
Jim Wallace


Ingredients
Total price for selected items: Total price:

Instructions
My local Pub in town has become a true collection of local friends in our small rural town here in the hills of Western Massachusetts so folks bring things to share. On an earlier winter visit to the pub, a very well laid out cheese board appeared on the bar (not from me but another friend).
Among these was a cheese I had not tried in a long time, the Red Dragon of Wales. I had my Pint of Porter in front of me and with this Welch cheese I thought nothing could be more perfect except maybe doing this on a sunny spring afternoon.
My wheels began turning… Wales and its rugged countryside... miners with cheese in their lunchboxes... pubs with their cheese... a pint of dark beer... mustard, and sausage... wait, no sausage.
- Higher Moisture | Washed curd cheese with a nice brown beer and a ton of whole mustard grains.
- Curd | Dry enough to prevent late fermentation yet moist enough to ripen early.
- Beer | Dark enough to outline the surface of each curd with a dark brown ring, as the color and flavor carry into the cheese.
- Mustard | A strong, spicy bite but not overwhelming.
As you can see, this recipe was a lot of fun to create!
-

Heat & Acidify Milk
Begin by adding Calcium Chloride, if needed, then heat the milk in two stages.
- Heat milk to 74F, then add your culture and ripen for 40-50 minutes, to activate the texture and aromatic culture strains.
- Increase temperature to 90F and ripen for an additional 30-40 minutes, to activate the acid producing culture strains.
All the cultures will be working together during the final ripening phase. Only stir during the heating phase and allow the milk to rest for the ripening phase.
If you do this in a pot on the stove make sure you heat the milk slowly and stir slowly as it heats.
The culture will be slow initially but will soon kick into a more rapid rate of converting lactose to lactic acid. At this point the cultures will be entering their growth phase to do the serious work.
Selecting Cultures: In this recipe I like to use an Aromatic/Buttermilk style culture. My top choice is KAZU, although MA 4002 and MM 100 can also be used.
For any of these cultures I recommend using 3/16 - 1/4 tsp.
Both KAZU and MA 4002 include a secondary culture that works magic in the aging process.
If desired, 1 - 1 1/2 packets of the simpler, less complex C101 culture can be used in this recipe instead of the above culture options. If using C101 a single ripening rest of 75-90 minutes is best.
-

Coagulate with Rennet
Once the milk has finished ripening, dilute 4 ml of single strength liquid rennet in 1/4 cup cool, non-chlorinated water (3 ml for raw milk). Add diluted rennet to milk and gently mix for one minute. Let the milk sit for an additional 40-45 minutes while the culture continues its work and the rennet coagulates the milk.
The milk will begin to thicken after 12-15 minutes, but allow it to coagulate for the full time before moving onto the next step.
It is always best to check for a firm coagulation, if needed allow the milk to sit for as much as 50% longer. The next time you make the cheese, adjust the rennet amount if needed, more rennet for a quicker set.
The thermal mass of the milk should keep it warm during this period. It is ok if the temp drops a few degrees during this time; you can heat it back to temp in the next step.
-

Cut Curd
Once the milk is well set, it's time to cut the curds. This is the first step in reducing the curd moisture.
Cut the curd mass as evenly as possible to about 3/8-1/2” pieces, then allow the cut curd to rest for 5 minutes, so the curd surface can heal.
Then slowly stir for 15 minutes, to help the curd surface to become firmer. The rest and stir are important to prepare for the next step. Without it, the curds would break and lose too much moisture.
-


Cook Curd
Now the curds will be heated by withdrawing whey and replacing it with warm water. This is a method borrowed from the Dutch:
- First remove the bacteria's food supply, residual lactose in the whey. Do this by allowing the curds to settle, then remove 30% of the whey. This will be about 4.8 qts of whey, when making a 4 gallon batch. This will slow the culture activity for a sweeter cheese.
- Then slowly, over 15 minutes, replace the removed whey with the same volume of 145-155F water. Stir the curds and add the water until the temperature of the curd is 102F. This process helps moisture release from the curds.
The final curds should be cooked well through and when examined should show that enough moisture has been removed. A broken curd should be firm throughout and the curds should have a moderate resistance when pressed between the fingers.
When this point is reached the curds can be allowed to settle under the whey in preparation for transferring to molds.
-


Drain Curd
Remove whey down to the curd level. The dry curds can then be transferred to a colander or drain pan lined with butter muslin. They should be allowed to drain for 30 minutes. A gentle stirring will ensure the whey drains off.
Don’t hesitate in stirring the curds because warm curds like to stick together. This draining and separation is important so the curds do not clump together.
-


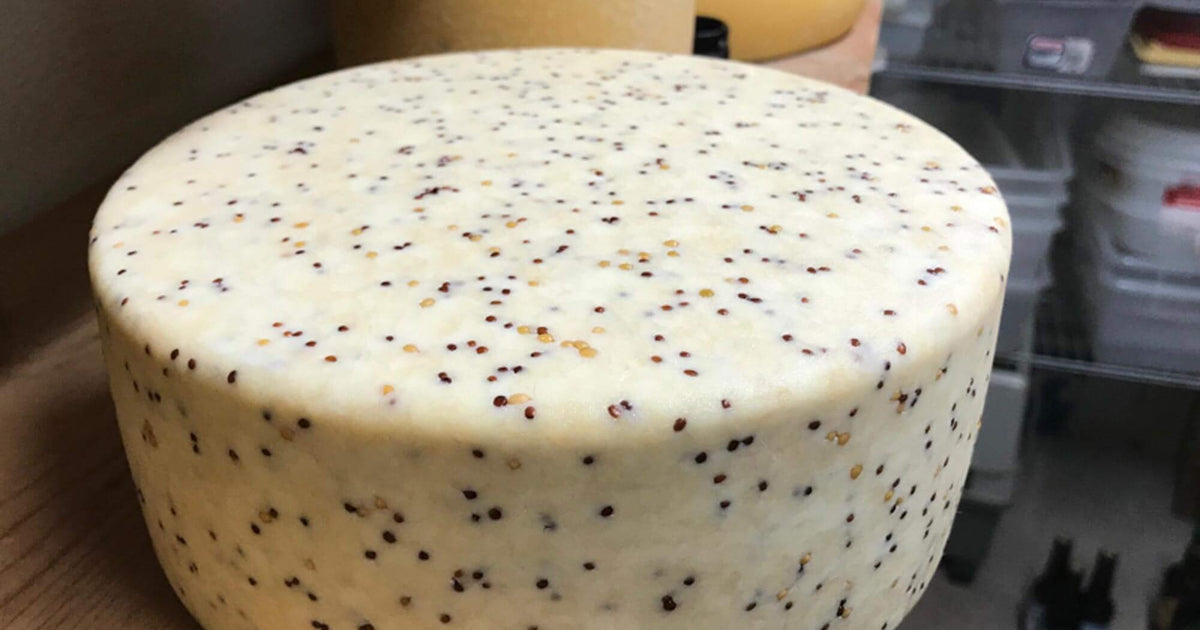
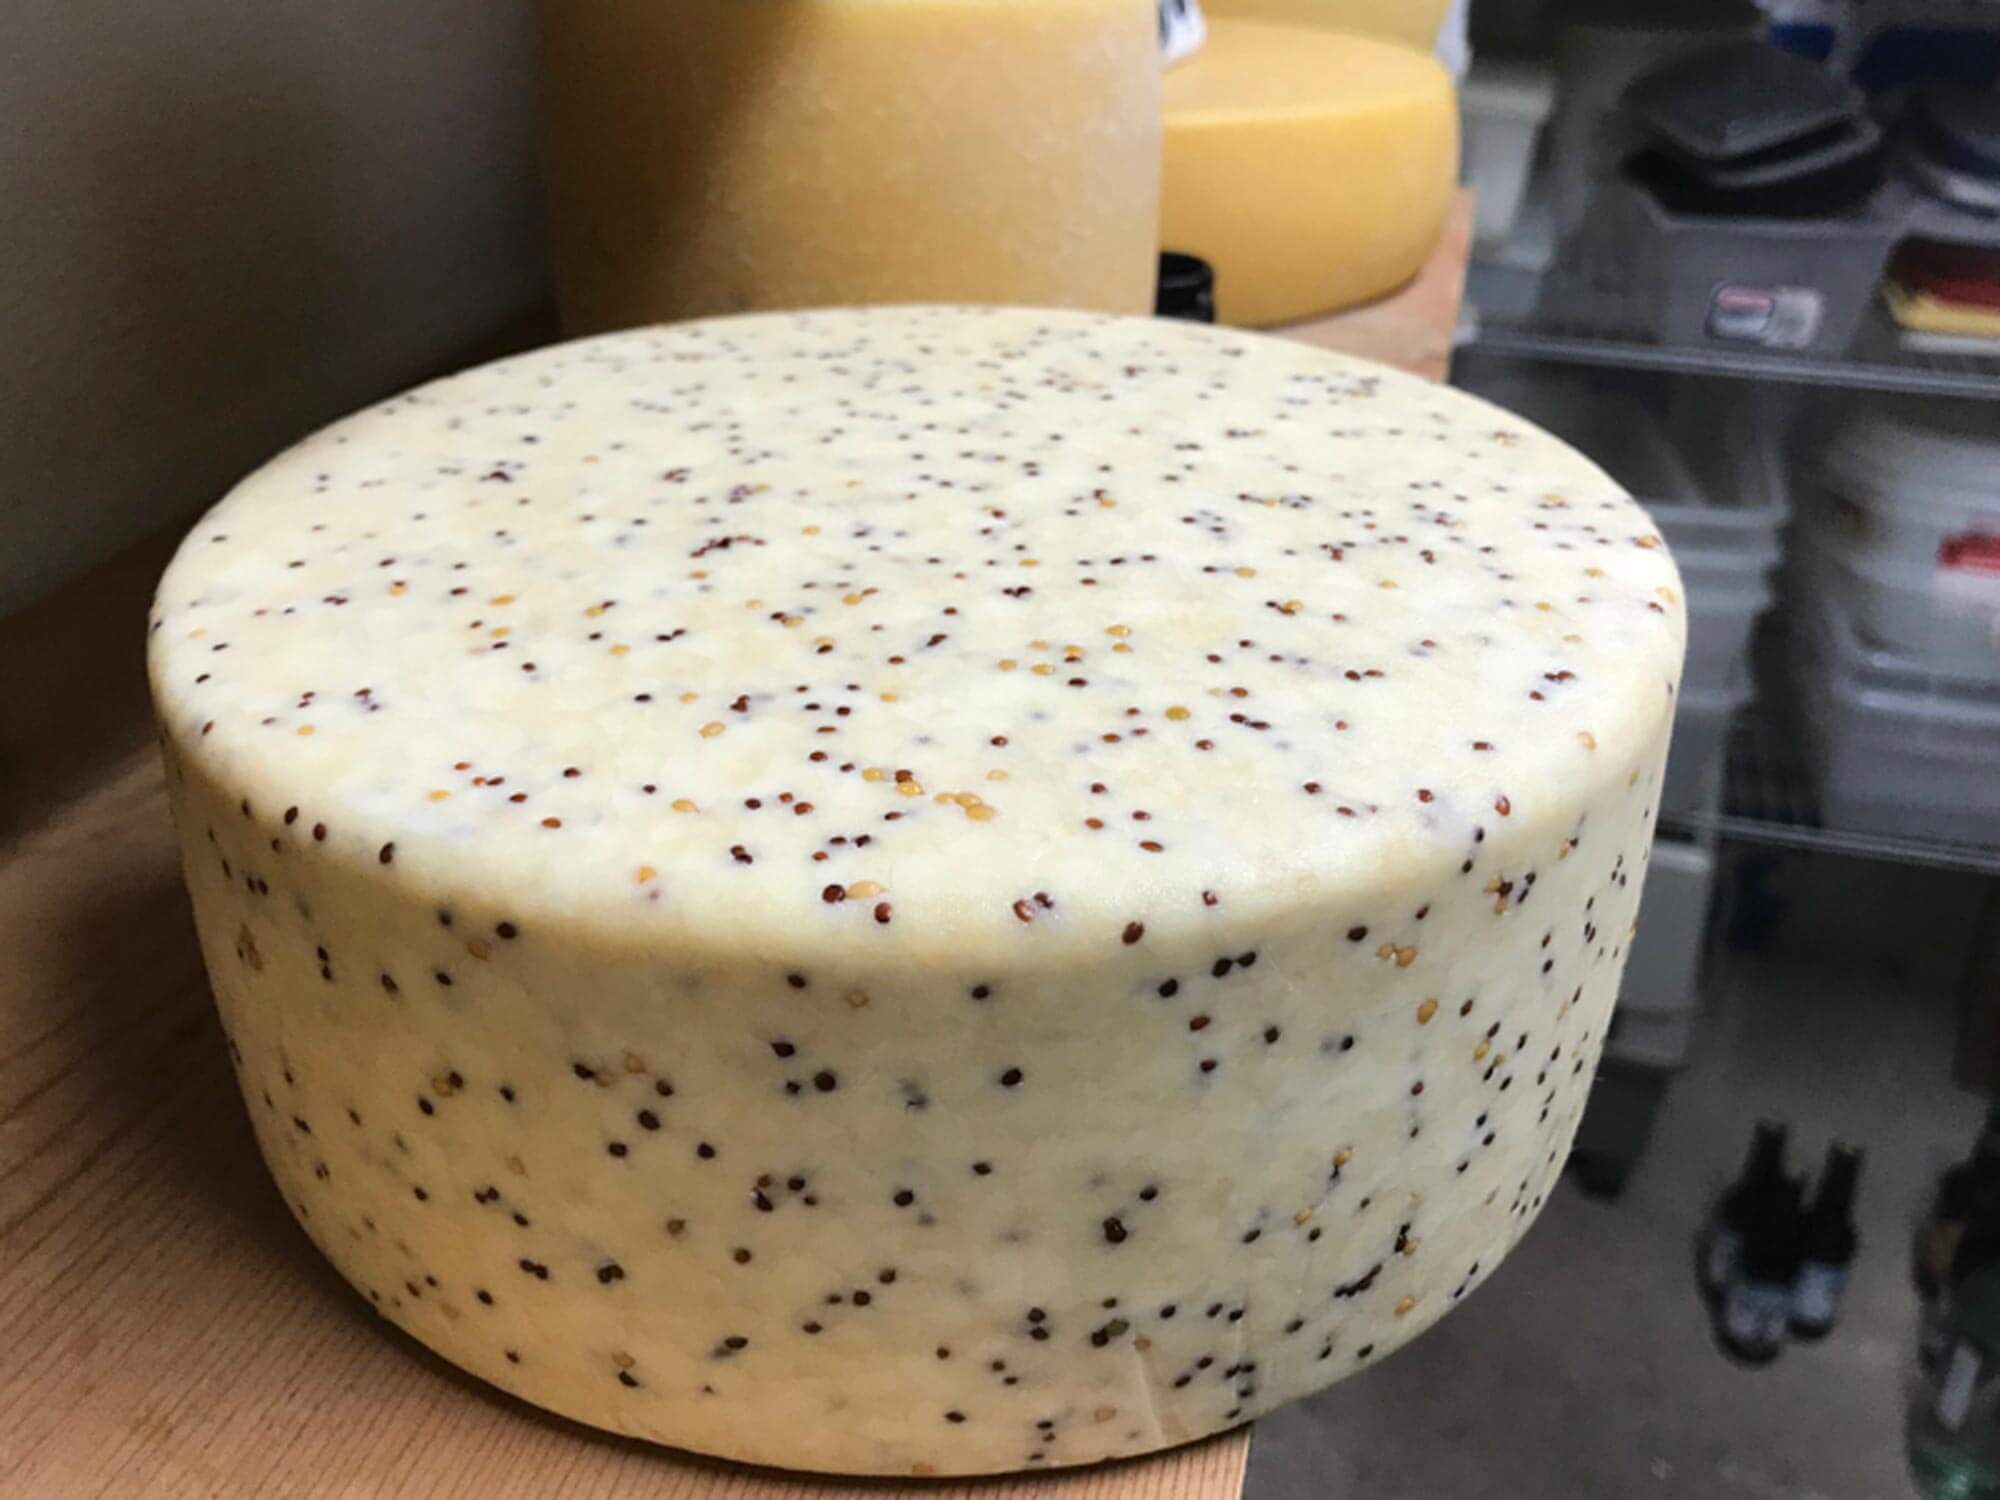
Adding Beer & Mustard
Beer | The beer should be at room temperature, cooler than the curds but not cold.
Dump the curds into a large, sanitized bowl, open a bottle of beer and pour it over the curds. Begin mixing quickly; you may need a second bottle.
Allow the curds to sit in the beer for 30-60 minutes, or longer. Give them a good stir every few minutes, so all the curd in contact with the beer as much possible. The longer it soaks the deeper the color.
When the curds have soaked enough, drain them once more and place them back into the same bowl.
Note: In step 4 we added warm water to the curds which effectively cooked the curds and pulled moisture from the curds. In this step we are adding cooler beer to warm curds because we want to move the beer into the curds to add flavor and a bit of color to the final cheese. The darker the beer, the deeper the curd surface will be colored.
When done well the cheese will show a very unique outline around each curd when it's cut.
In this batch I used Troegenator Doublebock style, which is lighter in color but very malty. I did this to counter the spicy mustard seeds with the sweet malty flavor of beer.
A dark stout adds a bit of roastiness to the flavor and a nice dark outline around each curd.
Mustard | Sprinkle all of the mustard over the surface of the curds, then mix well for an even distribution. It takes a lot of mustard to counteract the sweetness from the cheese.
If desired, you can adjust the amount of mustard used to your own taste. You can also adjust the yellow/brown blend ratio.
Note: Toasting the mustard seeds ahead of time will elevate the spice.
-


Pressing
Line a sterilized cheese mold with sterilized cloth then transfer the curd into the molds. Compress the curds well by hand (or fist) to get a tight pack into the mold. Then fold the cloth over top and place the follower on top.
Begin by pressing light and slow then increase the press weight to a moderate level:
- 30 minutes at 25 lbs
- 1 hour at 50 lbs
- 2 hours at 75 lbs
- 3-4 hours at 100 lbs
Between each weight increase, the cheese should be removed from the press, un-wrapped, turned, re-wrapped and put back into the cheese mold at the above intervals to assure even consolidation.
The rate of whey running off should be only a matter of drops, not a stream. This is a good rate of whey removal during pressing and will slow even more as the free moisture is released. The cheese mold should show tears of whey weeping from the draining holes very slowly. When this stops you can increase the weight slightly.
At each turn the cheese will have formed a smoother surface and will rest lower in the mold with fewer openings in the surface. More pressing may be needed if the final surface is not smooth and closed.
During the pressing, the cheese should be kept as warm as possible because the culture is still working. After pressing un-mold the cheese, remove the cloth, place the cheese back in the mold and leave in a warm location, 75-78F, for 4-6 hours.
Keep cheese in the mold and let sit in a cooler space overnight 65-68F. The final weight of the cheese should be between 5 - 5 1/2 lbs.
-


Salting
For this step you will need a saturated brine, details for making a brine can be found here.
A simple brine formula is:
1 gallon of water, 2.25 lbs of salt, 1 tbs calcium chloride (30% solution), and 1 tsp white vinegar.
Remove cheese from the mold and place it in a brine for about 2 1/2 hours per pound of cheese.
The cheese will float above the brine surface so sprinkle 1 - 2 tsp of salt on the top surface of the cheese.
Flip the cheese and re-salt the surface half way through the brine period.
At the end of the brine bath, wipe the surface and allow the cheese to surface dry for a day at 65-70F with free air movement.
Note: Do not let the cheese dry to the point of becoming dark or cracked.
-


Aging
The dried cheese can now be waxed for aging. Details on waxing can be found here.
Once waxed, the cheese can be placed into an aging space, at 50-54F with 80-85% moisture, for 6 - 8 weeks or more. Even though it's waxed the cheese should still be turned every few days.
Cheese Making Supplies
Related Products
You May Also Like


