


Derby with Sage Recipe
-

Yield
2 Pounds
-

Aging Time
~6 Months
-

Skill Level
Intermediate
-

Author
Jim Wallace


Derby with Sage Recipe Info
Herbs in Derby with Sage
Derby with Sage Origins
Making Derby with Sage
Historic Notes on Derby with Sage
Ingredients
Total price for selected items: Total price:

Instructions
A Recipe for Making Sage Derby Cheese
The following guidelines are ones that I have developed from info on the Derbyshire cheese made during the early 20th century, and is the way it continues to present times. This tends to be a moister, softer, and earlier ripening version of Cheddar.
At some time in the future, I may visit the much earlier process (going back to the 17th and 18th century) which was quite different.
-

Acidify & Heat Milk
Begin by heating the milk to 84°F (29°C). You do this by placing the milk in a pot or sink of very warm water. If you do this in a pot on the stove, make sure you heat the milk slowly and stir it well as it heats.
Once the milk is at 84°F, the culture can be added. To prevent the powder from caking and sinking in clumps, sprinkle the powder over the surface of the milk, and then allow about 2 minutes for the powder to re-hydrate before stirring it in.
Allow the milk to ripen at the target temperature here for about 60 minutes before adding rennet.
-


Prepare the Sage
While the milk is warming and ripening you should prepare the herbs:
- Clean the leaves well in cold water and then soak them for 10-20 minutes. This tends to remove a bit of the herbal bitterness.
- Drain the leaves well, then add about 2-4 oz. of cold water and blend the herbs to a fine puree.
- Set this aside for later use. It should be a deep dark green once the foam subsides.
-


Coagulate with Rennet & Cut Curd
Then add the single strength liquid rennet. Stir this in for about 1 minute in a slow up and down motion.
The milk now needs to set for about 45 minutes while the culture works and the rennet coagulates the curd. You will note the milk thickening at about 15-20 minutes, but wait the full time until you see a firm curd. Test the curd to see if it gives a clean break, if not wait a little longer. The thermal mass of this milk should keep it warm during this period.
Once you have a firm curd, it can be cut into 1/2-5/8 inch pieces as evenly as possible, using a knife to make the vertical cuts and a spoon or flat bottomed draining ladle to make the horizontal cut.
Stir these gently and just enough to keep the curds separate for about 5 minutes. This will allow the curd surface to harden enough for a longer stir. Allow the curds to settle for about another 5 minutes to allow the whey to rise. They should not be allowed to consolidate and mat in the bottom though.
Next, begin a slow continuous stir for the next 15 minutes. Bring the temp back up to 84°F if it has dropped.
In the beginning, the curds will be quite soft and show very little structure. The whey may be quite opaque.
-


Cook the Curd
Now it is time to begin drying out the curds. This will be done by increasing the heat slowly to 92°F (33-34°C). The heat needs to be increased slowly at about 3-5°F (2°C) every 5 minutes at the beginning. The total cooking time will be 15 minutes and may be extended slightly if the curds are still soft.
The curds will become much firmer and the whey less opaque.
The final curds should be cooked well through and should be examined to make sure that enough moisture has been removed. A broken curd should be firm throughout and the curds should have a moderate resistance when pressed between the fingers.
The curd is ready when, a handful of curds pressed togethor easily separate with a little pressure from the thumb. At this point the curds can be allowed to settle under the whey.
-

Remove the Whey
The whey should first be removed to the curd surface in the vat. The curds can then be transferred to a colander lined with butter muslin. They should be allowed to drain for a few minutes, and a gentle stirring will make sure that the whey drains off.
The strainer I use here is a food grade plastic washtub that I have made drainage holes in the bottom of. This tends to provide the nice flat surface needed in the following step.
-


Form the Curd Mass (Cheddaring)
Once the curds have been transferred and the free whey released, I fold the drainage cloth over and turn the cheese mass to allow it to consolidate. I then place another identical tub with no holes on top and add 1/2-3/4 gallons of water (4-6 lbs or 2-3x the curd weight).
The purpose for this is to:
- Keep the curd warm (water should be between 80-90°F)
- Help in consolidating the curd mass
This is the point where the final acidity develops and as it does, some of the calcium will be leached from the curd and flow off with the whey. The curd structure will also begin changing and is very similar to the pasta filata or Mozzarella process.
The cheese mass should be unwrapped, turned over and re-wrapped every 15-30 minutes for the next 1-2 hours while the final acid is produced (final acid pH=5.3-5.4 TA%=.45-.55) and more whey is expelled. The longer the curd develops and the more it is turned, the drier it will become.
When the curd has ripened you should see a change in structure. It should now be well consolidated/flatter and when broken you should see an elongated individual curd profile.
-

Break up the Curd
At this point the curd should be torn or cut into small pieces of walnut to hazelnut size. This will allow the salt to penetrate to the center of each curd and stop the development of excess acid which is already near it's targeted development. Failing to do this may result in an over acid cheese.
-


Add Salt & Sage to the Curd
The next step will be to add the salt to the broken curds. About 2% of the curd weight in salt should be added. The final curd weight of 2.5 lbs will need .8 oz of salt (it is always best to measure salt by weight because different salts will have different densities). Add this salt in 2-3 cycles, with time between for the salt to dissolve. A non-iodized salt must be used and a medium crystal structure is best.
Once the salt is absorbed, you can add the sage/spinach infusion to the broken curds. This should now have dropped to room temp and will be cooler than the curds. This will cause more of the sage liquid infusion to be absorbed into the curds. It is essential to add the salt before the sage infusion because the whey released from salt additions will cause some of the sage flavor to be released as well.
Stir the sage infusion well into the curds and allow them to rest for a few minutes while you prepare the mold.
-

Form the Curds
The mold and cloth should have been sanitized at this point and the cloth now lining the mold. I am using the E28M Stainless Steel Cheese Mold here.
The curd can now be pressed into the mold and compacted with a firm hand (or fist) to begin its consolidation.
The cloth folded over the surface and the follower placed on top so that the press weight is on the cheese surface and not on the mold itself.
-


Pressing
We should begin very lightly and slowly with the press, and increase the press weight slowly, turning and re-wrapping at each change:
- 30 minutes at 15 lbs
- 60 minutes at 20 lbs
- 2 hours at 35 lbs
- Overnight at 40-50 lbs
The rate of whey running off is simply a matter of drops and not a stream of whey being released. This is a good rate of whey removal during early pressing and will slow even more as the residual free moisture is released. You should see tears of whey weeping from the form very slowly. When this stops you can increase the weight slightly. The cheese should be removed from the press, unwrapped, turned, re-wrapped, and put back to the press at the intervals indicated above to assure an even consolidation. At each turn you will notice the cheese has formed a smoother surface and rests lower in the mold.
Note the green color of the initial whey running off in the photo. This should quickly show as a less colored whey.
-

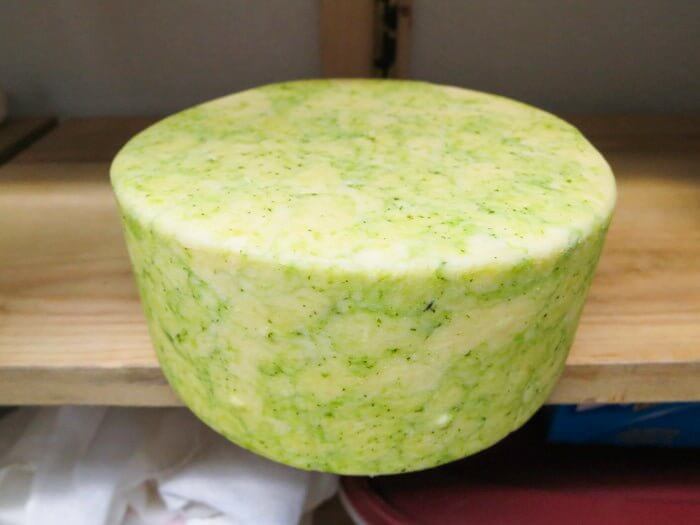
Aging
When the pressing is done, the cheese mass should be well consolidated, showing no cracks or irregular spaces in the surface. If some are noted then re-wrap, return to the press and increase the press weight until the surface is closed.
When ready, wipe the surface and allow the cheese to surface dry for a day or two before waxing. The surface will darken somewhat during this time.
The cheese can now be waxed for aging. For details on waxing click here.
The cheese can then be placed into your aging space at 52-56°F and 80-85% moisture. The cheese can now be aged for 4-6 weeks and it will be ready for your table as a very young cheese, or left for 3-6 months for a more complex aged texture and flavor.
Troubleshooting:
- Watch for pasty/sticky texture (too moist at molding) or chalky from too much acid.
- If final cheese is chalky/crumbly/acid this is caused by high acid milk/curds.
- If final cheese is too soft with pasty curd texture, the curds were too moist when they went into the mold, resulting in cracked rind, irregular surface, and perhaps a weeping cheese.
- Insufficient acid will result in off flavors from bad bacteria growth. Good cheese making is always about good bacteria (the ones you add) out-competing the bad ones.
- Low fat milk (less than 3.1%) will result in lean and chalky cheese body with little flavor.
Cheese Making Supplies
Related Products
You May Also Like


