


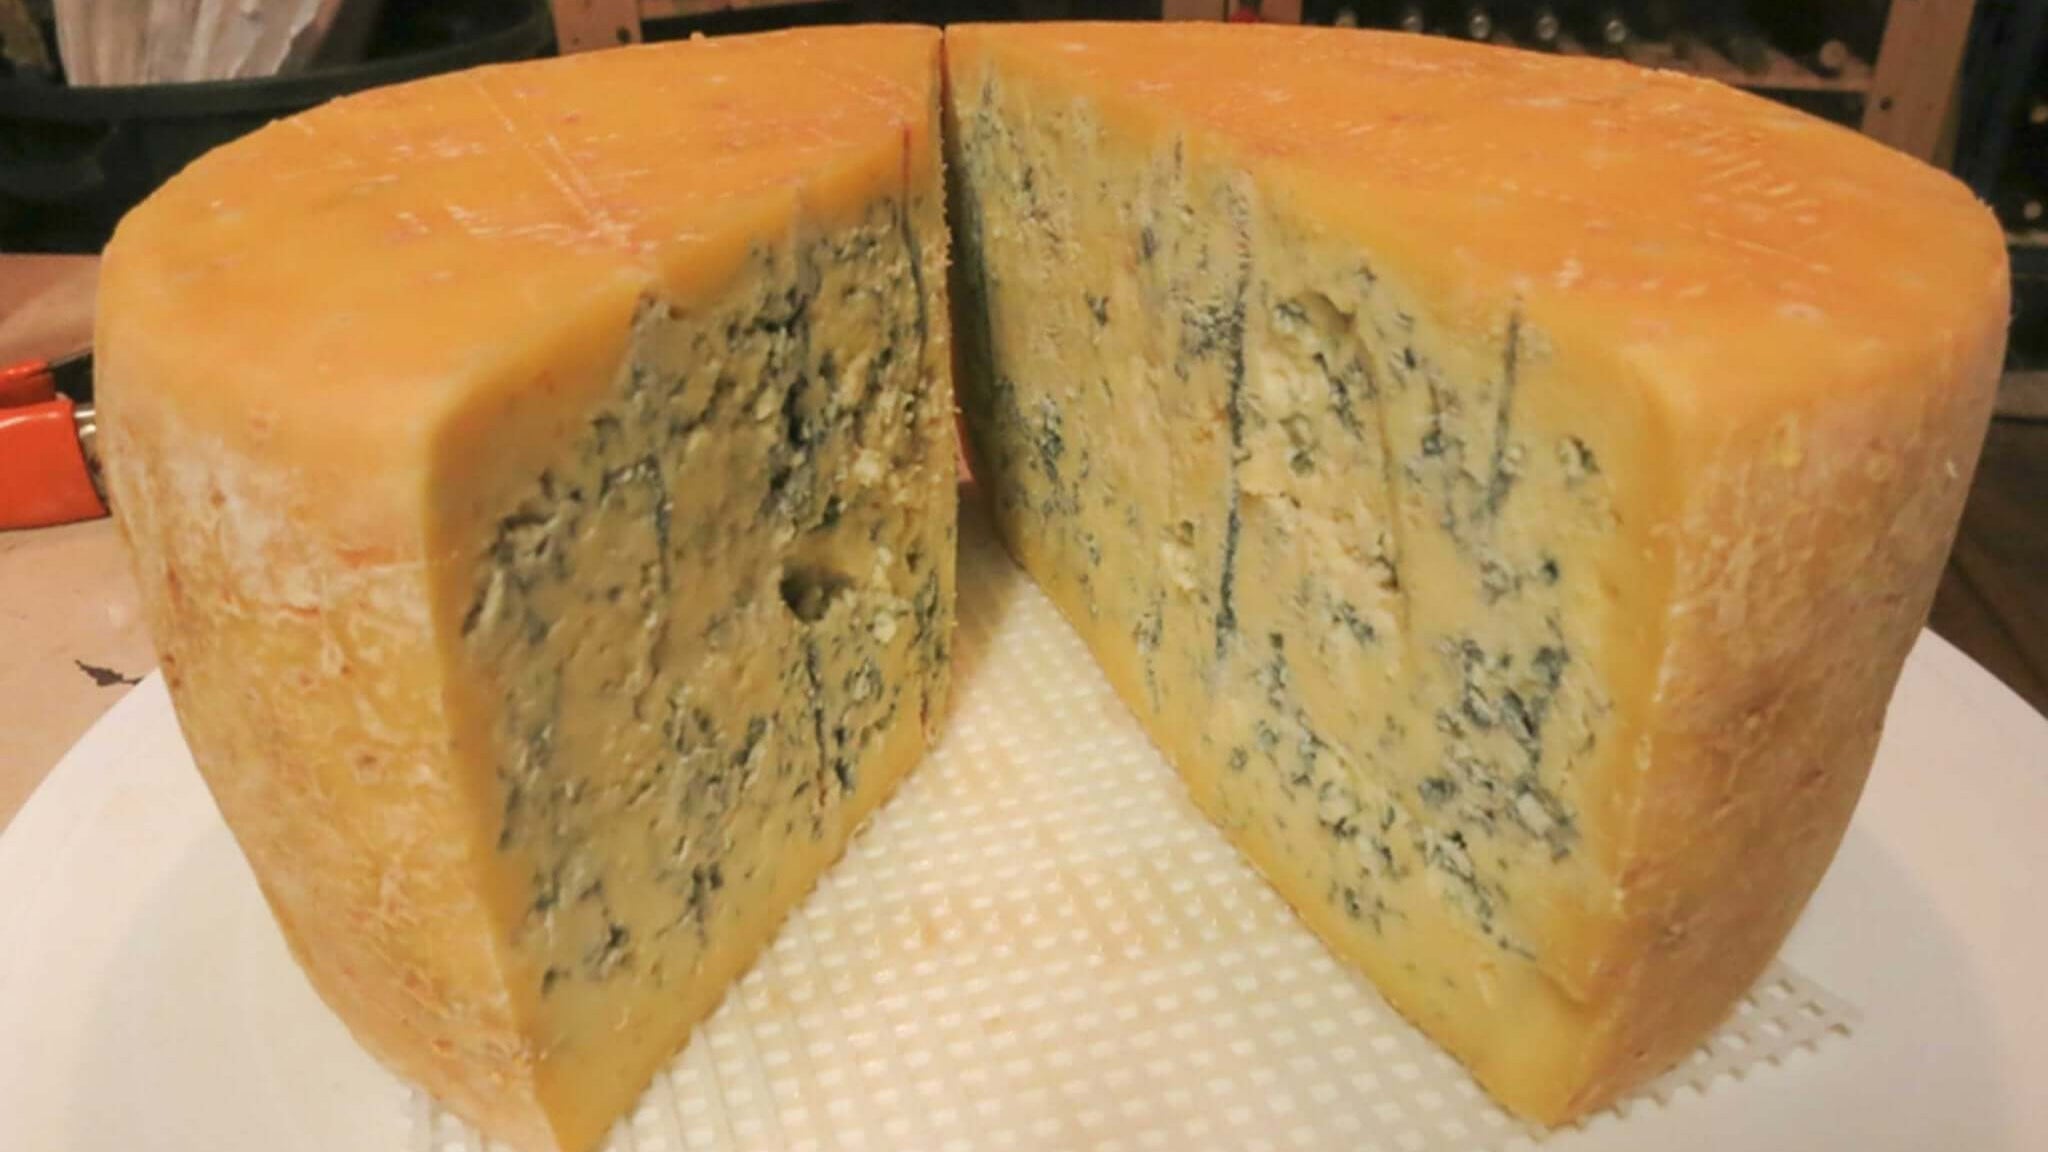
Giacomo's Blue Cheese Recipe
-

Yield
4 Pounds
-

Aging Time
~2 Months
-

Skill Level
Advanced
-

Author
Jim Wallace


Ingredients
Total price for selected items: Total price:

Instructions
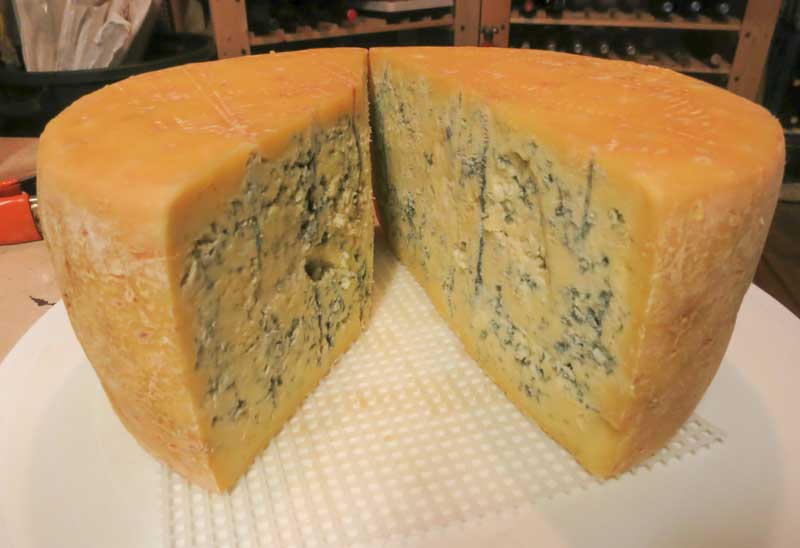
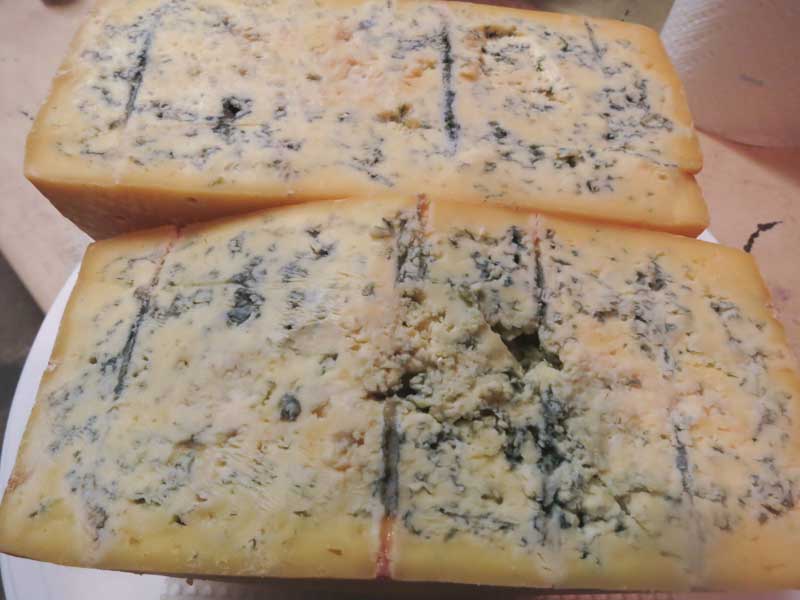
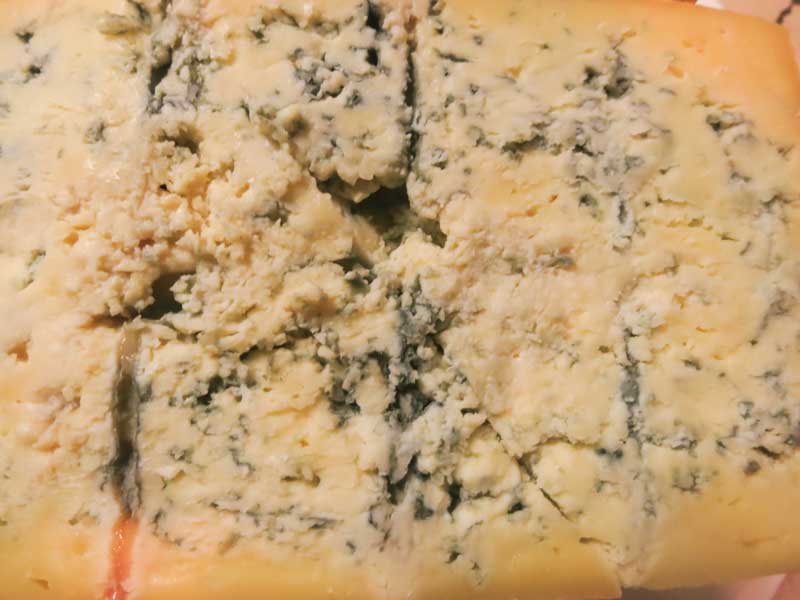
The real trick in getting a good blue to develop is to have a final curd with higher moisture yet does not collapse when moved into cheese molds. The final cheese should retain plenty of open channels and spaces internally to provide the air which blue mold needs to grow. Remember, No O2 No Blue.
This recipe is great for cheese makers who have a solid grasp of the basics of medium to hard aged cheese.
-
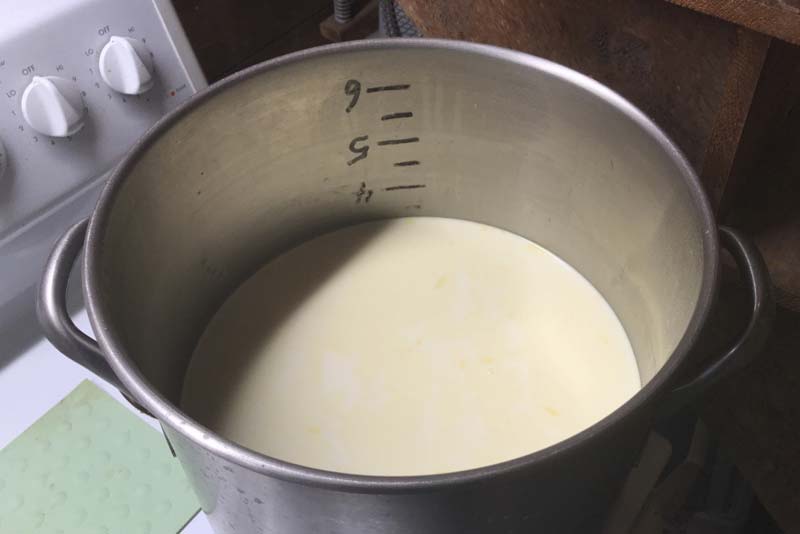
Acidify & Heat Milk
For this cheese you will be working with two types of culture which work at different temperatures. Mesophilic culture in MA 4002 and MD 88 prefer lower temperatures, while thermophilic culture, also contained in MA 4002, prefer higher temperatures. To support both of these cultures, the milk will be heated in 2 phases.
To begin, heat the milk to 72 - 75°F. If using pasteurized milk, add ½ tsp Calcium Chloride (diluted in ½ cup non-chlorinated water) to the milk.
While the milk heats, rehydrate the Pencillium Roqueforti in ½ cup non-chlorinated water for 30 minutes.
Once the milk reaches 72 - 75°F add cultures and rehydrated Pencillium Roqueforti. To prevent cultures from clumping and sinking, sprinkle them over the milk’s surface and wait 2 minutes before stirring in.
Let the milk rest quietly for 30 minutes. After this initial rest period, heat the milk to 90°F.
Let the milk rest quietly for at 90°F for an additional 45 - 60 minutes.
Tip: To heat, place pot of milk in a larger pot or sink of very warm water, or directly on the stove. Stir gently while heating at a rate of 2F/minute.
-

Coagulate with Rennet
Add single strength liquid rennet, diluted in ½ cup non-chlorinated water, to the milk. Stir with an up and down motion for 1 minute, then let the milk rest quietly for 90 minutes.
It’s ok if the temperature drops a few degrees during this time.
The milk will begin to thicken after 16 - 20 minutes, but allow it to coagulate to proper firmness for the full 90 minutes. This is a longer coagulation time than usual, to provide a good curd to lock in moisture.
When done, check for a firm coagulation, if more time is needed go as much as 50% longer. If needed, on the next batch, adjust the rennet amount (more rennet for a quicker set).
-
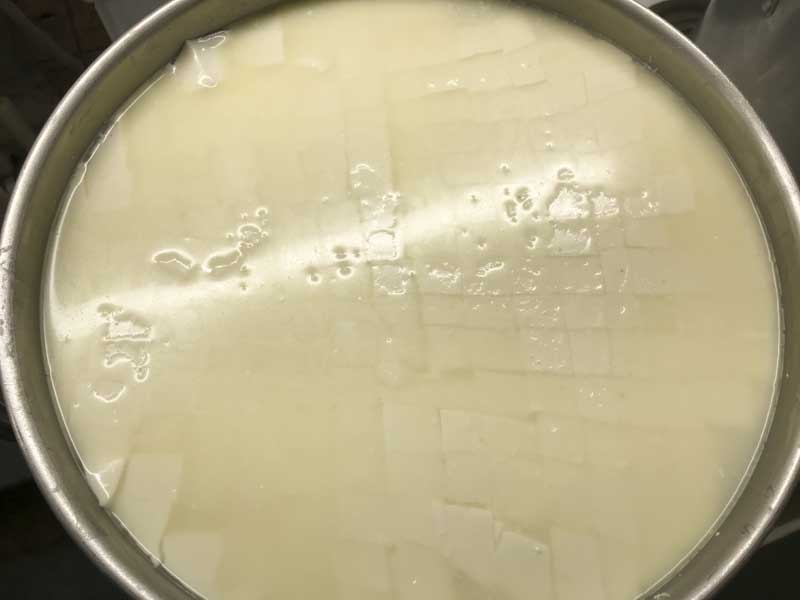
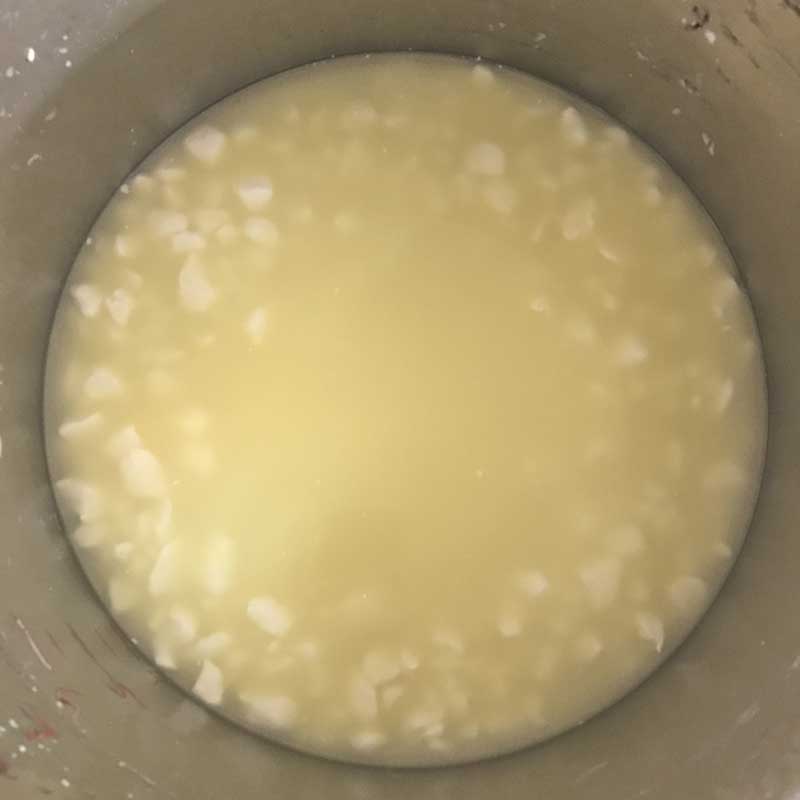
Cut Curd
Cut the curd mass vertically into a 1” checkerboard pattern, then allow the cut curd to rest for 5 minutes so the cut surfaces can heal.
Next, cut the curd as evenly as possible into hazelnut size pieces, this can take 5 - 10 minutes. Let the cut curds rest for another 5 minutes.
Note: Both the resting and stirring are important to prepare for the cooking phase that comes next. Without them, the curds may break further and lose too much moisture.
-
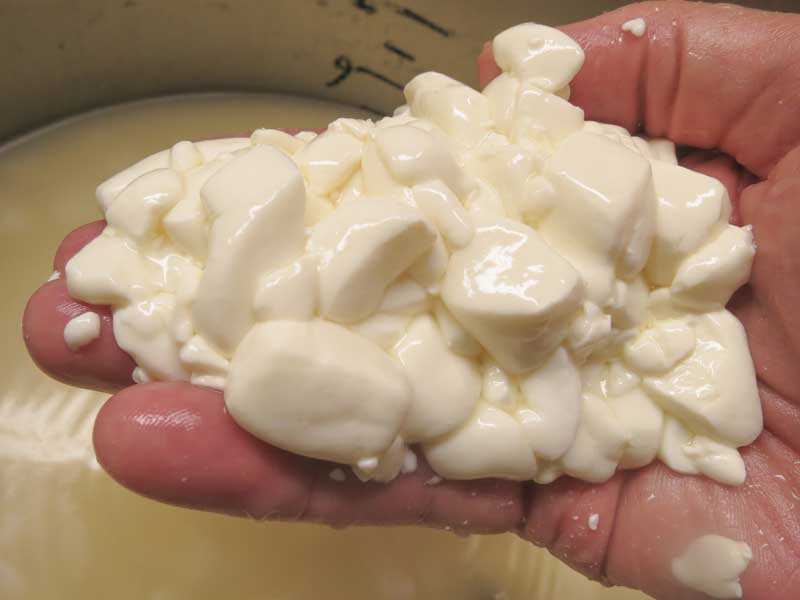
Dry Curds
Now it's time to begin drying out the curds. This process is different than usual, the goal is moist curds with firm surfaces to support good blue development. The level of moisture can vary, depending on the particular style of blue. For this cheese we are aiming for medium moisture.
If the temperature dropped return the curd to 90°F, while stirring gently for about 5 minutes.
Once heated back to 90F let the curds settle to the bottom of the pot and remove 10% of the whey (just over 1.5 qts for this 4 gallon batch).
Stir the curds gently for 10 minutes, slowly circulating the curds from the bottom of the pot to the top. This will keep the curds warm as they expel moisture.
Let the curds settle once more and drain an additional 10% (1.5 qts) of whey.
Now, stir in the same manner for another 10 minutes. When done, examine the curds to make sure enough moisture has been removed. A broken curd should show have firmer surface with a moderately moist interior.
When the curds are ready, allow them to settle under the whey, and remove the remaining whey to about 1” above the curd surface.
-
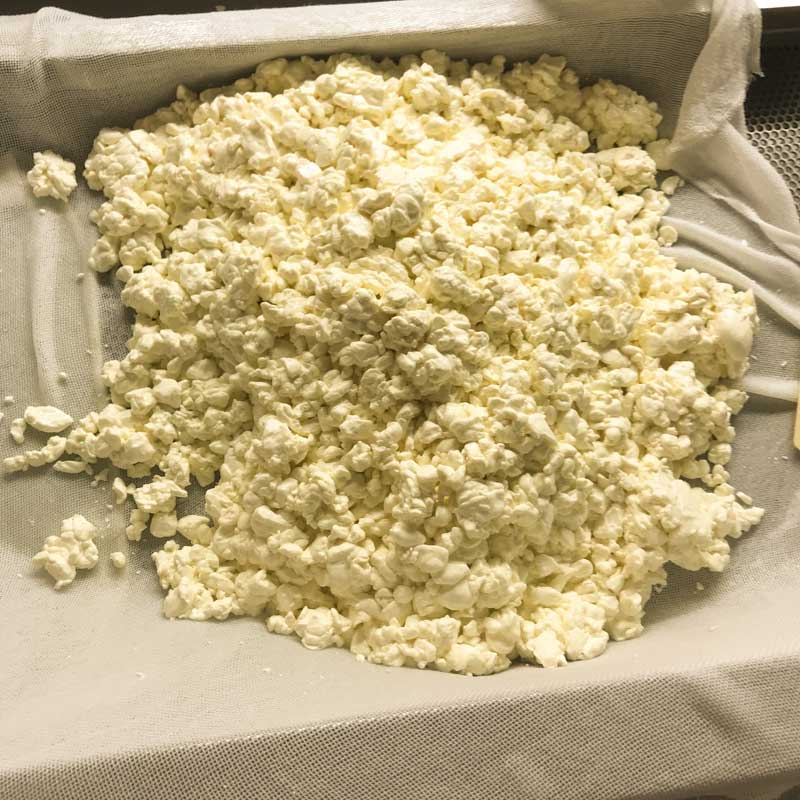
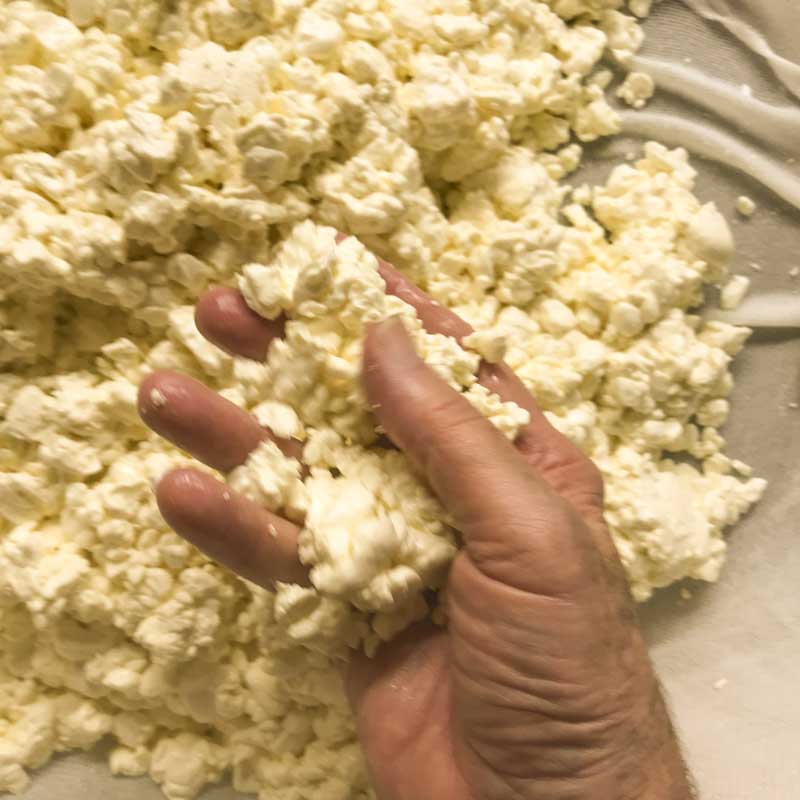
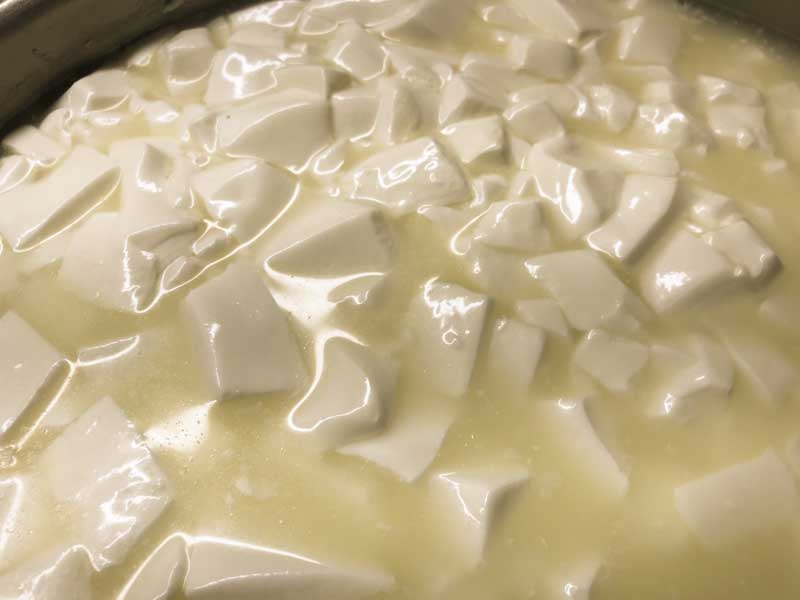
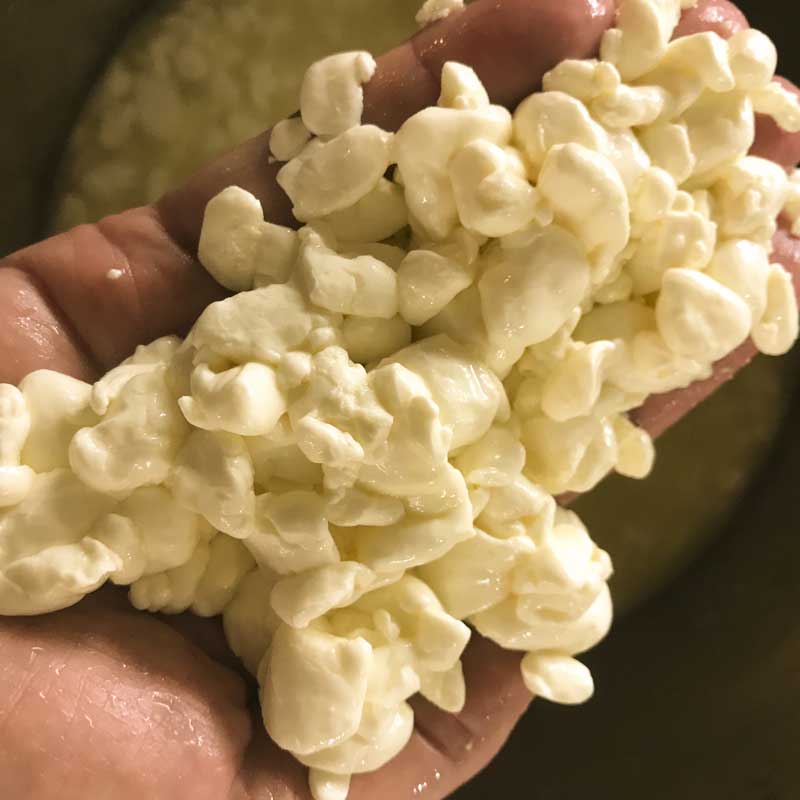
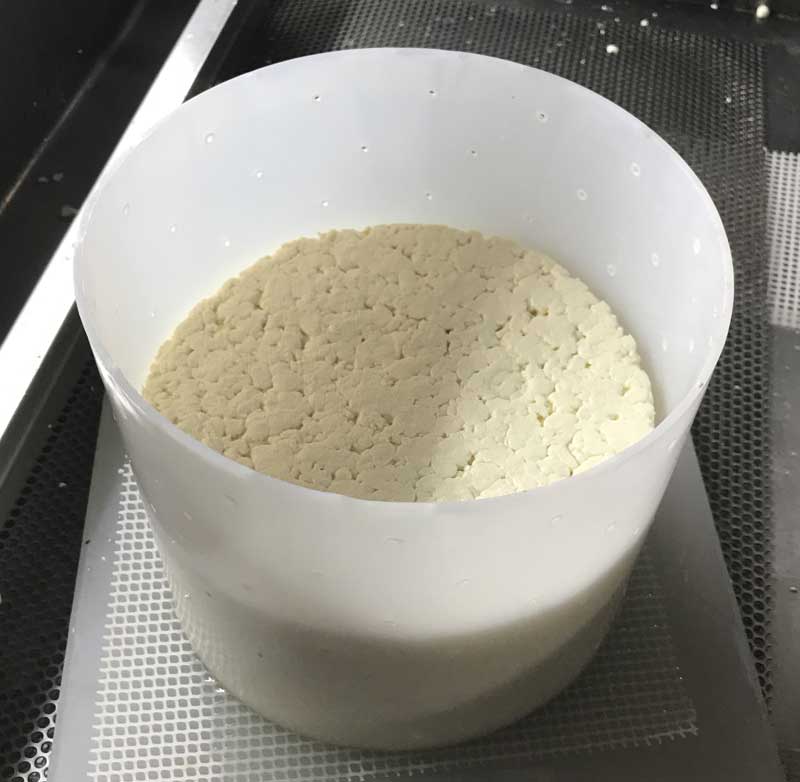
Drain & Fluff Curds
The curds will need to be aerated, or “fluffed,” before transferring to cheese molds, this step is unique to blue cheese. This will help preserve the many air gaps and fissures between curds so blue is able to grow in the final cheese.
Gently transfer the curds into a draining container. A draining pan lined with butter muslin, disposable roasting tray poked full of holes, or a regular broiler pan, lined with butter muslin can be used.
Keep the curds separated and “fluffed” by continuously lifting and turning them as they drain for about about 10 minutes. The final curds should have a “popcorn” consistency as shown in the images.
-
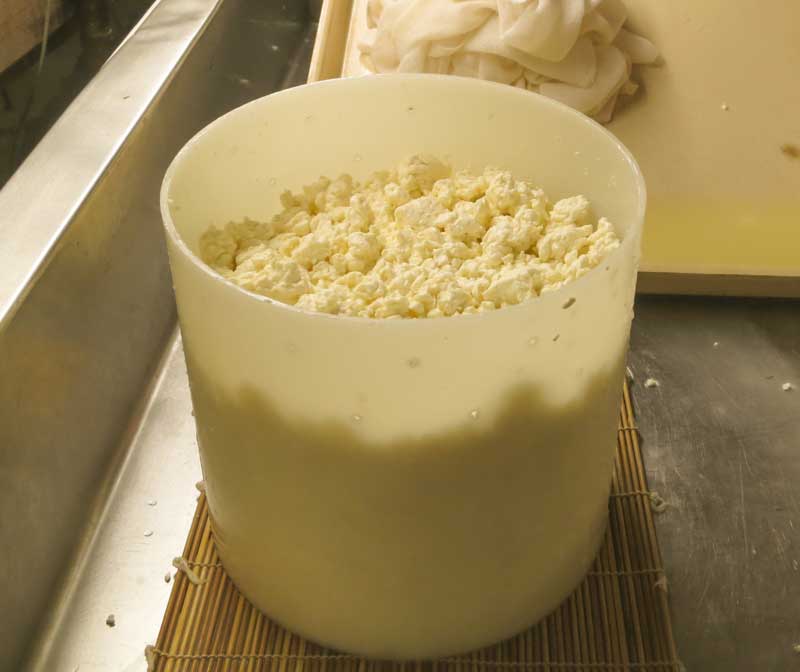
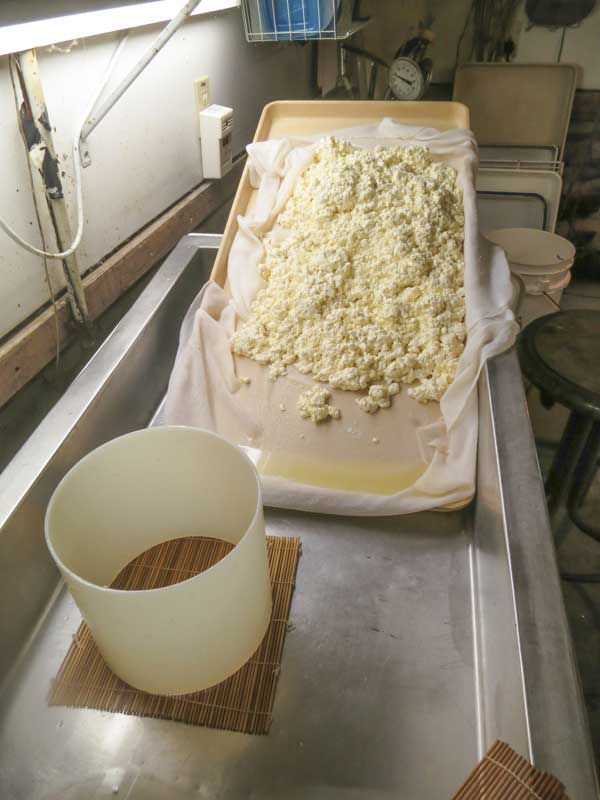
Transfer Curds
Place a cheese mold onto a draining mat covered with butter muslin, to wick the whey as it’s released. Loosely place the aerated curds into the cheese mold, they should not quickly compress or slump. No weight is needed, they will simply consolidate from the weight of the curds alone.
Turn the cheese after 30 minutes, or as soon as the surface shows enough cohesion to survive the first flip.
Continue to flip the cheese in the form at 45 - 60 minute intervals. It should remain in the draining area for about 3 hours total, or until the whey release slows to a drip. The curd mass will hold some residual heat during this time.
After the whey has slowed move the cheese, still in the mold, to a cooler space overnight, around 65°F. Too much warmth may cause additional culture activity resulting in an acidic cheese.
Let the cheese rest overnight, in the cooler area, or even until midafternoon or evening the following day if the area will remain cooler.
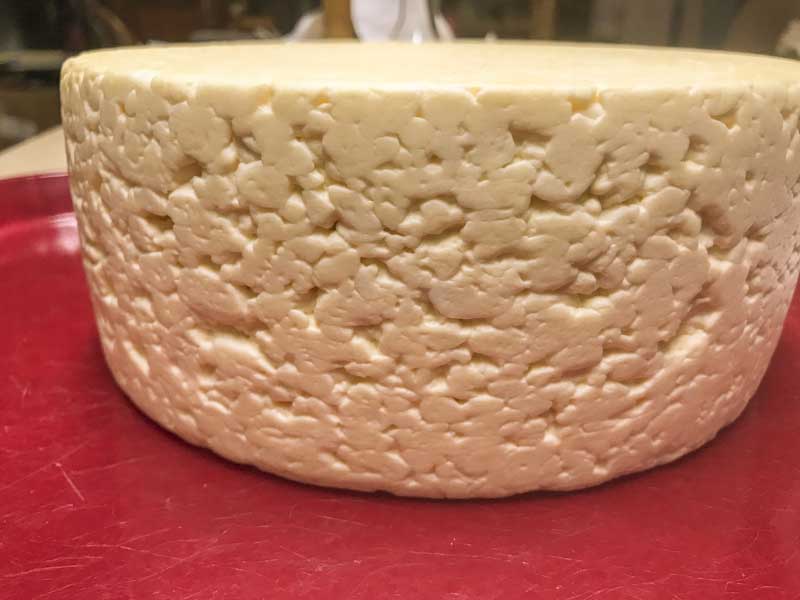
After the overnight rest unfold the cheese. It should look rather gnarly, a bit like a brain, with many divots and crevices across the surface. Hopefully the inside is the same.
Tip: To check for proper aeration pick up the cheese, and while listening carefully, give it a sharp slap on the bottom. A drum-like hollow sound means the cheese has plenty of air pockets inside where blue mold can flourish.
A dead, dull sound like smacking a solid board means the air pockets have collapsed, and blue mold may have a difficult time growing.
-
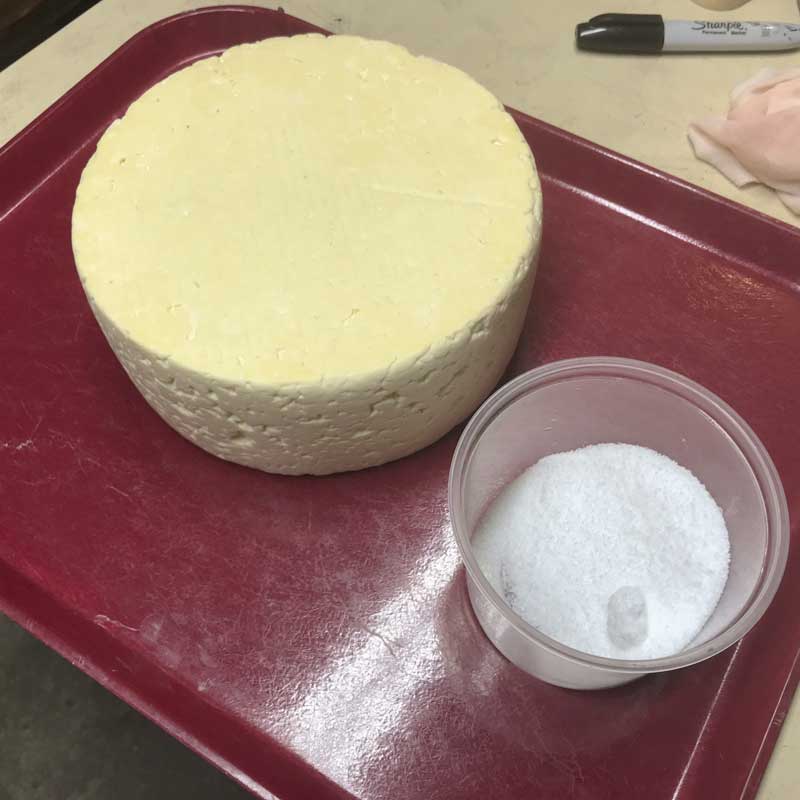
Salting
Blue mold can withstand higher salt levels than many other common molds. Dry salting this cheese, which leaves a heavier salt concentration around the rind than brining, will help deter other types of mold growth.
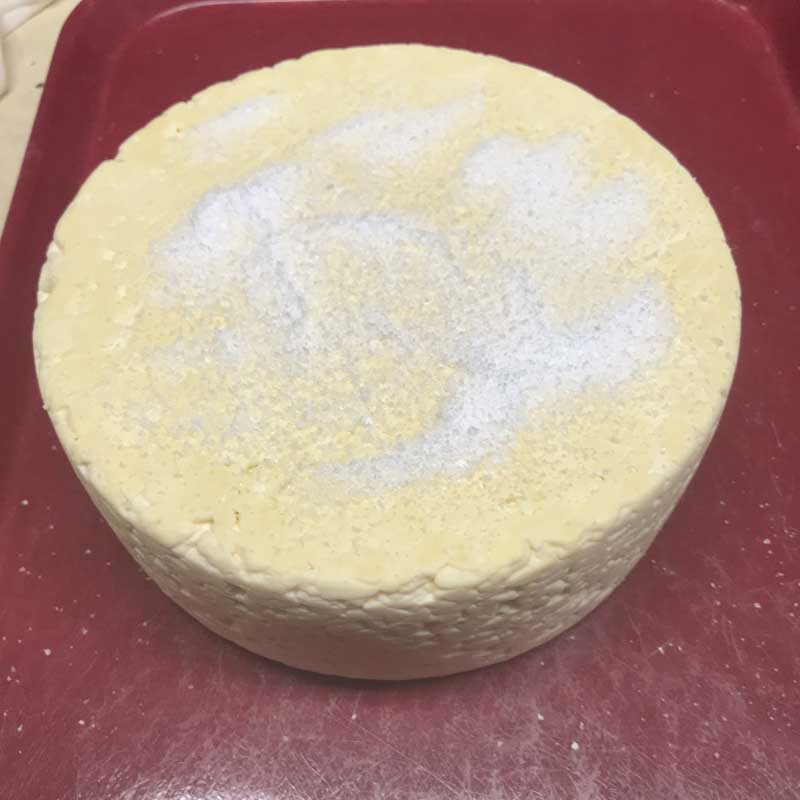
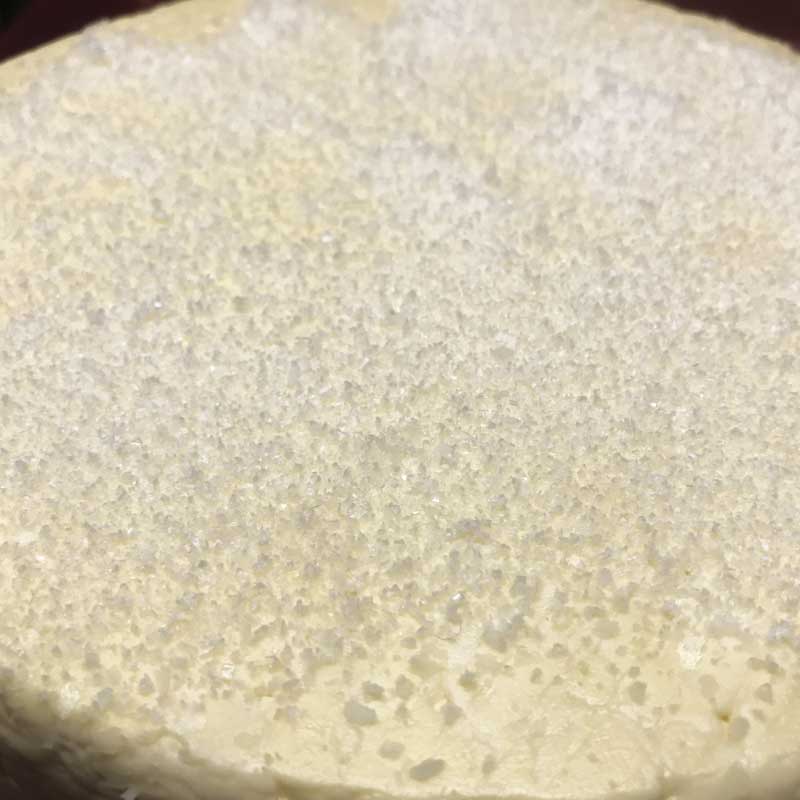
Weigh out 3 - 3.5% of the cheese weight in medium grain cheese salt. In a cool area, around 65°F, apply a moderate layer of salt to the top surface of the cheese. Spread the salt as evenly as possible over the top surface and rub it into the sides.
Once this first coat of salt turns to a brine and is absorbed by the cheese, flip the cheese over and repeat on the other side. Continue to repeat the steps until all of the salt is used up, it usually takes 2 - 3 days.
Once the cheese dries down completely for a day or so, it is ready for the cave. The salt may take a week or more to permeate through the entire cheese.
Note: Too much salt applied all at once will lead to a heavy release of moisture from the cheese. Instead of forming a small amount of brine, and then reabsorbing into the cheese, the moisture will quickly run off and carry the salt along with it, leaving the final cheese under salted.
Too little salt applied at a time will extend this process by days, and will give more opportunity for unwanted molds to grow.
-

Aging
Now all that’s left is to give the cheese time, humidity, and cool temperatures to work its magic.
Age the cheese at 52°F and 90 - 95% humidity for 6 - 8 weeks.
Place the cheese on a board with a plastic cover in an aging space to maintain humidity. Turn the cheese every day or so to keep all surfaces exposed.
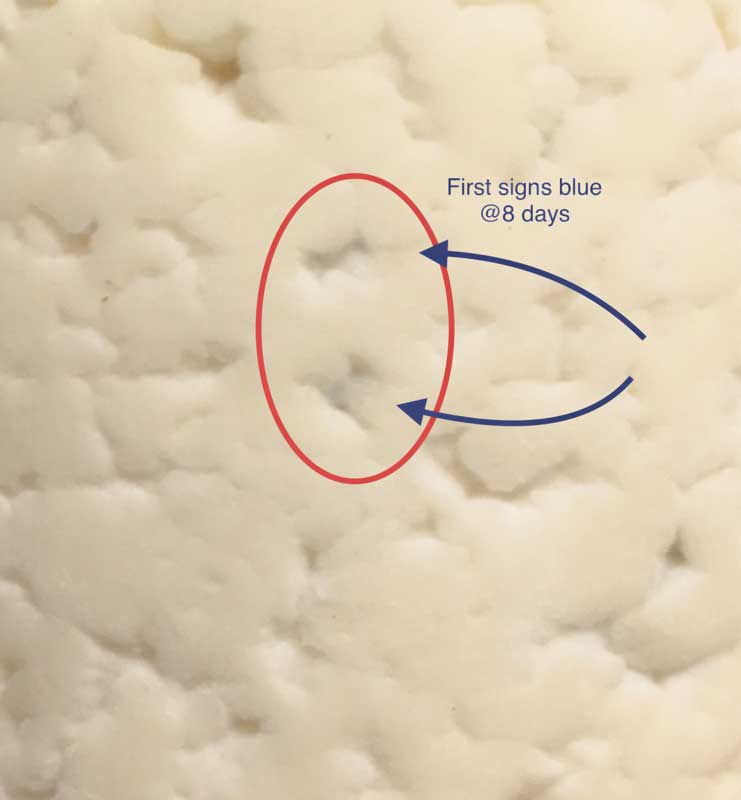
Day 4 - 5 | Signs of blue mold may be seen growing in the outer fissures and gaps.
Day 6 - 8 | A slightly greasy feel may be noticeable on the surface of the cheese. This should dry down as some of the ambient yeast begin to populate. If the cheese seems too greasy, wash the surface with a light brine, but make sure to air dry it well before returning it to the cave.
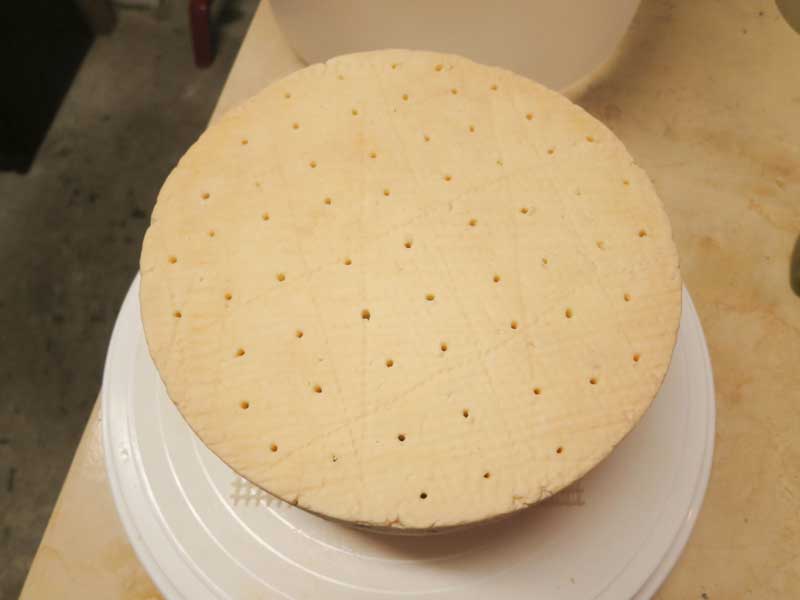
Day 10 - 12 | Punch holes in the cheese for further aeration. The holes should be around ⅛ inch (3 - 4 mm) in diameter. Too small and they will clog and be blocked. Too large and they may show as scars when cut. Space the holes in a grid every ½ - ¾ inch, punching in to around ½ - ⅔ of the way through the cheese.
At this time, the surface may show either a dry white or even a pinkish-yellow to red surface depending on moisture. Coriniforms associated with washed rinds may be at work, since they also like high salt surfaces. Too much of this surface development may clog the holes needed to aerate the blue mold. If this begins happening the surface can be scraped or washed for better control of moisture.
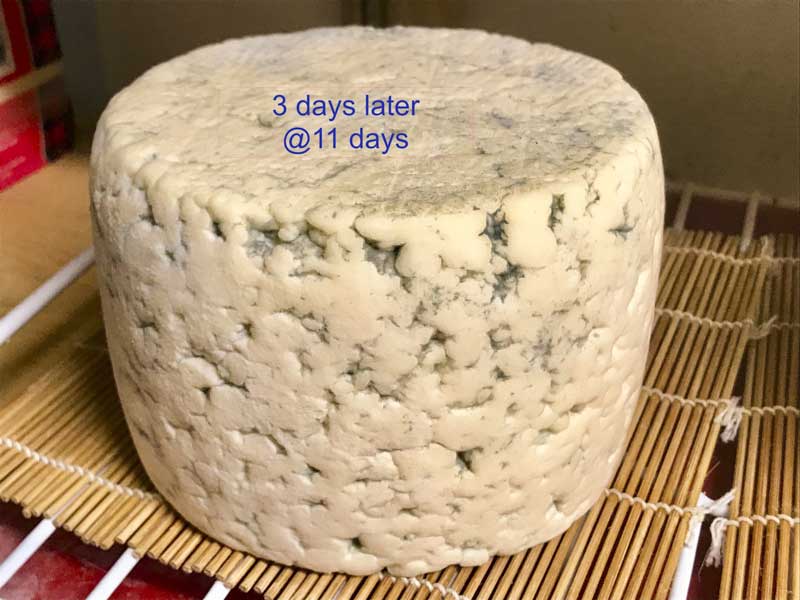
Week 2 - 3 | For the first week or so the cheese will have a very hard and coarse feel to it. At 2 - 3 weeks the cheese will begin to soften as the salt and moisture find an equilibrium, and the blue mold begins its transformation.
At this time the enzymes in the curd are also transforming the complex fat and protein into softer and more aromatic/flavorful components.
Week 2 - 3 Onward | Continue turning the cheese every 2 - 3 days, or more if needed. At about 6 - 8 weeks the cheese will be ready, although it becomes even better with further aging.
We hope you enjoy this delicious new blue, happy cheese making!
Cheese Making Supplies
Related Products
You May Also Like


