


Mont d'Or Cheese Making Recipe
-

Yield
2 Pounds
-

Aging Time
~2 Months
-

Skill Level
Advanced
-

Author
Jim Wallace


Mont d'Or Cheese Making Recipe Info
Mont d’Or Overview
What Makes Mont d’Or Unique
History of Mont d’Or
Spruce Wraps and Modern Makers
Ingredients
Total price for selected items: Total price:

Instructions
This is a very exciting cheese to make but requires some previous experience in making softer washed rind cheeses.
For the newer cheese maker I hope it offers more insight into how exciting cheese making can be and a mark to set your sights on as you develop your skills. I find the history and how the cheese came to be as interesting as making it.
If you are not up to the challenge of it all, then do watch your favorite cheese counter for its arrival because this is the season for it to show up and it will be worth your search.
-

Acidify & Heat Milk
Begin by heating the milk to 75F . You do this by placing the milk in a pot or sink of just warm water. This will seem to be a very low temperature but my research shows this as being the more traditional approach. The commercial folks go as high as 86F but the best texture comes from the long slow ripening.
Once the milk is at 75F the culture can be added. To prevent the powder from caking and sinking in clumps sprinkle the powder over the surface of the milk and then allow about 2 minutes for the powder to re-hydrate before stirring it in.
Due to the lower temperature a nice long ripening time of 60-90 minutes is required for the culture to begin to increase its population and develop a little acid to help the rennet work.
-


Coagulate with Rennet
Now it's time to add about 2ml of single strength liquid rennet.
The milk now needs to sit quiet for 60 minutes while the culture works and the rennet coagulates the curd . You should begin to notice the curd firming in about 15 minutes but the extended time is to help the curd retain its moisture when cut.
The 75F temperature should be held but since this is close to room temp, little effort should be needed for this.
While waiting for the coagulation to complete, sanitize the molds and draining mats in preparation for the curd transfer for draining.
Using the sanitized molds, prepare the draining bed with a firm board (these may be cut from small plastic cutting boards or thin wood). These will make it easier to turn the cheese as it is draining.
On top of this place one of the fine plastic draining mats from Ricki's website. The bamboo mats also work for this, just not quite as well.
The mold will then rest on top of this and all should be placed in a sink, large pan, or tray that can accommodate the whey being released.
As usual everything needs to be sanitized and a piece of cloth to cover the draining molds from bugs and debris will also be welcome.
-


Cut Curds & Release Whey
Once the curd has formed well it is time to cut the curd and begin some whey removal. Carefully cut the curd to a hazel nut size or perhaps slightly larger for more moisture retention. Allow this to rest for 5 minutes before stirring. This will firm up the curd surface and help to keep the curds from breaking when stirred.
Once the curds have rested begin a VERY SLOW STIRRING by lifting the curds from bottom to top over the entire pot. Then slowly keep this motion up for 15-20 minutes until the curds appear to be firmer on the outside and show a very developed shape when held in the hand. The curds need to be kept at 75F throughout the stirring.
Once this point is reached allow the curds to settle to the bottom and begin removing whey to just above the curd surface.
Once this is done give the curds a gentle stir to keep them from consolidating. You are now ready to transfer these curds to molds.
-


Form the Cheese
The curds are slowly transferred, a ladlefull at a time to the 4 molds in a round-robin sort of pattern allowing the whey to drain between scoops. Until the molds are full.
When the molds are full, allow the whey to run for a time until the surface drops slightly.
Then place another draining mat and firm board on top and very gently, lift the entire assemblage, hold both top and bottom board and sandwiching the form firmly in between.
The next move is the scary one, give the form a quick shake as you hold the entire assemblage firmly to loosen the curds from the bottom draining mat. Take a deep breath, and quickly flip the entire works over to the new draining surface.
Holding it all firmly, gently place everything back on the draining table onto the new draining surface. If everything goes well (it usually does), the entire draining curd will simply slide down onto the new draining surface leaving a nice patterned surface as the new top.
The curd is still very soft and if given the chance of a gap between mold and draining mat it WILL try to squeeze through ... and believe me, you do not want to see that.
Now the forms can sit quiet under their cloth cover while they drain . The turning process should be repeated 2-3 times during the remainder of the day to encourage even drainage and the temperature should remain in the 68-72F range. Colder slows the continuing culture work and drainage, warmer speeds it all up and can result in an acid cheese and excess moisture loss.
-


Salting
By the next morning the cheese will have drained in the forms to about 1/3 the original height and are ready for a brief salt bath.
You will need a saturated brine prepared for salting this cheese, find all of the details you need on brining here.
A simple brine formula is:
- 1 gallon of water
- 2.25 lbs of salt
- 1 Tbs calcium chloride
- 1 tsp white vinegar
- Bring the brine and cheese to 50-55°F before using
Due to the small format and high moisture of this cheese the brine time will be quite short. The total time in brine will be about 30-40 minutes.
Post brine, place the cheese back in their forms to help them hold their shape while the salt begins to move into the cheese and stabilize for the next 6-8 hours.
During this time the cambium strips should be soaked in a salt brine of about 8-12%.
-


Apply Spruce Band
The bands can now be applied to the cheese. They should now be quite supple and flexible after their brine soak.
Traditionally a small wooden peg was driven into the cheese but I find it just as easy to use an elastic band to hold the spruce strip. For the fancy presentation, tying a piece of raffia to hold this would add a touch of rusticity.
When done I lay the cheese on a dry piece of draining cloth placed on a small dry board to absorb any moisture being released. At this point and for the next 3-4 days they should be kept warm at 68-72F and moist at 85-88% humidity. This will encourage the initial surface growth
In a day or so the surface will begin to darken slightly but do not let it dry. A damp surface will be needed to promote the surface growth to come.
-


Aging
After 3-5 days, the cheese should show signs of a new surface forming. This will begin as a natural yeast (greasy) and gradually show as a thin white mold appearing. This is the result of the small amount of Geotrichum you originally added to the milk.
Once it is apparent that the new surface is beginning to develop (4-7 days), the cheese can be moved to a cooler cave at 52-56F with a moisture of 90%. In my cave maintained at 83-85% moisture, I use covered plastic trays for this. By cracking the lids just slightly, I can keep a good moisture there.
As the surface begins to develop more, it is time to wash the cheese using a light brine (~6%) made up fresh for each application using about 1 tbs of salt per cup of cool water. You may optionally add a pinch of Geotrichum to the wash water if surface mold is slow to grow (do this 6-8 hrs before using). I normally find this uneccesary.
The cheese should be taken from its cave, turned, and the new top surface and sides should be lightly wiped with the brine. The cheese is then placed back onto a dry board (inside my plastic box here) and back to the cave. In 2-3 days repeat this by turning and wiping the new surface.
Each wash, will knock the surface growth back somewhat but it will regrow stronger. The salt and moisture help. The surface should never be wet but should remain dampish. It is this surface flora that changes the proteins internally during aging.
Mold should continue to redevelop leaving a white to pinkish surface. Continue this for 5-6 weeks. As the cheese ripens, enzymes from the surface mold will begin to decrease the acidity and the paste will soften.
The aging may continue for another month or longer until the interior softens to the desired degree. The only care at this point is to prevent them from drying.
At 5 weeks this batch of cheese from my cave has developed a nice mold surface and moving along nicely as shown below.
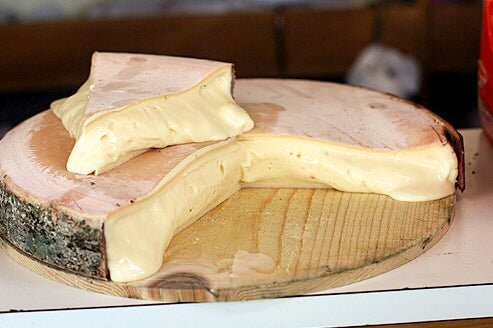
When the cheese is ripe the surface becomes softer until the entire body turns to a very soonable/spreadable paste.
Some like the paste still holding a cut others wait until it is very runny and cut the top away and dip in with a spoon or piece of bread.
The final photo above shows it all, the soft interior, the beautiful crust, and the spruce band all holding it together.
Cheese Making Supplies
Related Products
You May Also Like


