


Dry Jack Cheese Recipe
-

Yield
6 Pounds
-

Aging Time
~6 Months
-

Skill Level
Intermediate
-

Author
Jim Wallace


Dry Jack Cheese Recipe Info
About Dry Jack Cheese
History of Monterey and Dry Jack
The Legacy of Ig Vella and Sonoma Dry Jack
Flavor, Texture, and Uses
Ingredients
Total price for selected items: Total price:

Instructions
A Recipe for Making Your Own Dry Jack at Home
This recipe might not be for the start-up cheese maker, but anyone that has made a few hard cheeses is perhaps ready to take it on.
I have chosen to do a 6 gallon recipe because using a larger mass for forming in the cloth making the final cheese a much more spectacular presentation (and the larger surface makes it easier to balance my final press free weight).
Of Coarse the recipe can be scaled down proportionately for a 2 gallon batch and the cheese can be done in a small mold with cloth. The smaller cheese does not lend itself to forming into a ball in the cloth so does not have the organic character of using just the natural cloth to form it but will work just fine.
For making a 2 gallon batch Use:
- 2 Gallons of Whole Milk
- 1 Packet C101 Mesophilic Culture
- 1 ml (just under 1/4 tsp) Single Strength Liquid Rennet
The rest of the recipe will be the same as detailed below EXCEPT that the weight will be reduced to:
- 8 lbs (about 1 gallon of water) for 2 hrs and
- 16 lbs for the overnight pressing
-

Acidify & Heat Milk
Begin by heating the milk to 90-92°F (32-33°C). You do this by placing the milk in a pot or sink of very warm water. If you do this in a pot on the stove make sure you heat the milk slowly and stir it well as it heats.
Once the milk is at the correct temperature, the culture can be added. To prevent the powder from caking and sinking in clumps, sprinkle the powder over the surface of the milk and then allow about 2 minutes for the powder to re-hydrate before stirring it in.
Allow this milk to ripen for about 45 minutes, stirring occasionally to keep the cream from rising.
-

Coagulate with Rennet
Now add about 3 ml or a bit more than 1/2 tsp of single strength liquid rennet.
The milk now needs to sit still for 40 minutes while the culture works and the rennet coagulates the curd. The thermal mass of the milk should keep it warm during this period. It is OK if the temp drops a few degrees during this time.
You should notice the milk beginning to thicken at about 16 minutes, but allow it to harden the full time or until you get a firm curd. If the curd is not firm enough to cut at the end of the 40 minutes, allow it to sit longer until a clean break shows in the curd when tested. If it takes longer than 50 minutes you should increase the rennet proportionately the next time you make this cheese.
If the milk begins to thicken sooner than the 16 minutes, use less rennet in the next batch.
-


Cut Curds & Release Whey
Once the firm curd has formed, it is time to cut the curd and release the whey. The smaller you cut, the drier the final cheese and the longer it can be aged for more complex flavors. Here I usually begin my cut (pre-cut) with a large cross cut of the surface as shown below, then wait 5 minutes for the whey to rise before continuing. I then use a large whisk with expanded wires to cut the cheese into smaller pieces. I generally work to a 1/2-3/8" cut size in the initial curd.
-


Cook Curds & Remove Whey
Now it is time to begin drying out the curds. This will be done by increasing the heat slowly to 102°F (39°C). The heat needs to be increased slowly, about 1-2F every 5 minutes. The total cooking time will be 45 minutes.
The final curds should be cooked well through and should be examined to make sure that enough moisture has been removed. A broken curd should be firm throughout and the curds should have a moderate resistance when pressed between the fingers.
When this point is reached, the curds can be allowed to settle under the whey then remove 50% of the whey to just above the curd level. The whey removal will slow the bacteria activity by removing a good portion of it's food source (lactose in whey).
This would be a good time to make sure the draining cloth and colander have been sanitized and ready for the curd transfer after the next step.
-


Wash Curds
This next step is specific to the Jack style cheese and involves washing the curds with cool water (60F). This will result in a higher moisture curd as the cool water begins to migrate into the curd. At the same time this will cool the cheese and further reduce the activity of the bacteria due to the cooling cheese mass.
Add enough of the 60°F water (about 3-4 quarts) to cool the curds to 86°F, then continue to stir the curds over the next 15 minutes.
This should have taken about 4.5 hours up to this point and the curds should be ready to transfer.
-


Drain Curds
This would be a good time to weigh out the salt because the salt will be added to the curds before molding. I find the curd weight to be about 6.25 lbs and I use about 2.5% salt (2.5 ozs). This tends to provide about 1.7-1/9% salt in the final cheese, considering the brine lost in whey run-off during pressing.
The whey can now be removed again down to the curd level and the dry curds can be transferred to a colander lined with butter muslin. They should be allowed to drain for 10-20 minutes and a gentle stirring will make sure that the whey drains off.
-


Salt Curds
The salt can now be added to the drained curd in 2 separate additions, while stirring the curds well for salt distribution and to encourage the final whey drainage. Leave about 10 minutes between additions to allow the salt to dissolve and be absorbed by the curd.
-


Form the Cheese
The next step begins the curd consolidation and shaping of the final form (I just think this is such an interesting and simple way to form a cheese). It's only drawback is the limited weight that the cloth will take, but this is the way it has been made since the 'get-go' and I do love a challenge.
I begin by gathering the four corners of the cloth and pulling them together to enclose the curd mass. You want to have a big enough cloth so that there are no gaps below the knot.
Next the curd mass is gently formed into a round ball while pulling the loose ends of cloth up through your grip as the curd begins to consolidate into it's final form. This final form is accomplished with the help of a firmer hand pressure and in some cases a bit of body weight on the ball, along with a lot of rolling back and forth on a smooth surface. A large tray will be useful for this because some whey is still running off during the process.
-


Pressing
Once the curd is formed into a nice tight round ball, the cloth should be tied off tight and as close to the curd mass as possible. The next step is to place the ball with the knot upwards on a hard board and spread the cloth as evenly as possible around the surface.
Following this, another board is placed on top.
Now for the challenge of keeping a board and weight level on top of a round ball!
I will leave you to your own inventive ways for this, but what I have done here is to use the edge of my draining sink as a stable surface to keep a third board anchored and then with spacers between the top press board and the third board, I have a rather stable and level platform for my weights. The photos should make this pretty clear. As the weight compresses the curd, more spacers were added to keep the top board level to prevent a lop-sided cheese.
This pressing is much more simplified when done in a larger production because they have many of these being pressed under a much larger board. I believe they use large plastic buckets of water for the weight as well.
For pressing weight you should begin very light and slowly increase the weight to a moderate level:
- 2 hours at 25 lbs.
- 8-12 hours at 50 lbs
-


Pressing (cont.)
The next morning, the cheese should be well formed and fully consolidated. If it is not, then a longer pressing with increased weight should be done until you see a fully consolidated cheese.
The top of the cheese will show the unique pattern of the cloth and a small 'belly button' where the cloth was tied, but the bottom and sides should show a nice smooth surface.
Allow the new cheese to dry at room temp for 5-10 days until the surface seems dry to the touch. Avoid too dry a space to prevent any cracking or curd separation.
It should be turned daily and any mold that appears should be rubbed off with a medium textured cloth or brush as shown above. At the end of this drying time the surface will have begun to dry more and be ready for it's final surface rub.
-


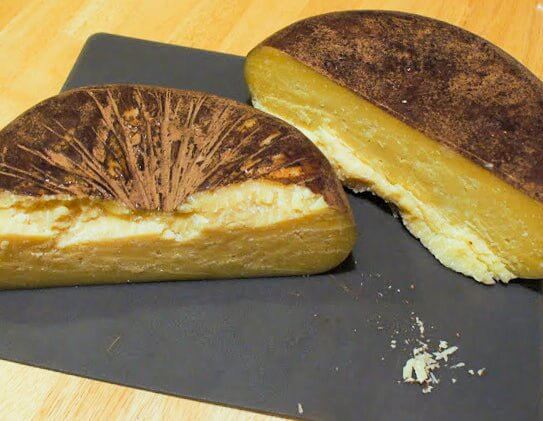
Create & Apply Surface Rub
Here is where the fun begins. The dark rub will create a surface that is less attractive to molds and be easier to keep clean. I also think that it adds a bit of aroma and flavor to the cheese.
Prepare the rub:
- 1tsp espresso beans
- 2 tbs cocoa nibs
- 1.5 tsp black pepper
- 3-3.5 tbs olive oil
Above, I show a collection of cocoa nibs (raw unsweetened), dark espresso beans, and black pepper, all needing to be ground fine before adding to the oil.
I begin with the cheese that has been drying for a few days in the aging space and has been cleaned of any mold that developed during that time.
Next, we gather our ingredients for the rub as shown above. It is best to reduce them to a very fine powder to make the smoothest paste for application. I have found it best to make this a day before the application because the powder takes some time to absorb the oil. The paste needs to be mixed very well and you may find that more oil is needed as the ingredients absorb the oil.
Now, it's time to return to our younger side to get our hands in the mud and rub it all over the surface. Make sure you rub it into all of the cracks and crevices.
Yes, it's messy, but it's also a lot of fun. It is best to apply this rub to only one side and edge, then wait for a day or so before turning and applying to the other side.
-


Re-Apply Surface Rub
Wait 2 or 3 days and repeat the rub. Two to three applications should be sufficient to protect the surface. If it does seem to dry out, you can rub the surface with just a little oil again. The oil is what keeps the mold from getting serious about attaching to the surface.
Aging should then continue as before with 52-56F and 80-85% moisture, turning and wiping any surface mold as it develops. The amount of time you age should be at least 6-9 months, but better if you can hold out and age it for a year and longer.
Cheese Making Supplies
Related Products
You May Also Like


