


Fourme d'Ambert Cheese Making Recipe
-

Yield
2 Pounds
-

Aging Time
~2 Months
-

Skill Level
Advanced
-

Author
Jim Wallace


Fourme d'Ambert Cheese Making Recipe Info
Fourme d’Ambert Overview
The Auvergne Region
Fourme d’Ambert Cheese Making
History and Variations
Ingredients
Total price for selected items: Total price:

Instructions
A Recipe for making Fourme Ambert
I managed to get Mark to order some of the traditional tall Fourme d' Ambert forms for me, so many of the pictures show the 7 gallon batch, but I have also made it in the 2 gallon size, which suits some of our small scale cheese makers.
The guideline below is focused on the 2 gallon batch size. For the larger size just multiply all ingredients proportionately.
-

Acidify & Heat Milk
Begin by heating the milk to 90°F. You do this by placing the milk in a pot or sink of very warm water. If you do this in a pot on the stove, make sure you heat the milk slowly and stir it well as it heats.
The 2 gallon milk for this cheese should be a full fat milk because it is the butterfat that the blue mold will be working on. Also, homogenization is good for this cheese because it releases the fat from its protective surface to allow the blue better access during ripening.
This milk should be heated to 90°F. This provides a good compromise temperature between the two cultures that will be working, one being Mesophilic and the other being Thermophilic.
While the milk is heating, add 1/16 teaspoon of the blue mold to 1/4 cup cool water to begin re-hydrating the mold spores.
Once the milk has heated, add 1/4 teaspoon of MA4002 then the rehydrate blue and stir it all in well. Then let it sit quiet to ripen for 45 to 60 minutes. The temperature can be maintained best if it sits in a water bath.
-

Coagulate with Rennet
Next, add 1 ml of rennet after mixing with 1/4 cup cool water
The milk now needs to sit quiet for 50-55 minutes while the culture works and the rennet coagulates the curd. You should notice that the milk begins to thicken (flocculation) in about 15 minutes but leave it to sit quiet for the full time. Cheese Geek Alert: Flocculation time about 15 minutes but total coagulation (15x3.5) time will be 50-55 minutes from time rennet is added.
The thermal mass of this milk should keep it warm during this period. It is OK if the temp drops a few degrees during this time, but needs to be brought back to temp after cutting the curds. Using a water bath would avoid this though.
The final curd should split cleanly and be quite firm.
-


Cut & Cook Curds
Once you have a firm curd, cut to 3/8 inch then rest five minutes. Only a small amount of acid will have developed at this point.
Now it is time to begin drying out the curds. This cheese does not require a higher cooking temperature but maintain the original start temperature throughout this process.
The following steps will be a slow and gentle stir, the objective is to retain as much internal moisture as possible but forming a good coat on the outside of the curd. This is called "Coating the Grains". The physical condition of the curds should be such that they remain separated until they go into the final mold. This separation will leave many small channels and opening that the blue mold will be able to grow in.
First Stirring: Begin very gently and slowly for 25 minutes. The objective is to harden the outside but yet leave as much moisture as possible without breaking the curds. Then let rest for 5 min.
Second Stirring: Begin stirring for five minutes, then remove 15% of the whey. The curds at this phase can now be stirred a bit more quickly until a good firm coat appears. This refers to a tougher skin forming on the outside while the interior remains moister. This "coating the grains" when successfully done will keep the curds from completely sticking together when molded. These small cracks and openings will be where the blue mold grows.
A good curd can be determined by the appearance:
- Rounded surfaces
- Surface is matte and no longer shiny
- When pressure is applied, the curd breaks
Total stir time is about 40 min. but this stir can be continued for another 10 minutes or so if needed. This may take some practice to determine a proper curd dryness.
-


Dry the Curds
The curd now needs to be transferred to a surface for draining. They must not consolidate but be kept separate.
Immediately begin hand stir to avoid consolidation. Here I have a draining table with a drain at one end. Another good option would be a large plastic dishpan with holes poked into it (I use a hot nail to do this) to allow the whey to drain off. Another option is a colander lined with Butter Muslin. Being creative here can help. Commercially they do this on vibrating conveyor screens.
Using your hands or a broad scoop keep the curds separated by turning them over and over until the surfaces seem dry and they tend to consolidate much less.
A certain amount of cooling and oxidation on the surface will help with this but do not overdo it because you want the curds to still consolidate over time in the mold.
At this point very little acid has developed (pH 6.2) and the curds will be going to the molds with much work to be done by the bacteria, so do not let them cool too much. Conditioning is rather subjective here so a bit of experience may be needed before you find just the right point to mold.
Essentially your curd pile should look like popcorn now.
-


Mold the Curds
The mold should be an open ended mold with a draining mat below (a second mat is handy for turning the mold later).
Have this already cleaned and sanitized at this point. The tall mold I show here is our M113 Fourme d'Ambert Cheese Mold and is for the large 7 gallon batch. This is the traditional mold made for the Fourme Ambert. It holds about 6-7 gallons of milk as curds.
The M3 Small Hard Cheese Mold I mention above may have difficulties holding all of the curds if they are too moist, but will retain a higher profile than the stainless mold which has a wider dimension and result in a lower form cheese.
This is the point at which your curds need to be just the right moisture and firmness before going into the mold.
- Too much moisture and they will just consolidate into a blind cheese where blue only grows in the punch holes done later.
- Too dry and the cheese will be difficult to form a consolidated mass.
Take lots of notes on what you do and timing at this point.
Transfer the curds to the mold when you think they are ready.
-


Pressing
For the full size traditional tall mold from 7 gallons, there is no weight needed for pressing because the curd mass will be enough weight to consolidate the curds enough.
For the M3 Small Hard Cheese Mold and E28M Stainless Steel Cheese Molds with lower curd mass from only 2 gallons, I suggest adding 4-6 lbs of weight on top of the curd to help consolidate.
At this point the curds should be kept warm and not allowed to drop below 75-80°F for the next 6-8 hrs. This will keep the bacteria happy and convert the lactose.
The rate of whey running from the mold should be slow and amount to small tear drops coming from the drain holes (as shown on the left) at a moderate speed. This whey is being slowly released as the slowly acidifying curd continues to release whey.
The form should be turned over at the following intervals:
30 min, 1 hr, 2 hrs, 4 hrs, 8 hrs (or next AM) and then should be ready to be removed.
The final acid should have been reached by the next AM (pH 5.3)
At each turn the weight of the curds will settle the cheese in the form a little more and the surface will become more consolidated.
-


Salting
Once the cheese is removed from the mold it should look quite well consolidated but with many small openings showing on the surface as in the pic to the right. This should give you an idea of the internal array of fissures and openings to accommodate the blue mold growth.
You just need to find the 'sweet spot' between the two conditions above.
The unsalted cheese is then left to rest for 2-3 days at a room temp of 70-75°F before salting, allowing the final fermentation to complete.
The cheese will then be ready for salting. This cheese relies on dry salting instead of brining. The tradition is 5% salt by weight but I find that 4% salt works nicely here. This is a lot of salt to some folks but it is essential to keep other molds down and allow the blue to develop.
The salt is applied to the surface over 2-3 days. I weigh the total salt out for each cheese and then sprinkle a portion (about 1/3) on the surface and spread evenly across the surface as well as top and bottom, then wait for this to form a brine and sink into the cheese, then repeat for the remaining salt in 1/3 doses.
It will extract some moisture during the salting so make sure you provide a surface for it to run off.
Dry salting differs from brining in that the salt is introduced in stages and, without the help of the normal brine, leaves a heavier concentration near the rind and protects the surface from extraneous molds for a while until the blue can set up a cover with a bit of white from natural geotrichum (sometimes added).
If the cheese does contain higher moisture, the red/orange molds will grow as in a washed rind but do not wash these. This is more common in the Montbrison style due to a bit higher moisture in their cheeses.
-


Aging
Once the salting is completed, the cheese should rest for several days before being moved to the cool cave (52-54°F 80-85% moisture). You may also notice that the cheese will bulge a bit with higher moisture as shown in the picture here.
In about a week you should note blue mold developing in the fissures and cracks of the surface. At this time the surface should be punched with a sanitized thin metal probe at about 1 inch intervals to allow air into the cheese interior. Remember, the blue is an aerobic mold and needs air to grow.
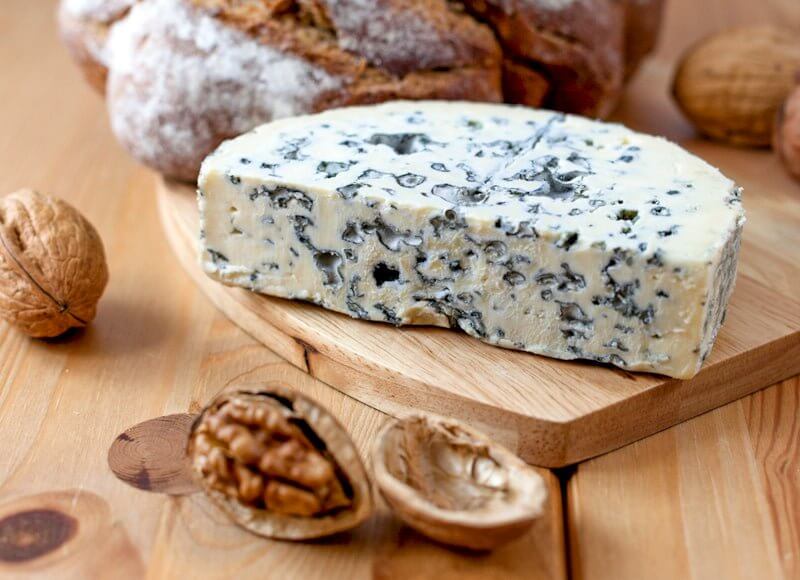
In about 3-4 more weeks, the cheese should be developing a nice pattern of blue mold throughout the interior.
This mold now needs to have some time at cooler temperatures to allow the enzymes produced by this mold to do its magic on the proteins and butterfat and develop a typical flavor.
They will often use a tool called a trier to examine the mold development as shown below
Once it has been determined that the blue is developing nicely internally, the cheese can be moved to a cool room at 42°F to slow the development and increase the complexity of aroma and flavor.
The smaller cheese pictured above was made with two gallons of milk pressed in the M3 Small Hard Cheese Mold, the larger cheese was made with seven gallons of milk and pressed in the M113 Fourme d'Ambert Cheese Mold.
Cheese Making Supplies
Related Products
You May Also Like


