


Goat Milk Tomme Cheese Making Recipe
-

Yield
2 Pounds
-

Aging Time
~3 Months
-

Skill Level
Intermediate
-

Author
Jim Wallace


Goat Milk Tomme Cheese Making Recipe Info
Goat Milk Tomme Inspiration
Traditional Goat Milk Tomme
History of Goat Milk Tomme
About Goat Milk Tomme
Ingredients
Total price for selected items: Total price:

Instructions
Recipe for a Medium Aged Goat Milk Tomme
The recipe below is for a 2 gallon batch, but it can easily doubled by increasing the milk and ingredients proportionately.
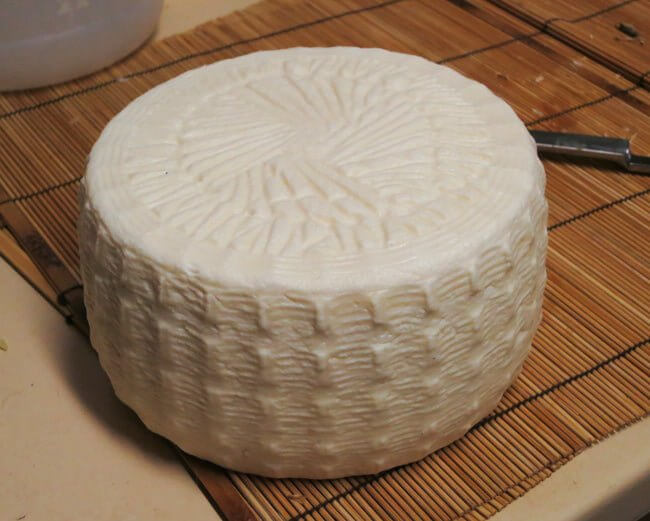
My pictures below show a double batch (4 gal) and using a patterned basket cheese mold because I really love the shape and imprint it leaves. Using a small hard cheese mold will leave a nice smooth surface and is easier for those that choose to wax.
-

Acidify & Heat Milk
Begin by heating the milk to 88F. You do this by placing the pot of milk into another pot or sink of very warm water. If you do this in a pot on the stove make sure you heat the milk slowly and stir it well as it heats
Once the milk is at 88F the culture can be added. To prevent the powder from caking and sinking in clumps sprinkle the powder over the surface of the milk and then allow about 2 minutes for the powder to re-hydrate before stirring it in.
Once the culture has been well distributed, cover the milk to allow the bacteria to do its initial work (converting a small amount of lactose to lactic acid). This small amount of acid will help the rennet to form a good curd and the milk will be well on its way to providing a good conversion of lactose to lactic acid. The milk now needs to sit quiet while the culture begins its work. It should be kept at the 88F for about 1 hour.
-

Coagulatie with Rennet
Now add about 1/8tsp of single strength liquid rennet and stir it in for about 1minute. The milk now needs to sit quiet for 60 minutes while the rennet coagulates the curd.
You should notice that the milk seems to thicken at about 15 minutes, this is the initial coming together of the coagulating proteins but do not cut at this time, wait the full 60 minutes and test for a firm curd before you begin to cut. If the milk is not firmly coagulated at 60 min., wait a few more minutes for signs of a firm curd. If it seems to have set too firm (very clear whey in the cut) this is a sign you need to use less rennet next time (-15%). If the curd was too soft use a bit more rennet (+15%) next time. If using raw milk, you will find that this amount needs to be varied through the season as the milk components change with the seasons and their feed/forage changes.
This long time from the first thickening (15min) to the final curd ready to cut (60 min and a factor of 4) is longer than many other cheeses (usually a factor of 2.5-3) but it will bring more moisture into the consolidated curd package and the finished cheese will contain more moisture. It will be this higher moisture that allows it to age quicker.
The thermal mass of this milk should keep it warm during this period. Placing in a sink of warm water will help. It is OK if the temp drops a couple degrees during this time but not below 86F.
-


Cut Curds & Remove Whey
Once the solid curd has formed you can begin to cut the curds into 1/4-3/8 inch pieces. Begin with a vertical cut first north to south and east to west, ending with a checkerboard looking surface.
Next, use the flat ladle or spoon to cut horizontally to the same size (this one takes practice but gets easier over time).
The photo above shows an experimental curd cutter I'm trying out, instead of the spoon for horizontal cuts.
The smaller the curd is cut, the drier the cheese
Once the curd has been cut, allow the whey to rise and the curds to settle for about 3-5 minutes while the new cut edges heal. This will allow you to stir without breaking the curds again as much. Then begin a slow bottom to top movement of the curd to get them all separated and freely floating. They will be very soft and mushy in your hand at this point so be very gentle with this.
-


Cook the Curds
Now it is time to begin drying out the curds. This is sometimes done by heating the curd as well as stirring but for this moister early aging cheese we will not heat above our original temperature. The curds should be quickly brought back to the original 88F if they have cooled at all. The stirring is simply a gentle lifting of the curds bottom to top so that all of the curds are floating individually and all surfaces are exposed to the whey. This will aid in the expulsion of whey and the curds slowly lose some moisture.
The total stirring time will be about 35-45 minutes but may be extended by another 10-15minutes if the curds are still soft.
The photos above show the change in curd appearance during the stirring phase.
I find that it normally takes about 60 minutes from the beginning of the curd cut until the curds are ready to be drained and place in the form.
The final curds should be cooked well through and should be examined to make sure that enough moisture has been removed. A broken curd should be firm throughout and the curds should have a moderate resistance when pressed between the fingers. These will definitely be moister and softer than those for cheddar
The The second set of photos above, shows a simple test for dryness. Take a small handful of curds and press firmly in your hand. After being squeezed, the curds should easily seperate with a bit of thumb pressure.
If the curd does not consolidate well, then likely it is too dry (make larger cuts and stir for less time next in your next batch).
The photo above shows the curds after being squeezed and then seperating form a light press with the thumb, this is ideal. If they do not separate easily, they are likely too moist and need a bit more stirring.
When the curds are done let them settle under the whey.
-


Remove Whey & Form Curds
Once the curds have settled you can remove the whey down to about 1 inch or less left above the curd mass.
Before transferring, give the curds and remaining whey a quick stir to make sure they are nicely separated.
The finished curds can now be transferred to a form lined with the draining cloth.
After the initial flush of whey a light hand pressure to even out the surface curds and the cloth can be folded over the top. Place the follower on top of this and you will be ready to press.
-


Pressing
So, for pressing we should begin very light and slowly increase the press weight to a moderate level:
- 1 hr. at 15 lbs (at the end of this step the cloth can be removed if using a basket mold as shown)
- 1.5 hr. at 25 lbs
- 2 hr. at 25 lbs
- remove weights and allow the cheese to drop to room temp
The rate of whey running off is simply a matter of drops and not a stream of whey being released. This is a good rate of whey removal during pressing and will slow even more as the residual free moisture is released. The form should show tears of whey weeping from the form very slowly. When this stops you can increase the weight slightly. The cheese should be removed from the press, unwrapped, turned, rewrapped, and put back to the press at the above intervals to assure an even consolidation. At each turn you will notice the cheese has formed a smoother surface and rests lower in the mold.
During the pressing, the cheese is still actively fermenting and needs to stay warm. The initial temperature should remain in the 80-90F range and then gradually drop to about 70F over the press period. This temperature then needs to be held overnight while the final work of the bacteria completes. During this period more whey will be dripping as lactose is converted to lactic acid.
In a normal cheese room, the temperature is usually high enough to keep the culture happy and working but if making a single cheese the room will probably be much cooler. Some innovation needs to be introduced to keep the bacteria working. Here I simply use a small cooler with the cheese form raised above some warm water to keep the bacteria happy. Since a press can not fit in this incubator, my press weights are simple flat weights balanced on top of the cheese for pressing. Sometimes its these little challenges in cheese making that make it more interesting
-

Salting
You should have a saturated brine prepared for salting this cheese. You will find all of the details you need on brining here.
Here is a simple brine formula:
1 gallon of water to which is added 2.25 lbs of salt, 1tbs. calcium chloride (30% solution), and 1 tsp. white vinegar.
The cheese now needs to be set in the brine for about 1-1.5 hours per pound of weight.
The cheese will float above the brine surface so sprinkle another teaspoon or 2 of salt on the top surface of the cheese. Flip the cheese and resalt the surface about half way through the brine period.
At the end of the brine bath, wipe the surface and allow the cheese to surface dry for a day or two before waxing. The surface will darken somewhat during this time.
-

Aging
The cheese can now be waxed for aging. For details on waxing the details are here. This is the easiest way but no where near as interesting as developing a Natural Rind
My preference would be to develop a Natural Rind and this would be a great cheese for this if you have not done it. It is a little more work but makes for a more interesting cheese both aesthetically and flavor wise. You do this by first allowing the cheese to dry down for 2-4 days until the surface darkens slightly and all damp spots disappear.
The cheese can then be placed into your aging space at 52-56F and 80-85% moisture.
Turn it and examine every day for mold spots developing. When they begin to appear, you will need to use a dry brush (like a scrub brush but with medium to soft bristles) to remove the mold. I prefer to use a brush with natural bristles because they have a 'tooth' that seems to clean the cheese better. In the beginning, this needs to be done daily but as the surface dries down more, it does not support the mold development as well and soon you will find that the frequency becomes longer between brushings. At about 3-4 weeks I usually find a light rub with olive oil makes cleaning easier.
The cheese can now be aged for 2-3 months (or longer) and it will ready for your table.
Cheese Making Supplies
Related Products
You May Also Like


