


Queso Oaxaca Recipe
Stories say that in the 1950's, Italian influence came into the area and was the methodology behind this cheese, but many elders say they remember this cheese well before then. Although this cheese is much like Italian Mozzarella, research shows it's quite different in how it evolved.
-

Yield
2 Pounds
-

Aging Time
None
-

Skill Level
Intermediate
-

Author
Jim Wallace


Queso Oaxaca Recipe Info
Oaxaca Info
Where Queso Oaxaca Comes From
Varieties of Stretched Curd Cheese
Large Batch Queso Oaxaca
Ingredients
Total price for selected items: Total price:

Instructions
-

Acidify & Heat Milk
Heat the milk to 94¡F. Do this by placing a pot of milk into a larger pot of water or sink of very warm water. If you heat directly on the stove top make sure the milk heats slowly and is stirred while heating.
Once heated to 94¡F the culture can be added. To prevent the culture from caking and sinking in clumps, sprinkle the culture over the surface of the milk and wait 2 minutes for the culture to re-hydrate before stirring it in.
Note: If using yogurt as the culture, make sure it's fresh and stirred to eliminate clumps before adding it to the milk.
The milk now needs to be kept at this target temperature until it is time to increase for cooking the curds. Let the milk sit quietly for the 3 hours (Yes this is much longer than normal) to allow the culture ripen. It will be very slow initially but will soon kick into a more rapid rate of converting lactose to lactic acid
Traditionally, this cheese was made with raw milk, which in warm climate of Mexico would develop considerable acid before adding rennet. Because of this rennet is added at very high levels of acid development hence the long 3 hr ripening time before adding rennet.
-

Coagulate with Rennet
Now it's time to add just over 1/4 tsp (1.6 ml) of single strength liquid rennet. This is less rennet than many other recipes, since the milk is ripened to a higher acid level it will coagulate quickly.
Let the milk sit quiet for 30 minutes while the rennet coagulates the curd. The thermal mass of the milk should keep it warm during this period. It's ok if the temp drops a few degrees during this time. You will likely notice the milk thickening (just touch it with the flat of a knife to see this) in about 15 minutes but allow it sit for the full 30 minutes before it's cut.
Note: If it takes more time just let it go until you see a good firm curd. You may need to increase the rennet next time if this is the case.
-


Cut Curds & Release Whey
Once you have a firm curd, the curd can be cut into 1/2-5/8 inch pieces. You can cut the curd into 3/4 inch if you prefer a moister cheese. Once cut heat the curds to 100¡F with minimal stirring for about 30 minutes then allow the curds to rest at the bottom of the pot for 5-10 minutes.
To cut the curds, I begin with a large 1 inch crosscut. Next I allow the curds to rest for about 5 minutes before using a loosened whisk to break the curds down into smaller pieces.
During this portion, the curds will not dry out much and the sweet whey provides food for further acid production.
-


Develop Final Acid
The whey can now be removed and the curds can be transferred to a colander or cheese mold lined with butter muslin.
The cheese needs several hours to develop its acidity. It's important to keep the cheese at 95-100¡F during this time to encourage acid development. The incubation chamber I use is quite simple:
- Place 2-3" of water or whey at 110-115¡F in the bottom of a large pot or insulated cooler.
- Use a spacer into the pot or cooler, an empty cheese mold works well, the top of the space needs to be above the water level.
- Place the cheese still in its draining mold or colander on top of the space, be sure the cheese is not submerged in the water.
- Put a lid on the pot or close the cooler and let it sit for 2 hours. The cheese should be turned in the form after the first hour.
The final acid will be reached after 2-4 hours depending on how warm you keep the cheese. In some cases it may take longer.
During this time you should heat water for stretching in the next step (whey can also be used). I usually bring the water to a simmer at about 185¡F.
The traditional way to test the final curd is to cut a small piece and place it in hot water 175¡F for about 5 minutes. When it's ready it will stretch with little to no effort.
If the curd shows no sign of stretching leave for another half hour and test again. Repeat this at 30 minute intervals until you see signs of stretching. If the curd stretches but then breaks, repeat the test at 15 minute intervals.
This method was used before there was a way to accurately test for acid levels and is still widely used today.
-


Heating the Curds
This step combines acid development and heat which will change the final structure and texture of the finished cheese. It's important to have enough moisture in the cheese, the correct final acid, and the cheese body at the right temperature.
Once your test has shown a good stretch, the curd is ready for the final stage. Begin by slicing the curd mass into long thin strips. This will allow the hot water to evenly heat the curd.
Next pour some of the hot water/whey into a bowl with the cheese strips. Do not pour the hot water directly on the strips (that will cause portions to become too hot), pour the hot water around the edges.
Quickly work the curds to keep them separate and evenly heated. I find that in about 5-10 minutes the cool curds and hot water will stabilize at about 145¡F (measure the water). Keep the curds separate until you begin to notice them stretching on their own as you move them around.
Check the water to make sure it has not cooled too much, add more hot water if needed. Once the curds meld (not melt) together, you can begin to consolidate into a single mass.
Note: Dipping your hands into a bowl of ice cold water periodically while handling the hot curds will help protect your hands. You could also wear food safe gloves while stretching the curds.
-


Stretching the Curds
Begin stretching by slowly lifting the large cheese mass from its bottom center, use a heavy wooden spoon or paddle for this, it will be very hot. What you are looking for is the curd to show stretching under its own weight. This always starts out very slowly as the protein structure begins to change.
Allow the curd to stretch enough to be able to fold double on itself and then repeat. Do this 2-3 times.
If the stretching seems to slow drop the mass back into hot water/whey and check and adjust the temperature if it dropped.
Once the initial stretching is done you'll need to work with your hands. The curd will be almost too hot to handle at this point but as I have seen done so many times in Italy, dipping your hands in cold water will give you about 30 seconds or more to handle it. Gloves can be used but are often cumbersome.
Italian Mozzarella only needs a few long stretches but Oaxaca needs to be stretched and stretched again into 3/4 to 1 inch wide wide bands like a a rope, about 1/2 inch thick. The cheese should be continually returned to hot water as it's stretched to keep it at the right temperature.
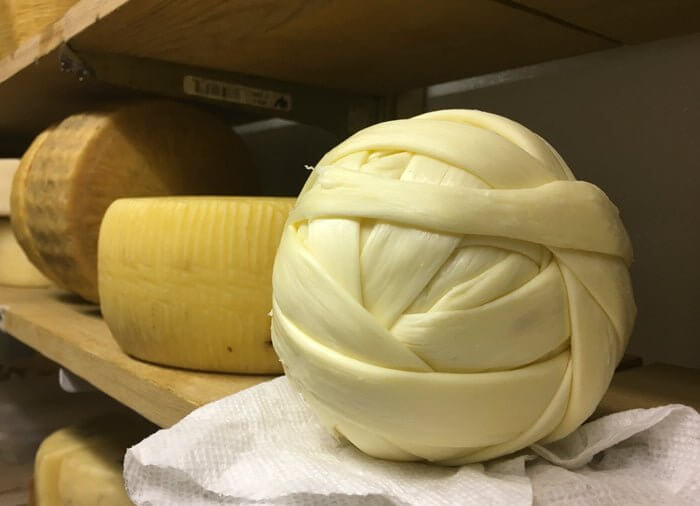
The stretch continues repeatedly as one continuous strand. At first it will be a long thick rope and then eventually it will become wide bands of cheese. The stretched bands should be placed into cold water to chill before rolling into a final ball, characteristic of Queso Oaxaca.
-


Wrapping the Curds
Once slightly chilled, the bands can be wound together, into a ball, somewhat like a ball of yarn or string.
The chilled curd will not consolidate with other layers which makes it easier to wrap while forming a ball. The rapid chilling also allows makes the cheese naturally form into thin threads like string cheese when it's pulled apart.
-

Salting
You will need a saturated brine prepared for salting this cheese, find all of the details you need on brining here.
A simple brine formula is:
- 1 gallon of water
- 2.25 lbs of salt
- 1tbs. calcium chloride
- 1 tsp. white vinegar
- Bring the brine and cheese to 50-55¡F before using
The cheese should be salted in the brine for about 1.5-2 hrs per pound of cheese. This is less time than normal for a cheese this size because it's fairly open and has a greater surface area for salt to penetrate.
The cheese will float above the brine surface so sprinkle another teaspoon of salt on top of the cheese surface.
Flip the cheese and re-salt the surface half way through the brine period.
-


Finished Cheese
This cheese does not need to age, it's made to be eaten fresh. If you'd like to store it, simply place it into a covered container in the fridge where it will last for 1-1.5 weeks.
I often place the salted cheese on a shelf in my cheese cave where it will last for a week to 10 days.
For Commercial storage Oaxaca is packed in a vacuum seal. But traditionally it would be made and go to market the same day and is best when eaten the same day.
Cheese Making Supplies
Related Products
You May Also Like


%20region%20of%20Mexico.%20It's%20a%20beautiful,%20stretched%20curd%20cheese,%20wound%20into%20a%20ball%20for%20a%20unique%20presentation.%20Commonly%20known%20as%20Quesillo,%20it%20is,%20by%20far,%20the%20mos...
)