


Sao Jorge Cheese Making Recipe
-

Aging Time
~6 Months
-

Skill Level
Intermediate
-

Author
Jim Wallace


Sao Jorge Cheese Making Recipe Info
Inspiration Behind São Jorge
São Jorge’s Island Origins
About São Jorge Cheese
Aging & Variations of São Jorge
Ingredients
Total price for selected items: Total price:

Instructions
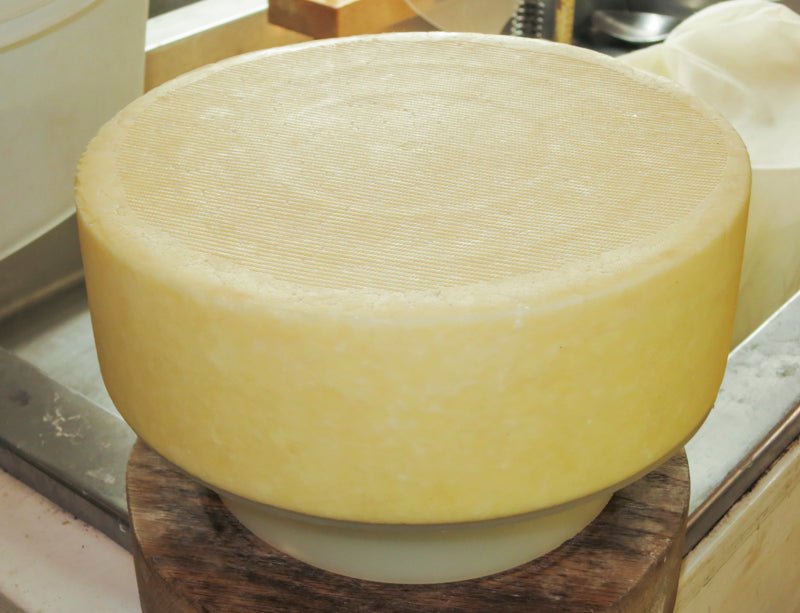
The recipe below is for a 2 gallon batch of milk, but can be increased by changing the additions proportionately to the amount of milk. For a larger diameter cheese, more pressing weight will be required. Do not be surprised by the pictures showing a larger mold and final cheese since I prefer making larger batches, especially since larger batches are the same amount of work as smaller batches.
-

Heat & Acidify Milk
Begin by heating the milk to 87F (30C). You do this by placing the milk in a pot or sink of very warm water. If you do this in a pot on the stove, make sure you heat the milk slowly and stir it well as it heats
As mentioned earlier, the traditional culture used in the Azores is a whey from previous batches of cheese and this would most likely account for a complex mix of Mesophilic and Thermophilic cultures. Our MA4002 culture is the best match for this mix of bacteria. It contains a Mesophilic complex with a slight gas production, which will help with the more open texture found in the traditional São Jorge cheese. The Thermophilic portion of the culture will help in aging the cheese. The culture contains the following culture components: Lactococcus lactis subsp. lactis, Lactococcus lactis subsp. cremoris, Lactococcus lactis subsp. diacetylactis, Streptococcus thermophilus.
Once the milk is at the target temperature, the culture can be added. To prevent the powder from caking and sinking in clumps, sprinkle the powder over the surface of the milk and then allow about 2 minutes for the powder to re-hydrate before stirring it in.
Allow the milk to rest quietly for 30-45 minutes while the culture begins to ripen the milk, maintaining the target temperature above.
-

Coagulate with Rennet
Then add about 1/4 tsp or 125ml of single strength liquid rennet.
The milk now needs to sit quietly for 60 minutes while the culture continues its work and the rennet coagulates the curd . The thermal mass of this milk should keep it warm during this period. It is OK if the temp drops a few degrees during this time. Do not add any heat or stir during this time, but do try to maintain the 86F in a sink full of warm water. You should find that the milk begins to thicken at about 18-20 minutes, but allow it to firm for the full 1 hour.
-


Cut Curd
Once the firm curd has developed, the curd should be carefully cut to about 3/8" pieces. A brief 5 min. rest following the cut will allow the curd surfaces to firm slightly. Following this with a slow and gentle stir for 10 minutes will further condition the curds. During this stir bring the temperature back up to 86F if it has dropped.
-


Cook Curd
Now it is time to begin drying out the curds. This will be done by increasing the heat slowly to 95-97F (35-35C). The heat needs to be increased slowly at about 2-3F every 5 minutes at the beginning. The total cooking time will be 30-45 minutes and may be extended to about 1 hr if the curds are still soft.
The final curds should be cooked well through and should be examined to make sure that enough moisture has been removed. A broken curd should be firm throughout and the curds should have a moderate resistance when pressed between the fingers. Also, when the final curds are squeezed in the hand enough to consolidate, they should separate easily with just a little thumb pressure.
When this point is reached the curds can be allowed to settle under the whey
-


Drain Curd
Begin the whey removal by ladling off the layer of whey above the curds until about 1 inch of whey remains above the curds.
The dry curds, along with remaining whey, can now be transferred to a colander lined with butter muslin. They should be allowed to drain for 15-30 minutes; an occassional slow and gentle stirring will assure that the whey drains off and the curds do not mat together at this point. During this time the curds will begin to cool slightly to about 75-80F.
To keep the curds warm, I create an incubator by placing a raised rack in my empty and cleaned cheese pot and adding warm water. I then place my draining curds in this and cover it between stirs.
At the end of the initial stir the curds should be dry enough but still left warm (75-80F) for the next 2-3 hrs. During this time the bacteria is still working. Be sure to give them a stir every 15-30 min to keep the curds separated.
The final cheese will have a higher moisture content of between 48-52%, whereas cheddar has a moisture of 39%. This results in a cheese that is moist enough for sides to deform and spread slightly in aging room (like Parma). However within 30 days the final moisture loss will approach that of a young cheddar.
-


Salting
At this point the curds will be dry salted prior to being transferred to the mold. This is similar to the making of cheddar, but the big difference is that São Jorge has not developed as much acid as the cheddar would have developed at this point and therefore the work of the bacteria (conversion of lactose to lactic acid) is not done yet. São Jorge cheese will still have a higher pH of 5.4-5.7 whereas a cheddar cheese would have a final pH of 5.2-5.3 at this same point in the process.
What this means is that the salt applied here will only be enough to slow bacteria down whereas the cheddar receives enough salt to end the acid developing process. Cheddar normally gets about 2% salt by weight but this cheese only gets about .9-1.5% salt by weight.
.5oz. of salt will be adequate for a cheese weighing 1.75-2lbs
As a result of the light salting and high moisture (residual lactose), the bacteria continue working over the next 30 days post pressing, the pH eventually stabilizes at about 5.1-5.25 over this period.
During the ripening as proteins change the pH will again rise to about 5.3-5.5 again.
-


Molding & Pressing
For pressing we should begin very light and slowly increase the press weight to a moderate level:
- 30 minutes at 20 lbs
- 1 hr at 40 lbs
- 4 hrs at 50 lbs
- Overnight plus 1-2 days at 75 lbs
The rate of whey running off is simply a matter of drops and not a stream of whey being released. This is a good rate of whey removal during pressing and will slow even more as the residual free moisture is released. The form should show tears of whey weeping from the form very slowly. When this stops you can increase the weight slightly. The cheese should be removed from the press, unwrapped, turned, re-wrapped, and put back to the press at the above intervals to assure an even consolidation. At each turn you will notice the cheese has formed a smoother surface and rests lower in the mold.
It is important to keep the pressing cheese at a warmish temperature of 62-72F while pressing because the bacteria culture is still working.
The extended press time will be determined by the final surface consolidation. The surface should be quite smooth and with good curd binding to prevent too many openings where mold can hide or enter the cheese.
The final cheese weight should be about 1.75lbs from this much mil
-


Aging
Once the cheese has been pressed well and removed from the mold it needs several weeks to a month or more at about 58-65F and a moderate moisture of 70-80% (some go 30 days at these conditions). If the room is too dry or excess airflow, the curd junctions may begin to shrink and separate at the surface and moisture needs to be increased. This warmer time should stabilize the cheese for aging.
The cheese can then be placed into your aging space at 52-56F and 82-88% moisture. The cheese can now be aged for 3 months and it will ready for your table but can go up to 7 months for a cheese with more character.
Keep molds down with dry brushing daily beginning 3-5 days after removing from molds. This should become less frequent as the surface dries.
Note: During the winter months in my cave the moisture is much lower so I use partially covered plastic boxes to keep the moisture up
Cheese Making Supplies
Related Products
You May Also Like


