Clockwork Lemon is a great name for a delightful website created by Stephanie Eddy in Okotoks, Canada. There are hundreds of recipes, tips and culinary adventures. Every single recipe is basically a tutorial with clear, detailed directions and the right amount of pictures.
Stephanie began making cheese last year when she joined Cheesepalooza which is hosted by three Canadian Bloggers. Each month they post a new cheese challenge and they are all working out of the same book – Artisan Cheese Making at Home by Mary Karlin.
Every time Stephanie makes a new cheese, she takes pictures and writes a post about it. So, at her website, you will currently find all the inspiration you need to make Creamy Chevre, Homemade Feta, Homemade Gruyere, Homemade Farmhouse Cheddar- Part 1 & Part 2, Whole Milk Ricotta, 60 Minute Mozzarella and Homemade Butter. (Her Asiago posts are shown below.)
Stephanie told us, “My mom and I are doing the challenges together which makes it a lot more fun. Sometimes you end up standing around waiting for the milk to come up to temperature, so it’s nice to have someone to talk with!”
Homemade Asiago {Cheesepalooza}
By Stephanie Eddy at Clockwork Lemon
For me, Asiago is the cheese that accidentally makes it’s way into my shopping cart when I was supposed to buy Parmesan. The two cheeses look so similar and are often right on top of each other in the displays that sometimes it’s not until I’m tossing the wrapper from the finished cheese that I notice it was Asiago all along.
Sneaky, sneaky Asiago.
Regardless of the possibly sinister nature of this cheese, I was excited that it was chosen for this month’s Cheesepalooza challenge. The recipe makes two little wheels of cheese; one to eat after a few weeks when the cheese is young and another to age to that crumbly, parmesan-ish texture. I’ve found that I’m pretty impatient with the whole “aging for months on end” process so the prospect of trying the cheese early appealed to me.
Homemade Asiago {Cheesepalooza}-1As the cheese making challenges progress, the recipes get a little bit more time consuming. With our farmhouse cheddar we had issues with the instruction to bring the temperature of the cheese curds up only a few degrees over the course of 40 minutes. Although we got through it just fine (after putting out a mayday help help plea on twitter) this time we employed some advice from a fellow cheesemaker and used a hot water bath in our sink to slowly and evenly increase the milk’s temperature.
Look at our sweet set up: digital thermometers (to purchase) for monitoring both the milk and water temperatures. You could actually see the heat transfer from the water to the milk when the temperature of the water would drop by a degree at the exact same time that the milk temperature rose one degree. The most interesting science is the kind that gives you cheese when all the learning is done.
Once we had safely and successfully brought the milk up to temperature we took a peek at the curds and were happy to see that they appeared to have survived our waterbath experiment. We’ll be using this method again for sure. Sweet (cheesy) success!
Next the curds were stirred and stirred and stirred to encourage them to expel whey and shrink down.
Once they reached the fluffy-popcorn-stage (not actually called that, but it should be) they were ready to pack into cheese molds for pressing.
We had ordered little basket cheese molds (to purchase) a little late so they did not arrive in time for the asiago. So we improvised and used the plastic baskets that cherry tomatoes come in. First we lined them with damp cheese cloth, filled them up with curds…
Then packed the curds down with our hands until the molds were half way full.
Next we sprinkled a few peppercorns on each cheese and then covered them with more curds which were packed down again.
AND THEN.. we realized we really couldn’t stand there and manually press on the molds for the next 8 hours with our hands. After some debate we decided to move the little cheeses to our bigger cheese mold that has a lid for pressing (to purchase). So much for the little tomato baskets.. sigh. We were worried that the cheeses would suffer the same fate as our cheddar and be pressed a little bit thinner than we liked due to the mold’s large size. It’s a small detail but it does affect the aging process.
I was happy to see that after the cheese was finished being pressed it was a little thicker than our cheddar had been. Not as thick as we wanted, but not as thin as we had feared. We moved them into a brine for the next 8 hours…
.. and then dried it on a rack before placing it in our cheese cave (aka a small wine refrigerator) for aging. I’m looking forward to revealing how the young cheese turns out in Part II of this post…
Keep an eye out for part II of the farmhouse cheddar! It was sliced, tasted, melted, photographed, and tasted again. The best part of cheese making is definitely the part where you get to eat it.
My mom and I are on a year long cheese making adventure along with the other Cheesepalooza participants. We are working out of Artisan Cheese Making At Home by Mary Karlin and will not be posting the recipes for the cheese online. You can join Cheesepalooza at any time!
Homemade Asiago Part 2 {Cheesepalooza}
A few month back my mom and I heated, stirred, rested, and babied a mixture of milk and bacteria in the hopes that it would transform into a slab of delicious Asiago over time.
The cheese was placed in our cheese cave (aka a small wine refrigerator) and left to age. I should have been checking the humidity, monitoring the temperature, and just generally keeping an eye on our Asiago-to-be. The key word here is ‘should’ .. should have, but did not. Sadly, work and life got busy and our little cheese was forgotten for weeks at a time punctuated by realizations of “oh my god! The cheese! I haven’t checked the temperature!”
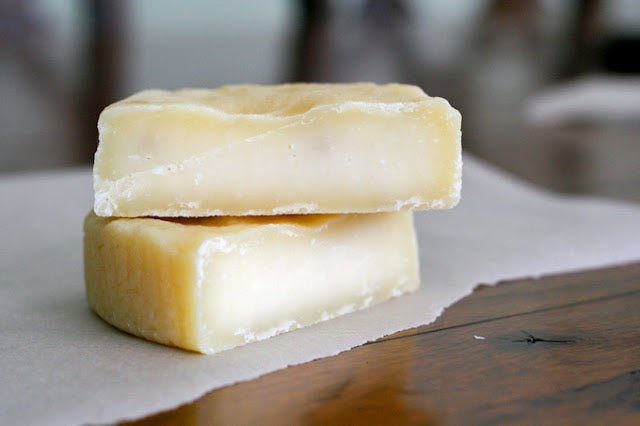
Luckily, when it came time to taste the young Asiago nothing too bad had happened. The tougher rind gave way to a creamy-but-firm interior speckled with a peppercorn or two. The flavor was mild and salty but still identifiably Asiago.
Could it be? Did our cheese thrive despite the neglect? Was it really as simple as placing young cheese in a improvised cheese cave and forgetting about it?
Um.. no. But I didn’t learn that immediately.
I had never tasted a young Asiago before, most of the cheeses available in the stores have been fully aged for years and are much sharper and more savory. So our cheese was a tentative success and we grated up the slab to sprinkle on pasta and chicken and eggs.
I thought to myself that maybe cheese didn’t need as much babying.. maybe it could just do it’s own thing and everything would still be ok…
Homemade Asiago-23.. and that is the attitude that I had when we rubbed olive oil over the remaining slab and put it back into the cheese cave to age for several more months.
Fast forward a month and I am now the proud owner of an olive oil rubbed inedible slab of dried-out milk. Curses! It seems that the margin of error and forgetfulness only lasts a little while before the cheese starts to suffer. I don’t have any photos of the older, dried out asiago (it wasn’t as photogenic as the younger tastier slab).
It was such a waste and I suddenly remembered all of the house plants that I’ve killed over the years in a similar fashion (oh my god! I haven’t watered the plants in weeks!) and I wondered if making aged cheeses was something that I would be able to do successfully.
We’re not ready to give up that easily though, and now that we are aging our Gruyere my mom and I are watching it with eagle eyes. It’s cheese schedule has been penciled into my daytimer and my mom has been texting me about the cheese cave temperature while I’ve been away. We’re giving the aging process a good solid effort this time around.
Tasting Notes for Young Asiago:
Appearance: Hard rind, lighter interior. Yellowish white
Nose (aroma): Slightly cheesy.. almost like Parmesan
Overall Taste: Mildly asiago-ish
Sweet to Salty: Salty
Mild (mellow) to Robust to Pungent (stinky): Mild
Mouth Feel: (gritty, sandy, chewy, greasy, gummy, etc.): Dried rind, soft and almost chewy center, grated easily.


