


Learn how to make a cheese cave right at home. If you want your cheese to ripen properly you have to make them a good home and take care of them like little bambinos.
Homemade Cheese Cave
For centuries caves, which are usually cool and have a consistent humidity, have been great environments to age and store cheese. Caves are still used today, but usually they are man-made structures with a highly controlled environment.
Now as Home and small Artisinal cheese makers with limited resources we need to see that our aging cheeses have the best possible environment we can give them.
How do we do this? Well the good news is that we do have options, but these options must consider what is best for the aging of the cheeses within the confines of your resources
Aging Considerations:
- A proper and as constant Temperature (45-58F) as possible
- Specific Moisture level for the specific cheeses (~ 80-98%)
- A certain amount of Fresh Air to remove by products of aging
Option 1 - Use Your Existing Fridge
Unfortunately it is 10 - 15 degrees cooler then a cave and it has a tendency to suck the moisture out of anything that is unprotected.
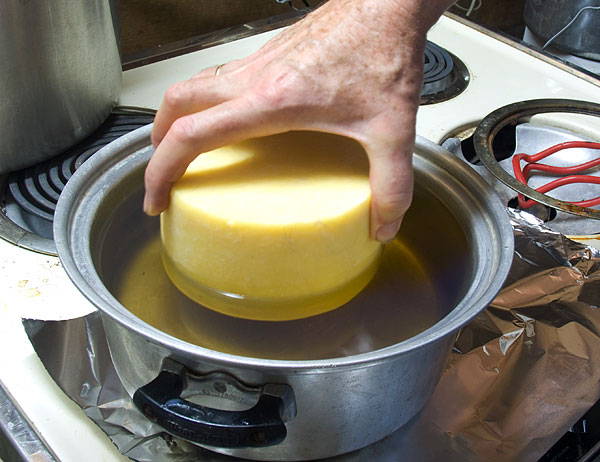
To protect the cheese place it in the warmest part of the fridge and to keep it from drying out you will need an airtight container. The size of the container should be larger than what is needed ... 40% cheese and 60% empty space (air).
You can control the humidity of the air inside the container by using a wet paper towel, crumpled up in a ball and placed in a corner of the container
Option 2 - Modify an Old Fridge
The temperature can be easily controlled using a controller like the one shown above. The humidity can be controlled by simply using a pan of water with a partial cover as shown here, by simply adjusting the cover opening you should be able to control the amount of humidity. At times you may need to seriously increase the amount of moisture in the box, especially when starting ou, in this case you may need to spray the inside with sterile water or provide a damp towel.
You will also notice that at seasons change you will have abrupt changes in the moisture level You should seriously consider a means to measure the moisture in your mini-cave as the gauge (hygrometer) in the photos above.
The amount of cheese inside the cave will also affect the amount of moisture needed, less of a problem when filled with moist cheeses
All of the above can also be done with an old full sized unit.
Option 3 - Find a Cool Space in The Cellar
Where the cheese can be protected in a cabinet or covered plastic boxes.
This cool cellar will do a pretty good job with stable temperatures during most of the year but controlling the humidity will still be a bit of a challenge.
Controlling Humidity with Plastic Boxes
Plastic boxes with, lids as shown here, will do a pretty good job with conserving moisture, our current favorites are Rubbermaid 'Take-Alongs' they are essentially a flat tray with covers.
They can easily hold 6 or more smaller 5" cheeses, or 2 or more 8" Tomes. I simply use a wet sponge or paper towel to maintain the moisture needed, which can be easily rinsed in bleach to keep it somewhat sanitized.
The paper towel or sponge should not be dripping wet. The object is to introduce moisture to the air and not to leave the bottom of your container with standing water. The paper towel should not be touching the cheese, the air should be damp, not the cheese.
Note: If you are also using these boxes for draining your soft ripened cheese make sure you keep clearing the draining whey so that cheeses are not in contact with it. If you then use the box for drying remove the top and use a fan to provide gentle air movement.
For larger wheels, cake holders work quite well, but the occupied space percentage is a bit higher and more attention needs to be paid to opening and turning the cheese to provide it with fresh air If using the plastic boxes, several considerations are important.
The first is not to let too much moisture build up inside on the cover and drip onto the cheeses. If you see moisture condensing on the lid or collecting in the bottom , make sure you wipe it off when turning the cheese. You do not want a wet surface to develop or mold may become a serious problem. Also when using these for soft ripened and high moisture cheeses that continue to drain for several days, pay close attention to the moisture build up.
Mats should also be used in these boxes to keep the cheese off of the bottom surface to allow them to breathe and keep away from excessive moisture.
Since the volume of air in these boxes is somewhat limited, they should be opened frequently to exchange the gases produced by ripening for fresh air, especially with higher moisture young cheeses.
How I Set Up My Cheese Cave
A New Kitchen & Cheese Cave
In 1999 when my wife Robin and I set about re-doing our kitchen (remodeling with bulldozer !), we decided to take this opportunity to dig down 9 ft. to build a cave under the new kitchen. Since this is a 150+ yr. old house, the entrance to it required cutting through the old granite foundation. The new cave would be isolated from the heating system of the house by about 30" of granite (note the thickness of the granite wall in photo to the right) and another 10" of cement and the ceiling with about 10" of insulation and a vapor barrier. The new cave would be primarily cooled by the ground temp but in mid winter a small heater is needed to keep it above 50F and during mid-summer an air conditioner is needed to keep it below 60F. This means a bit of seasonal fluctuation and this would have been normal in a traditional cave. In the future if I do want to keep the upper temperature more in the 52-56F range, I will use a small compressor and an evaporative loop to do this.
Ideal Temp + Ideal Humidity = Perfection
The finished cellar measures 15'x25' and I have isolated a 6'x15' foot room with a heavily insulated wall w/ vapor barrier and an insulated door on the North side of this space to eliminate as much solar gain as possible. This smaller room is the 'Cave' and where my cheeses age quite well. I have left the north wall of this room as bare unfinished concrete. The humidity in this room can be kept at a fairly stable 85-90% and the temp will hold at 52-54 during most of the year with no help to cool or heat. During July and August I need to use an air conditioner in the larger room to keep it down in the upper 50s and during late January a small heater in the cave to keep it at 52F. The larger room his usually much drier at about 65% and makes a good drying room for my soft ripened cheeses before they are placed in the cave.
The 'Cave', holding at a perfect 'cellar temperature' of 52-54 is ideal for my serving kegs of beer which get forced by CO2 directly up to taps on the kitchen wall. The larger room is also a great place to store my beer and wines and during the winter it holds stable at a constant 48F from November to April and is the perfect fermentation temperature for my lagers. In addition to all of this it is a great root cellar for vegetables and home canned goods.
All in all it is a pretty good traditional system. Those that have been here for workshops can attest to that.
Just Enough Space
As you enter the cave notice the insulated door in which I have used a large sheet of urethane, sandwiched between 2 plywood panels.
The cave itself is actually quite small but offers plenty of space along 3 walls for shelves and just enough room between them to work
The temperature and humidity are very important to the successful aging of the cheese. I find it essential to have at least one or 2 of these hygrometers around to monitor this.
Note: the cave is holding here at 87% and 55F, Very good ripening conditions.
Pine & Ash Boards
The shelves I use here are a mix of pine and ash. These 2 materials I find to work quite well and are easy to keep clean. Other woods such as oak and maple are somewhat problematic in that they stain the cheeses.
Also note the spacing between and behind cheese for proper air movement. I also keep a good distance between shelves to accommodate moving and handling the cheeses. Several times a year I remove, scrub, and air dry the shelves in the sun ... This is quite effective in keeping unwanted mold under control and is very traditional . I then reverse them when brought back into the cave.
Using a Humidifier
For the cheeses that require higher moisture of 95% and above I still use these plastic trays shown on the left to keep high RH% The hygrometer can show a stable 95-97% in these covered trays. I do watch for excessive condensation inside and remove it when needed.
I use this humidifier to control my moisture. This actually performs a dual purpose since it contains a fan that does a great job at moving the air gently through the 'Cave.' Just a gentle breeze is all that you really want. Without this I would need a couple of small computer or muffin fans to circulate the air through the 'Cave.' If you do not have enough air movement you will find a tendency for mold to build up on the sides of the cheeses with no air movement.
During Spring and Fall I always find a week or so when the balance of moisture changes and I have to compensate. In the spring when the outside ground gains more water I need to turn the humidifier way down or off and in the fall I find the dry ground absorbs the moisture through the walls and at times I need to splash water on the floor as well as operate the humidifier on high for a week or so. During the winter the cave demands much more water than at other times.
Fresh Air
Air exchange (different from air movement) is another consideration since fresh air is needed and the products of aging such as CO2 and Ammonia (NH4) need to be removed on a regular basis and fresh air brought in. If this is not done, problems will result such as slower growth of candidum on the soft ripened cheeses. In a small space such as mine, opening and closing the door one or twice a day is sufficient. In a larger cave with more cheese ripening, I suggest providing filtered outside air to be brought into the cave daily or as needed.
If you do not have a cellar ready made, then much of what I have written above can apply to building your own purpose built room. Just remember that different cheeses have different requirements and each 'Cave' will have it's own special plan depending on what you are aging in it.
More Considerations for Building a Cheese Cave
Temperature
Optimal range of temperature is between 45º and 55º F. and should remain as constant as possible. To obtain this consider:
- Location of cave, on the North side will exclude solar gain problems
- Frost line, building below grade will use cooler earth temps for cooling
- Insulation of walls and ceiling, to isolate from other heated space
- Opening of doors, how much traffic in and out of the cave
- Heat generated from motors, lights, etc.
- Heat is released from cheese as it ages, the more cheese you are ripening the greater this consideration becomes
- Use of artificial heating and cooling units
- Artificial heating and cooling back-ups
Relative Humidity (RH%)
Optimal range of humidity is between 85% and 95%. To obtain this consider:
- Permeability of walls
- Humidifiers that do not produce steam as well as a proper hygrometer to monitor this
- Availability of clean cold water. A source for increasing humidity
Ventilation
Air exchange should help make temperature and humidity even throughout the cave and eliminate the gasses that cheese releases as it ages. To obtain this consider:
- Volume of airflow
- Velocity of airflow
- Quantity of cheese vs. volume of cave
- Method of intake and exhaust
- Temperature and humidity of intake air
Sanitation
Proper and consistent standards of sanitation are essential. To obtain this consider:
- Types of cleaning agents
- Availability of water
- Cleaning methods and equipment
- Location of washing area
- Location of drains
- Design of Shelving Units
- Local Regulations


