


Molly Brown in Altoona, PA told us her first bandage wrapped cheese, a Lancashire looks worse than it actually was. She only had to trim some spots off the surface of the cheese. (We’ll be posting our interview with Molly soon.)
Sometimes things just don’t go the way you planned!
That’s why we have a technical advisor on our staff to answer questions. (Jim Wallace can always be reached at jim@cheesemaking.com.)
Most of the time, folks don’t take pictures of the cheeses that got away, for obvious reasons. But, recently I was doing Paulette Walker’s interview and, along with photos of her fabulous cheeses, she sent me a few of her blunders:

Bret Noir

Provolone

Manchego rubbed with olive oil and smoked paprika
I was fascinated by them and I decided to ask a few of my fairly recent interviewees if they had any to share. It turns out 12 of them did and they had no qualms about going public with them.
This was very brave of them and it’s only fair that you should be able to see their successes, so, their names are linked to their interviews.
I arranged them in alphabetical order by last name.
(By the way, if you have any to share, send them along to jeri@cheesemaking.com and we’ll see if we have enough for a Part 2.)
Alexia Allen in Woodinville, Washington

Alexia’s Affinage Disaster: My little wine fridge ages cheeses in the barn. I have hundreds of hours stored in there, in the form of big wheels of Parmesan-adjacent cheese. The wheels are supposed to age for over a year. While the fridge keeps the cheese cool in the summer, it can’t keep it warm when the temperatures dip far below freezing.
When a spell of hard cold was forecast this winter, I moved the cheeses into the pantry. Where I promptly forgot about them.
Did it get crazy cold in our pantry? No, but the unusually dry air had an effect on my skin and on the cheese. Everyone got a little flaky. Fortunately, I did not crack as much as the cheeses.
Once I realized my mistake, I hustled to drape damp cloths over them, and the minor cracks magically sealed themselves back up. But the legacy of that cold week will be obvious in another 8 months, when we finally open that big wheel! Making the cheese is one thing, but diligent affinage is another skill set I need to work on …
Coreen Beaulieu in North Monmouth, Maine

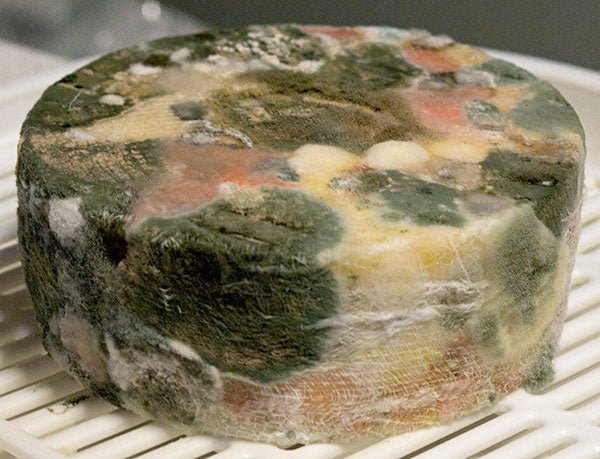
Coreen’s Affinage Disaster: I made this Asiago at the end of October hoping to enjoy it for the holidays. I’ve made this cheese before with good results, but as you can see this one was not so good.
It started very nice when I put it in my cheese cave after drying (1). I turned it frequently and rubbed off some spots of mold (2) and then in December, our holiday season started at work.
Working six 9 to 10 hour days a week and about a two hours of commuting each day, I neglected it. It quickly developed mold, and when the holidays arrived, I looked at it and decided it was too moldy.
I then decided I needed to toss it but couldn’t help but cut it to see what the inside looked like. The outside was very hard, and it sounded hollow when I tapped on it. As you can see from the pictures, it started to separate inside and developed large holes (3) and (4).
It was a good lesson for me, not to make cheese if I don’t have time to tend to it. I’m sure if I’d have turned it regularly, let it get some fresh air and brushed the small spots of mold off, it would have been a great cheese.
Sarah Berweger in West Point, California

Sarah’s Disaster #1: This was my first try (A) with the recipe for a washed rind monks cheese. A farm emergency delayed my cutting the curds at the right time so it sat with rennet added for probably twice as long as was written in the recipe. It ripened under a dome and I washed the rind, and yet the molds didn’t grow much and it ended up being a drier cheese. We called it Rock Cheese. Super tasty grated over pasta.
I then tried to replicate it (B) and ended up with an even drier, mold-free rock of a cheese that I still haven’t figured out what to do with (though a piece of it did melt and soften in the cast iron skillet and was yummy but gummy to chew on).
I figured out how to maintain humidity with either vacuum sealing or using a plastic container as a dome over each wheel.
I haven’t had the same delay in the rennet stage since, so I’m not sure how that affected it.

Sarah’s Unknown Disaster #2: This one is a Tomme aged 4 months with a surprising mold-filled hole inside it that reminds me a bit of a geode. No idea what caused it, as I followed my usual recipe and aging process and it looked amazing from the outside with great rind development.
We cut out the moldy bits and it was still delicious!
Mary Anne Farah in Oakville, Ontario

Mary Anne’s Mold Ripened Disaster #1: Here’s a photo of a goat cheese where I used too much black ash. When I cut the cheese, all that extra ash created vertical streaks down the interior, ruining what should have been a pristine white paste.
Lesson learned—don’t be heavy handed with ash. You don’t even need to coat the entire surface. “More is not better” when sprinkling ash.

Mary Anne’s Mold Ripened Disaster #2: When I was a beginner home cheesemaker, the brie and camembert-style cheeses I made were uber delicious but too runny.
a) I was initially putting too much culture in the milk, so the acidity in the cheese was lowering too quickly. So, I used less culture, and the acidity developed slower.
b) I was not rubbing enough salt on the outside. I added more salt, and it made the fungal coat grow slower and less thick.
c) The cheeses should not be wet during the early maturation phase, so I learned to dry the cheeses before they go into their maturation boxes. (I use a fan, if needed, to dry the surface, and to make sure to remove excess moisture from inside the box in the first few days.)
Jonathan Groner in Bexley, Ohio

Jonathan’s Pressing Disaster: This is an Asiago recipe that requires about 18 hours of pressing with a 6 pound weight (on my home-made cheese press). This photo was taken before brining.
Here is what happened when I did not wrap the cheesecloth around the cheese with care. It came out of the cheese press with a deformed top and wrinkles on the side. These wrinkles become very tough to wash when making a natural rind cheese.
This particular cheese was made with 1.5 gallons of Snowville Creamery 2% milk using thermophilic culture, calcium chloride, and vegetable rennet from your company.
For this one, I coated it with ash. I have not tasted it yet – it still has a few weeks to go.
Bonnie Hastings in Olalla, Washington

Bonnie’s Brining Disaster: My worst failure was my first try at feta.
The fresh squares of feta looked great and I set them to soak in a salt brine.
When I pulled the jar out of the fridge a few days later, I was dismayed to find that the curds had completely dissolved into the brine, leaving a jar of salty white slime.
I had been looking forward to sharing the feta with my sister since it is her favorite cheese, so I was very disappointed.
Since then, I’ve made many batches of soft feta (which skips the brining process) and my sister loves it! I still need to try that recipe again and conquer “real” feta.
Lynn Keay in Sacramento, California

Lynn’s Moist Curds Disaster: After watching Gavin Webber’s Bel Paese video several times, I followed his recipe closely. Or so I thought.
After draining the curds, the cheese (2 gallons whole milk) just sat there spoiling sat in my refrigerator, covered in a ripening box for two weeks as I turned it daily. Sadly, it seemed to get quite stinky and softer. Perhaps the curds had too much moisture.
I wiped it off a few times with light brine but the outer rind went quite soft before the 3 week target was up and that was all I could stand. It did not taste good.
I cut away the outer 1/2″ layer and threw it out then froze the rest. The inner portion seemed ok but, overall, not firm like in Gavin’s video. If I try it again, I will cook it much longer to achieve a dryer curd or maybe try a different recipe.
Peg Lamphier in Lytle Creek, California

Peg’s Mold Ripened Disaster: Last summer I made a batch of Brie and I thought things were going fine, but two and a half weeks into aging (in big tupperware-type containers) they still hadn’t grown any white fuzz (from the geotrichum). NONE.
Generally, there’s white fuzz all over the place, including places you DON’T want it, so I knew I had a problem. But there was no way I was going to throw out all that yummy milk…. then I had a brain wave, inspired by a picture of chestnut leaf wrapped cheeses in one of my cheese books.
I drove up this mountain road near my house where I knew there was a wild fig tree and picked some big leaves. I brought them home, blanched them, soaked them in homemade pear cider overnight (though white wine would have worked just as well, I’m sure) and wrapped the cheeses in the leaves.
I finished them by tying them with twine. Voila! The cutest cheese EVER! Two weeks later they were soft and they’d taken on the particular essence of fig leaf and cider and they were spectacular. In retrospect, I must have forgotten to add the geotrichum … but I ended up with a signature cheese, both in looks and taste.
Vivian Lucero in Otis, Oregon

Vivian’s Mold Ripened Disaster: The 1st photo above was taken from Artisan Cheesemaking at Home. That’s what Valencay is supposed to look like. The last photo is the collapsed mess it was. I’ve been making cheese for 6 years.
In the beginning, all was going well. The curds formed beautifully and settled into the molds quite nicely.
Once the cheese was covered in ash and given time to dry out, I placed it on a drying mat in a ripening box in my cheese cooler. Since the shape is a pyramid, it is not possible to turn the cheese bottom up as you would with any other round or symmetrical shape, so, I tried turning and rotating it on it’s sides.
After a week or so of turning, I just set it upright on the mat and let it ripen without turning it anymore. When the cheese appeared ready to eat, I pulled it up from the mat and the bottom tore off the cheese and it all collapsed into an ugly black gooey mess.
Next time, I will be sure to continue turning it on its sides and replace the mat a few times during ripening. As ugly as it was, it was delicious!!
Kim Mack in Sacramento, California

Kim’s Pressing Disaster: In my 1st attempt at cheddar (photo above), the curds didn’t knit together completely – it was a big lumpy mess.
2nd attempt. I started with the idea that my curds had been too cold in the press. I used my awesome “bucket press” (see Paulette Walker’s interview) and placed it in my sink. With warm water in the top bucket and a warm water bath in the sink, I was sure that this would keep my curds warm enough that they would knit together beautifully. They knit together better but didn’t achieve the beauty I was looking for.
3rd attempt. Next troubleshooting angle – curds too dry. I followed my recipe to the tee and, nope – still not knitting together the way they should.
As I was flipping my slab, I realized that a lot of whey was being expelled so, I wondered if this may be the trouble step. Instead of flipping every 15 minutes for 2 hours, as directed, I figured there had to be variables here and I flipped until my slab got shiny and then I flipped one more time.
I went through the rest of my steps and put it in my regular press and it was better, but not where I wanted it to be.
4th attempt. I made another cheddar and I flipped until my slab got shiny and then one more time. Went through the rest of the process, put it in the mold and into the bucket press with a warm water bath and – OMG, success!
James Phelps in Buffalo, Wyoming

James’s Milk Disaster: We had some brutally cold days – minus 20 and high winds this winter. My milk producer is only 45 miles away but nevertheless the milk (35 gallons) arrived almost completely frozen. It was not easy getting out of the cans.
I followed my usual recipe for a washed curd type cheese. Everything went very well and seemed like it was on course until salting. When I pulled it (a 40# wheel) from the brine, it had huge and numerous cracks. Not even cloth bandaging would fix this.
I decided to cut the wheel into wedges. When I did, I noticed large mechanical holes – not at all common for this style cheese. Now I was deciding if I should feed it all to the chickens or what?
This is a cheese I make in large wheels all the time and the only thing different was the partial freezing.
I might note – the dark in the holes is due to a smoke collagen (similar to liquid smoke) in the brine, as I dipped each wedge in it for a few minutes to assure a salted outer. It is like a liquid smoke, I use it with the salt brine. Unlike smoking cheese after aging, it adds a subtle flavor element. It also discourages blue molds and helps encourage good ones like geotrichum candidum.
I ultimately decided to vacuum pack it and see how it goes. It has been in the cave now for 3 weeks and looks like it did when I packed it.
We still don’t know the outcome, but if its good, we will market it as “Winter Storm” one time only!
Paulette Walker in Cincinnati, Ohio

Paulette’s Mold Ripened Disaster #1: This is one of 3 Camemberts made in June 2020 that could not hold its shape. I was able to salvage the other three, although their taste was disappointing, as bloomy rinds continue to stymie me.
After it fell apart, I was very careful and gentle while turning the others, which helped them keep their shape. I have never taken a cheese making class, but someday I hope to take a class on bloomy rinds, so I can master this nemesis of mine.

Paulette’s Stirring Disaster #2: Here is my first Parmesan cheese. When I opened it, it was too hard to slice, so I tried to grate it with my food processor.
The poor food processor made a shrieking noise I had never heard before. I referred to the instruction book, which said that noise meant I was attempting to shred something too hard for the food processor. (whaaaaat???)
A few more attempts at Parmesan taught me to stir less, and for a shorter period. I have since made much better Parms!
I was able to heat the shredded Parm in a skillet and made crispy little treats.


