 |
| Gareth Mark |
As with any cheese, there are many different ways to make Mascarpone. Mascarpone is not only versatile in desserts but also has its own unique making process. If youre interested in trying your hand at crafting this delightful cheese, youll find detailed Mascarpone Cheese Making Recipe Instructions that cover both traditional and quicker methods. We have two recipes in our book, Home Cheese Making – one using creme fraiche starter culture and the one below using tartaric acid. We also sell a Mascarpone Kit with everything you need to make it both ways. In this article, we give you the traditional way to make it and a few recipes for using it.
Gareth Mark of Stumptown.Savoury bakes artisinal breads and pastries in the lucky town of Asheville, North Carolina. We love his website because it’s easy to read and his pictures are yummy. He was kind enough to let us use his post for this article:
Mascarpone, the queen of dessert cheeses. At least it is when it’s freshly made. The mascarpone available in most stores is a little rubbery and a bit too citrusy. The real thing has a texture like whipped cream about to turn to butter and an ethereal, ever-so-slightly tart flavor.
To make mascarpone you’ll need tartaric acid. In spite of what you might have read, cream of tartar is not tartaric acid; rather, it’s a derivative of tartaric acid. You cannot subsitute one for the other with any hope of success. In the picture to the right, the powdery cream of tartar is on the left, and the crystaline tartaric acid is on the right.
You’ll also need a double boiler setup of some sort, or you could just use two pans like I did. A thermometer is mandatory. You’ll need to line a stainless steel colander with a double layer of butter muslin to finish the cheese. Set the colander into a bowl to catch the whey.
Heat one quart/liter of half-and-half or cream to 85°C. Then add ¼ teaspoon tartaric acid and stir until the dairy thickens. It should be thick enough to be reminiscent of cream of wheat or farina, and the spoon or whisk you’re stirring with should leave tracks behind. It takes a good five minutes or so to coagulate, so have some patience.
When the dairy is thickened, pour it into the muslin-lined colander and let it drain for about an hour at room temperature. Carefully spoon the cheese into a container, cover, and refrigerate overnight; in a dessert emergency, you can use it once it’s chilled a couple of hours. It will keep in the refrigerator up to two weeks, not that you’ll have any around that long.
Mascarpone has many uses: cannoli, tiramisu, cheesecake, or it can be served plain. I used it to make the dessert pictured above, which has quartered strawberries in mint simple syrup on the bottom, mascarpone, and Rainier cherries on top. The dollop on top that looks like whipped cream? More mascarpone. Delicious.
NOTE: Be sure to save a cup of the potato water when you drain the potato and green onion mixture. And be careful adding white pepper – it’s more potent than black pepper.
Ingredients:
3 pounds Yukon gold potatoes — scrubbed
2 bunches green onions — coarsely chopped
1 1/2 cups mascarpone cheese — room temperature
1/4 cup Italian Parsley — chopped
Ground white pepper and salt — to taste
2 tablespoons unsalted butter
1. Cut the potatoes into large chunks if they’re big. Cover with water in a large saucepan and add green onions. Add salt, cover and simmer for about 25 minutes.
2. Drain potatoes, reserving about 1 cup of the cooking water. Return potatoes to the pan and coarsely mash them with a potato masher, add cheese, parsley and some of the cooking liquid if they are too stiff. Add additional liquid to make the right consistency. Season to taste with salt and white pepper. Keep warm in a low oven until ready to serve.
Servings: 8
Ingredients:
4 boneless skinless chicken breasts, cut into bite-sized chunks
1 tablespoon garlic salt
1 tablespoon dried basil
2 teaspoons black pepper
Olive oil
1 cup whole milk or cream
2 cups mascarpone cheese
½ cup semi- or full sun-dried tomatoes, chopped
¼ cup fresh basil, chopped
4 cups dry penne pasta
1. Heat a large pot of water over high heat to bring to a boil for the pasta. Do not add the pasta until you have completed step 3 of the recipe.
2. Warm a couple tablespoons of olive oil in a frying pan over medium heat. Mix the garlic salt, dried basil, and black pepper together in a shallow bowl. Lightly coat each chunk of raw chicken in the mixture then place in the warm olive oil. Do this until all chicken is in the pan or the pan is getting full. Cover for four to five minutes then shift the chicken chunks to cook the other side. Let cook until the other elements are ready to serve, but continue to shift and stir every few minutes and keep the temperature at medium.
3. Bring the milk (or cream) to boil then remove from heat. Turn the heat down to low. Keeping the milk off the heat, whisk in the mascarpone. Put the pot back on the heat but stir frequently.
4. Put the pasta in the boiling water and let cook for recommended time for al denté. Add the sun-dried tomatoes and basil to the chicken while the pasta is cooking. Once the pasta is cooked, strain it and add the cooked pasta to the mascarpone and milk sauce.
5. Using a solid serving spoon or ladle, serve the pasta in sauce and top with the chicken. Sprinkle extra chopped basil or parmesan on top for garnish. Serve!
Ham Mushroom and Mascarpone Pasta Melt
 |
| Prosciutto (ham) with mushroom and mascarpone – a perfect topping for some nicely cooked pasta. |
You will need as much as you fancy of the following:
Pasta cooked in lightly salted water (follow the packet instructions)
Ready made pasta sauce – (I only used half standard sized jar)
Ready made cheese sauce (I used four cheese sauce)
Sliced and fried mushrooms (I used 2 chestnut mushrooms)
Mascarpone cheese
Prosciutto (ham)
Grated matured cheddar
Olive oil for drizzling
Preheat your oven to 400F.
Get yourself a suitably sized oven proof dish, put a tiny bit of olive oil in and spread it round the dish with a piece of kitchen paper.
Put a layer of cooked and drained pasta. Randomly top with a little tomato pasta sauce. In the bits you missed out, top with the cheese sauce.
Now add the fried mushroom slices and the prosciutto here and there. Just put them wherever – be artistic!
Add a few dollops of the mascarpone then top the lot with some grated cheddar and drizzle over a tiny bit of olive oil.
Bake in your preheated oven (uncovered) for about 30 to 35 minutes – or until it’s nice and hot in the middle and serve with some nice salad.
Ingredients:
1/2 stick/1/4 cup unsalted butter, softened
8oz mascarpone cheese, softened
1 tsp vanilla extract
1 lb sifted confectioner’s/icing sugar
With an electric mixer, beat the butter and mascarpone cheese together until fluffy. Add the vanilla extract, and the sugar incrementally, until fully incorporated.
Ingredients:
4 oz. or 1/2 cup heavy cream
1/8-1/4 c. sugar
1 tablespoon + 1 teaspoon Raspberry Liquor
4 oz. mascarpone cheese
In a small bowl, mix together the cream and sugar until it has a thick whipped consistency. (I only used about 1/8 c. of sugar as I didn’t want the center to be super sweet, as the buttercream was already pretty sweet, though you could add more if desired.) Add the cheese and liquor and mix until all ingredients are combined. It will have a fairly thick consistency.
If making mini cupcakes, using a straw, poke holes into the center of each cupcake in a “X” type fashion. Remove the center. (An apple corer would be a good utensil to use for regular-sized cupcakes.)
Fill a small sandwich-sized ziploc bag (or a pastry bag if you have one) about halfway full of the raspberry mascarpone filling. Snip of a small corner of the bag. Place the tip of the bag into the bottom of the hole you made in the cupcake and start filling from the bottom up. Stop when the filling is even with the top. (Starting at the bottom will help prevent air pockets, which will cause the filling to sink it settles.) Repeat with all the cupcakes.
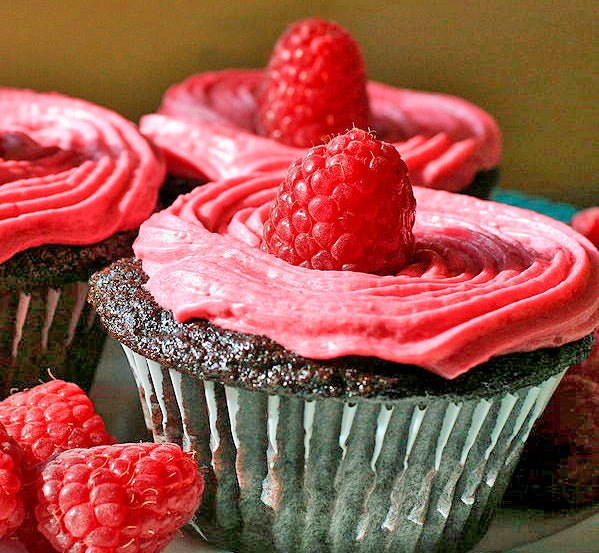
Frost with the buttercream and top with a raspberry!
Makes: about 100 mini-cupcakes (or 36 regular cupcakes)
Ingredients:
18 individual Dove Dark chocolates, unwrapped, melted, and cooled (130 grams)
2 cups flour
¼ teaspoon salt
1 ½ teaspoon baking soda
¾ cup butter, softened
1 ½ cup sugar
2 eggs room temperature
¾ cup mascarpone cheese
¾ cup chocolate milk
1 tablespoon instant coffee
1 teaspoon almond extract
Put oven rack in middle position and preheat oven to 350°F. Line a muffin pan with paper or foil liners.
Sift together flour, salt, and baking soda into a small bowl. In a medium, dissolve coffee in milk. Add mascarpone and almond extract, beat until fully combined. Beat together butter and sugar in a large bowl, using an electric mixer at medium-high speed until light and fluffy, about 4 minutes. Add eggs 1 at a time, beating well after each addition. Add chocolate and beat until combined and uniform in color, scraping down sides with rubber spatula when necessary. Reduce speed to low and add flour mixture and mascarpone mixture, alternating, using 1/3 each time, mixing until just combined.
Fill muffin cups 3/4 full and bake for 15 minutes or until a toothpick inserted in the cake comes out clean.
Ingredients:
1 cup crushed digestive biscuits or shortbread cookies
1/2 cup quick cooking plain oatmeal
1/4 cup unsalted butter, at room temperature
1 egg
1/3 cup granulated sugar
1 tablespoon salted butter, softened
1/4 cup flour
1/8 teaspoon baking powder
1/2 cup seedless strawberry or raspberry jam
4 ounces mascarpone cheese, at room temperature
9 ounces fresh strawberries, stemmed and sliced
whipped cream
1. Preheat the oven to 325 degrees.
2. Blend the unsalted butter and the cookie crumbs together. Press the mixture into a 9-inch round tart or quiche dish. Refrigerate the dish to let the crumb crust set.
3. In a large mixing bowl, beat the egg and sugar together with a hand-held mixer. While continuing to blend with the mixer, add the salted butter, flour, baking powder, and jam. Do this until the mixture takes on a smooth texture.
4. Gently spoon the jam batter into the crust. Spread it evenly and all the way to the sides of the dish.
5. Bake in the oven for 18 to 23 minutes. Place the dish on a cooling rack or rest it on a larger dish that holds crushed ice. Once it has cooled to room temperature it is ready for its next layer.
6. Spread the mascarpone over the cake layer. Arrange the strawberry slices in a decorative circular pattern. Feel free to be creative with this and layer them to add dimension to the tart topping.
7. Cover the tart with plastic wrap to protect it from sediment. Refrigerate it for at least 20 minutes (no more than 24 hours). Serve with whipped cream.


