


Here is another great article from Andrew Wilder’s I Make Cheese blog. It had originally been submitted by a guest contributor, David Greenberg.
For many years I’ve been an avid amateur bread baker, cook, and general foodie. I’ve long been interested in owning livestock, particularly dairy animals, despite having had only limited contact with them over the years. I figure that one day owning milk-producing animals will be a good way to combine my interests in animal husbandry, cooking and eating.
This idea actually got its start about 15 years ago when I was a Peace Corps volunteer in Central Africa. I lived in a small rural community in the savanna where many people have dairy cattle. In the nearest large town, there was an international collective running a commercial dairy business producing milk, cheese, and ice cream. Their milk came from the many small dairy farmers in the surrounding rural communities. Every morning a 4-wheel drive truck drove the country roads picking up the metal canisters of milk (these trucks were great to hitch rides into town since they were MUCH faster than being stuffed into a bush taxi like a sardine for hours and hours).
 I naively thought that I could meet with the management of the dairy collective to teach me how to make cheese. I figured they would have the same “sustainable development” mentality I had to help the villagers improve their nutrition. As it turns out, profit-making collectives aren’t always interested in helping foreign aid workers and the villagers who supply them with cheap milk. So cheese making went on the back shelf.
Recently, my interest in cheese has resurfaced and I decided it was time to learn more. Hours on the internet uncovered numerous websites with information about dairy animals, cheese making, and supplies needed.
I purchased Ricki Carroll’s Home Cheese Making book and was off and running. I’ve made several soft cheeses thus far including one semi-failed attempt at feta.
One of the more successful cheeses I’ve made is a variant of a Ricotta Salata, or salted ricotta. I like this recipe because it is simple, doesn’t require any fancy equipment, and you can age it in your fridge without need for an aging-cave.
In my variant, during the aging process, I rubbed the outside with smoked paprika. The idea for this came from a similar style cheese I had found in one of the local hispanic groceries. The basic, overall concept is to make a ricotta cheese, hang it to drain, salt it again, press it, and then age it.
 Here we go!
Needed:
1 gallon store-bought whole milk
1 teaspoon citric acid dissolved in 1/4 c hot water
1.5 teaspoons cheese salt
Extra cheese salt for curing process
Paprika (Smoked or Hungarian)
Large Stainless Steel Pot
Thermometer
Butter Muslin
Ricotta Mold
Step 1:
Add citric acid solution and ONE teaspoon of salt to milk. Stir.
Step 2:
Heat milk, without boiling, to 185-195 degrees F. Do not allow to boil or scorch. Stir often. Raise temperature slowly. Be patient, this step takes time. Probably around 30-45 minutes.

Step 3:
The curds and whey will begin to separate. Make sure there is no milky whey. There should be white curds and a somewhat clear fluid. When in doubt, keep gently stirring and wait another minute or two. Turn off heat.
Step 4:
Cover and let sit for 10 minutes.

Step 5:
Line a colander with butter muslin. Ladle (don’t pour) the curds into the muslin. Tie corners muslin and hang to drain for 30 minutes. I squeezed it a little initially to help express more fluid. I drained mine over the sink.

At this point you have ricotta cheese. you can stop here and eat it if you want. Some people add a tablespoon or two of heavy cream to the curds to make it a little richer. This will keep for about a week.
Step 6:
If you want to make the salted ricotta, next is to salt it again. The original recipe calls for a second teaspoon of cheese salt to be mixed in. I did that. I personally think it was too much.
In this recipe I’m recommending a 1/2 teaspoon of cheese salt, and frankly, I might even consider skipping this second salting.
If adding the second round of salt, remove curds from muslin, add salt, and mix.
Step 7:
Put curds back into muslin, this time you can use single ply muslin. You want something just to help move the cheese around and hold its shape.
Place the cheese (within the single layer muslin) into the ricotta mold. I bunched up the excess muslin on top of the cheese, sticking out of the mold, so that the weight I put on top, would push down on the cheese within the mold. I used a heavy cast-iron pan.
Press for 1 hour.
Step 8:
Unmold cheese. Turn upside down. Rewrap. Put back in mold. Press for 12 hours (in sink).
Step 9:
Unmold cheese. Lightly rub outside of cheese, on all sides, with cheese salt. Cover and place in fridge.
Step 10:
Once each day, lightly salt the outside of the cheese and turn it upside down. I ended up putting the cheese inside of a salad spinner so that it could drain. Not a lot of fluid comes out, but enough to make the bottom moist.

Step 11:
Continue salting and turning for 7 days. On day 7, coat with paprika on all sides. Age for 2-4 weeks, turning every few days.
Troubleshooting:
If any mold appears, use moist cheesecloth, dipped in salt water to gently remove.
I personally found it hard to regulate moisture. Either condensation was forming on the inside of the lid/plastic wrap or fissures appeared as it dried out if I didn’t cover it. Normal fridges aren’t the best for aging.
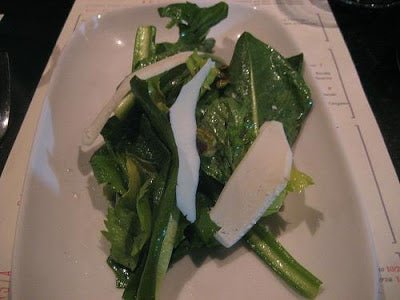
After about 3 weeks, I couldn’t wait anymore and had to try it. The cheese was firm, crumbled a little, and had a very nice texture and taste. As I mentioned before, it was a little salty. The paprika on the edge of the cheese was fantastic. FYI, it didn’t melt very well which is characteristic of this style of cheese. It is good for eating solo, chopped up on salads, or crumbled on mexican dishes.
Good luck and enjoy!


