


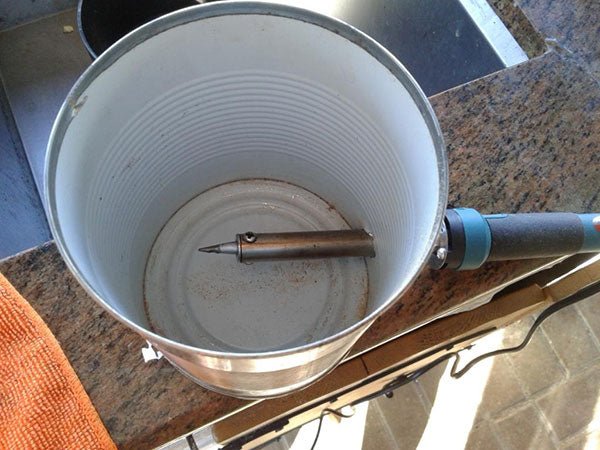

Claude Garneau’s smoker in a 28 oz tomato can
In 2010, we did an article about smoking cheese (click here) which has directions for making a cold smoker. A lot has changed since we posted that article, and now there are many more options available.*
Recently, Claude Garneau in Ottawa, Canada sent us a few pictures of his “smoking gizmo” and it reminded us that not everyone has their own smoker to adapt. Some folks just want an inexpensive way to smoke their own cheeses. Claude’s method has been used successfully for a long time. Check out this quick little video.

Tin Can Method For Smoking Cheese
Overview:
Your goal is to smoke your cheese without the temperature going above 90F (so the cheese won’t melt). Therefore, it goes without saying that if the temperature outside is over 90F, it’s not a good time of year to be smoking your cheese. If you really want to do it, put a pan of ice beneath your cheese.
Note: Conversely, if the temperature is freezing cold, you can actually just start a fire in the can with a few charcoal briquettes and the chips, and never even need to use the soldering iron.
Equipment Needed:
Small Soldering Iron
This must be new when you first use it and remain dedicated to this purpose (otherwise there might be toxic chemicals from other metals). There is one on Amazon for $7.99 (Hobbico Soldering Iron 60 Watt) and you can find 30W irons for even less at discount stores. It would be best to get one that is not “pre-tipped.”

Tin Can
This should have held at least 10 oz of food. A larger one (coffee can size) will hold more chips and last longer.
Smoking Chips
These come in all kinds of flavors. According to WikiHow, “Generally, fruit woods or nut woods such as pecan, apple, or cherry work well with mild cheeses such as mozzarella, Swiss, or mild cheddar. Stronger woods such as mesquite and hickory should only be used for strong cheeses such as sharp cheddar, Stilton, or pepper jack.” They also suggest that you can try new flavors by replacing the wood chips with bamboo chips, dry tea leaves, or nut shells.

Aluminum Foil and a Rubber Band
For the top of the can (just in case any of the chips flare up. You will also need a little aluminum foil to wrap around the handle of the soldering iron.
Container
Smoker, charcoal cooker, gas barbeque, old refrigerator, even a cardboard box with dowels to form a rack for the cheese. Note: If you use an old refrigerator, you will have to dedicate it for smoking because the smell will be permanent.
Preparation:
If you are making your own cheese, smoke it after it is completely aged.
Take your cheese out of the fridge an hour before you smoke it. Otherwise, condensation will form during the smoke.

Photo courtesy of I’ve Never Done That
Directions:
- Drill a hole in the can (near the bottom) and stick the end of the soldering iron through. (Some choose to drill the hole in the top of the can as shown at right)
- Wrap aluminum foil around the handle if it is close to the can, so it doesn’t melt.
- Fill the can halfway with dry smoking chips – (Some people alternate wet and dry chips in the can, but, if you do this, there is a risk your smoke will be bitter. If you want to try it, soak a few of your chips in alcohol.)
- Cover the top of the can with aluminum foil and poke holes in it.
- Place the can in your container (grill, etc) with the cheese on a rack.
- Plug the soldering iron in and the chips will start to smoke. Once they have started, you can usually unplug the iron for the duration.
- Smoke your hard cheese no more than 3 hours the first time. You will get a feel later for how long to smoke it-on a cold day it might take 6 hours. Soft cheeses will be done in 30 minutes.
- Check the cheese every 15 minutes. If there are sweat beads on it, it is close to melting. If so, unplug the iron and open vents in your container. You can also place the cheese above a pan with a cake rack on top and ice beneath it.
- When it’s done, wipe off the oil on the surface with paper towels.
- Wrap the cheese in waxed paper or parchment paper and put it in a plastic bag. Let the flavors set for 3 days to a week if possible before eating (the taste might be harsh at first). If you have a vacuum sealer, you can let it set for 2 weeks and the flavors will meld together well.
* If you prefer not to bother making your own smoker, there are new gadgets on the market –
The 12″ stainless steel tube from A-Maze-N burns pellets – click here
Realsun makes a Smoker Box for BBQ Wood Chips – click here
Cave Tools makes a V-Shaped Smoker Box – click here


