


As you may already know, we sell several different kinds of presses, including the Dutch Style Press (E30) (shown below) and the Off the Wall Press Plans (OWP). Both of them come with the weight measurements already calculated.

Our friend, Bob Albers in Mandeville, Louisianna made his own Dutch style press (shown below) and he had to figure it out for himself. He sent us his calculations, so you would have them if you ever decide to make your own press.
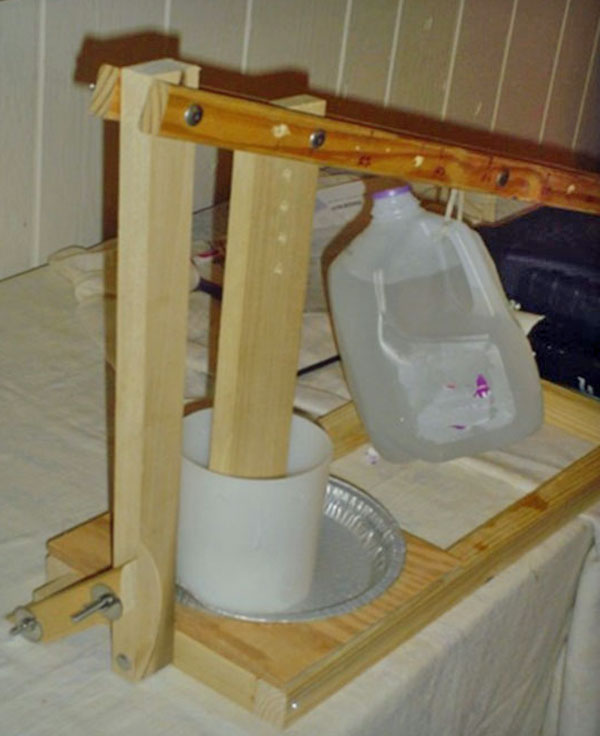
If you look closely at the pictures of the press, you will see that it is assembled with bolts and wing nuts. This allows disassembly into a flat package for storage. The only change Bob has made to it over time was to replace the aluminum pie pan with one of his wife’s retired cookie sheets.
The Weighty Side of the Dutch Style Cheese Press
By Bob Albers*
“Give me a place to stand, a lever long enough and I will move the world” – Archimedes
Such is the principle on which the Dutch style cheese press is based.
Where cheese presses are concerned, I have a preference for the Dutch style in home cheese making. It is a simple mechanism and can easily be built in the home workshop by anyone with only a smattering of wood working skills. I’m a tinkerer. Dutch style presses come in a variety of shapes and sizes but the basic components of the press are a lever, pivot point, a connection to the follower placed in a cheese mold and a weight hung on the lever at a distance from the pivot to generate the pressing force. In the Dutch press, the pressing weight and cheese being pressed are on the same side of the pivot. A rudimentary sketch follows:

Let’s call the effective weight on the cheese “C” and the hanging weight which applies the pressing force “W.” The fundamental formula for the leveraged system is C x D1 = W x D2. In practice, the distance D1 is usually fixed as is the desired pressing force. The variables we need to consider are the hanging distance (D2) and the amount of weight (W) needed to accomplish the pressing.
In the press I built, I placed “hanging points” at distances from the pivot at distances 2, 3, 4, and 5 times the distance D1. So, if D1 is 5 inches, D2 will be either 10, 15, 20 or 25 inches. This allows multiplying the pressing weight C to be 2, 3, 4 and 5 times the weight I am hanging.
Now, let’s consider the weight. The weight could be almost anything. Some people use exercise weights. These usually come in various fixed sizes of 1, 2, 5, 10, etc. lbs. If you have them already, that’s great. If not, consider what I use – milk jugs filled with water. Being a city boy, my milk always comes in a jug. Every time I make cheese, I empty 1 or more jugs.
One gallon of water weighs 8 lbs. Because the jug is not constrained by the presence of other jugs in a case, the sides bulge out a bit when filled, resulting in a “gallon” jug actually holding a bit more than 8 lbs. of water. The jug also has weight. This might not seem like much but, since we are multiplying these anomalies by up to a factor of 5 or 6, depending on the measurements of your particular press, they can be meaningful. In practice, I figure out the amount of weight I need for a particular pressing, then place an empty jug on the scale and fill it with water until I have enough.
So much for the hard part. Now let’s consider something easy. The lever of your press has weight. So does the rod connecting the lever to the follower for the cheese mold. If you use your press without any hanging weights at all, there will still be some weight exerted on the cheese. To determine this, simply place a scale in place of the cheese and measure it. This may not seem like much but, since the first pressings of a cheese are at relatively low weights, it’s important then.
We will call this “the minimum pressing” or Pm. Therefore, the force exerted on the cheese is the sum of this minimum weight + whatever we achieve using the leverage values detailed above. When the recipe calls for an initial pressing of 10 lbs., we must figure the force to be contributed by leverage to be C – Pm. So, if the recipe calls for a pressing at 10 lbs. and our measured Pm is 3 lbs, we must arrange W x D2 to be 7. At higher pressing forces (35 lbs. or more), this minimum force could probably be ignored. Also, it should be noted that these calculations could result in a “W” being both pounds & ounces. Because of this, the jug weight system with it’s fine grained adjustability presents obvious advantages over the use of fixed weights.
 *About Bob
Bob is a retired electronics engineer who has traveled all around the world, but now lives in Mandeville, Louisiana. He has written 8 articles for us so far (including this one), and we have done one about him (click here). We’re very grateful to him for his contributions to our community of home cheese makers.
These are his previous articles, listed in order with the most recent at top:
Be a Court Appointed Special Advocate (CASA)
Kummelkase (Caraway Cheese)
Cream Cheese Experiment
Bob’s Homemade Curd Cutter – Part 2
Bob’s Homemade Horizontal Curd Cutter
Making a Drying Box
About Cooking Curds
Creole Cream Cheese


