


Nick Fordy with his book of recipes.
When we interviewed Nick Fordy in Tingewick, England, he mentioned that he had learned to make cheddar from a book called The Ministry of Agriculture and Fisheries bulletin no.43, published in 1934. One of our readers commented that he would like to have that recipe and Nick was kind enough to send it to us.
Note: Since we first posted this, the entire booklet has been scanned by the LIBRAL online library of Rural and Agricultural Literature. If you don’t want to view it there, please email me at jeri@cheesemaking.com and I will send it to you as a PDF.
This recipe may be somewhat intimidating for those of you who are just starting to make cheddar. We invite you to check out Jim Wallace’s recipe at our website (cheesemaking.com) which includes the history of cheddar and other interesting information, as well as pictures of the process (click here).


Cheddar Cheese
Whilst the general principles of Cheddar cheese-making, as laid down by the expert makers of old, are still the foundation on which the industry stands, the public demand for greater uniformity in both flavour and texture has resulted in a great deal of research and experimental work being undertaken. This work has yielded much information concerning many problems in the manufacture of Cheddar cheese enabling the maker of to-day to introduce minor adjustments to meet the varying requirements of local conditions.
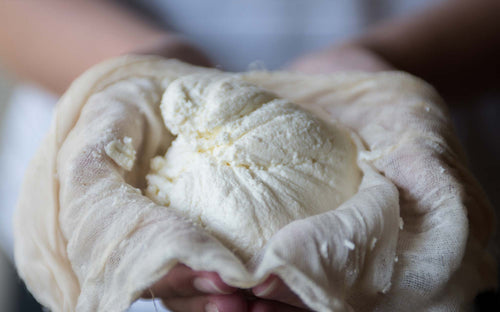
Cheddar cheese is made from evening’s and morning’s mixed milk that has been ripened. Some makers are in the habit of removing a portion of the cream from the evening’s milk, but this practice is strongly deprecated as it results in the production of a “chalky” cheese. The ripening may be brought about either by keeping the evening’s milk warmed during the night so as to hasten the development of acidity, or by using a starter. With careful handling, the first and original method gives satisfactory results, but the use of a good starter is now generally accepted as the best means of ensuring the production of a good quality cheese.
Treatment of Evening’s Milk. – The evening’s milk is strained into the cheese vat or tub, and is then treated according to seasonal conditions. In warm weather the milk is at once cooled (preferably by running over a cooler) to a temperature of 65-70F. The use of a cooler is advocated as by this means the milk is evenly cooled and aerated, and the action of the acid-forming organisms is not in any way unduly checked. When cooled in a jacketed vat or tub, the milk is constantly stirred whilst a steady stream of cold water is circulated through the jacket. If stirring is not constant, the cooling will be uneven and a portion of the milk may become chilled. The outstanding feature in the treatment of the evening’s milk is to ensure a rapid and even cooling without rough treatment. During the evening the milk is stirred occasionally; this prevents a too rapid rising of the cream and results in a thinner layer being found on the milk the following morning. In cold weather it is not desirable to cool the milk when brought into the dairy, but it must be stirred occasionally during the evening, the vat being covered over to maintain the temperature of the milk so that by the following morning it will be about 60-62F. After the evening’s milk has been treated as outlined above, the acidity is taken; the acidity at this stage (generally 0.17-0.19 per cent.) determines the subsequent details of manufacture.
Ripening with Starter. – Next morning, the evening’s milk is carefully skimmed; the cream is raised to a temperature of 90F, and then strained back into the milk, the temperature of which has been raised to 70F. Starter is now added, the amount required varying from 1-2 per cent. (1-2 quarts per 25 gal. of milk), according to the acidity of the milk and the time of year. Sufficient should be used, however, to give a correct degree of acidity for renneting in from 1 1/2 to 2 hours after adding. When the starter has been well mixed in, the morning’s milk is added, either in bulk or as it is brought into the dairy.
The whole is then heated to renneting temperature, i.e. 84-86F, and a test of acidity is taken. The acidity of the milk at this stage controls the texture, flavour and keeping-quality of the cheese and also determines the time taken to complete the making process, which should be from 5 1/2 to 6 hours after renneting. The acidity desired at renneting is at least 0.02 per cent. above that of the evening’s milk taken 30 minutes after it was received in the dairy. As a general rule it will be from 0.19 to 0.23 per cent.
Colouring. – In the early spring, the addition of a little colouring is advisable, annatto generally being used. This colouring matter is diluted with 5-6 times its volume of water and is mixed with the milk about 10 minutes before renneting. The amount required varies from 1 to 2 drams of annatto per 100 gal. of milk.
Renneting. – Rennet is generally added at the rate of 1 dram to 4 gal. of milk, but sufficient should be used to produce a curd firm enough for cutting in 35 – 45 minutes. The rennet is first diluted with three or four times its volume of cold water and is then thoroughly stirred into the milk for from 3 to 5 minutes. The surface of the milk is then slightly agitated until signs of coagulation appear. Coagulation generally takes place between 7 and 12 minutes after the addition of the rennet, and as soon as it starts the vat is covered and left until the curd is ready for cutting, i.e., when it breaks cleanly over an inserted finger and when the back of the hand can be pressed on it and removed quite free of curd.
Cutting the Curd. – Cutting is done with American knives; first with the vertical knife, lengthways and then across the vat, and then similarly with the horizontal knife. The sides and bottom of the vat are then cleared of curd by gently passing the palm of the hand over the surface; the tap is also cleaned. Cutting is then continued with the vertical knife until the curd has been cut into cubes the size of a very small pea. An acidity test is now taken (the acidity will usually be from 0.14 to 0.15 per cent.), after which the curd is stirred for 10 minutes to get it into a loose condition.
Scalding the Curd. – For scalding, the temperature is raised at the rate of 1 degree in every 3 minutes for the first 6 degrees, and then 1 degree in every 2 minutes for the remaining degrees, the maximum temperature of the scald being from 96-102F., depending largely on the time of year and the acidity of the milk. On no account must the heating process be hurried; if it is carried out too quickly the curd will be hard on the outside whilst the interior will remain wet and uncooked, causing it to run whey, and resulting in a poor quality cheese. The scald should take from 35 to 40 minutes, during which time the curd should be well and continuously stirred.
When the curd is in a springy condition, i.e., when a small quantity held in the hand is found to resist pressure, it is allowed to pitch and an acidity test is taken; the acidity desired at this stage is 0.16-0.17 per cent. (i.e., 0.02 per cent. above that at cutting). If the acidity development is less than this the whey is left on a little longer until the desired acidity has developed. The time required for pitching varies from 20 to 40 minutes.
Piling the Curd. – The next step is to get the curd into a solid mass; this is done by pushing it halfway up the vat and then, whilst the whey is still in the vat, cutting it in two, the front portion being floated on to the other portion. The two are then pressed together and the whey is drawn off. The curd is now cut into convenient-sized blocks, about 8 in. by 4 in., to facilitate handling, and is then piled on a rack covered with a cheese cloth, either in the bottom of the vat or in the cooler, with a cheese cloth between each layer of curd. The depth of the pile depends on the bulk of the curd, but usually two layers is the best depth for the first turn. A rack, with a weight of from 28 to 56 lb., is then placed on the top. The curd is left for from 5 to 15 minutes, according to the acidity, and is then repiled 3 or 4 pieces deep, cloths again being placed between each layer. The time taken from piling to grinding is usually 1 3/4 – 2 1/2 hours necessitating, in all, five turns, during which time it will be noted that the curd becomes solid and silky in appearance, and when cut through and pressed shows no signs of free moisture. If a cooler is used the curd must be kept well covered.
Grinding, Salting and Moulding. – When ready for grinding, the curd is flaky in texture and can be torn into leaves; there must be no sign of grittiness. The acidity at grinding varies appreciably on different farms and at different periods of the year. It must, therefore, be left to the discretion of the maker to decide what acidity is most desirable; as a rule the acidity at grinding may be taken to be five times the initial acidity of the evening’s milk, and the curd should draw threads of from 1 1/2 to 2 in. on the hot iron.
After being ground, the curd is well stirred and aerated on the cooler and is then covered over with a cloth for from 10 to 15 minutes before salting. Stirring reduces the temperature, and aeration assists in getting rid of any gases that may be in the curd. The curd is salted at the rate of 1 oz. of salt to every 3 lb. of curd, or the calculation may be made on the basis of 2 1/4 lb. of salt to every 100 gal. of milk. The salt gives the desired flavour to the cheese and acts as a preservative, the amount added governing to a certain extent the time of ripening.
After the salt has been mixed in, the curd is left for 15 minutes and then put into the moulds, which are first lined with coarse canvas cloth. When the moulds are being filled the curd is firmly pressed in as it is added, the temperature of the curd at this stage being from 70-75F.
Pressing. – First day. – After the moulds are filled the cheese is put to press with chain or screw pressure only until the whey commences to run, the pressure then being gradually increased up to 20 cwt. in 2 hours.
After the cheese has been in the press for from 3 to 4 hours it is removed and turned out of the mould, its edges are trimmed and the cheese is replaced in the mould in the reverse way. In the course of this turning-process the mould and cloth are rinsed in tepid water and the cloth is wrung out before it is replaced on the cheese. On being returned to the press the cheese is subjected to a pressure of 25 cwt.
Second day. – The cheese is removed and bathed in water at a temperature of 140F. for 30 seconds, and then returned to press, using the same cloth and applying slight pressure only. Two hours later the cheese is taken from the press and the cloth changed, after which the cheese is returned to the press with 25 cwt. pressure. In the afternoon the rough cloth is removed and the cheese inverted, wrapped in a cloth of finer texture, and returned to press with 30cwt. pressure.
Third day. – The top and sides of the cheese are greased with unsalted lard, caps and bandage are fitted, and the cheese is returned to press with 30cwt. pressure.
Next morning the cheese is removed from the press, the permanent bandage placed round it and the weight and date added. It is then removed to the ripening room which is kept at a temperature of 58-65F. The cheese should be turned daily for at least the first month after making; if this is not done the moisture will drain to one end of the cheese, causing it to crack. After the first month the cheese is turned every other day. A well-made cheese will develop a good flavour in from 3 to 4 months, and, if kept under satisfactory conditions, will retain its good qualities for 12 months.
Summary of Process of Manufacture
Average Acidities at the various stages.
Evening’s milk in the evening………. 0.17-0.19 per cent.
Evening’s milk next morning………. 0.18-0.20
Mixed milk before renneting………. 0.19-0.23
Whey after cutting………. 0.14-0.15
Whey at pitching………. 0.16-0.17
Piled curd in vat when whey off………. 0.24-0.28
Before grinding………. 0.65-0.95
From press………. 0.95-1.10
Time occupied in the various stages.
Adding starter to renneting………. 1 1/2-2 hours.
Renneting to cutting………. 35-45 minutes.
Cutting to start of scald………. 25 minutes.
Cutting to end of scald………. 1 hour.
Renneting to pitching………. 2-2 1/4 hours.
Renneting to grinding………. 5-6 hours.
Adding started to grinding………. 7-8 hours.
Faults in Cheddar Cheese-Making
I. Taints. – The occurrence of taints in Cheddar cheese may be due to any of the following causes:-
(i) Lack of care and cleanliness in producing and handling the milk.
(ii) Faulty feeding of cows, such as the use of sprouted turnips or decaying cabbages, or allowing cows access to garlic and certain other weeds. Curd having a bad flavour should be stirred for 5 minutes after grinding and allowed to stand for 10-15 minutes before salting; if the taint is only slight it may disappear during ripening.
(iii) Use of milk from cows suffering from udder trouble or use of milk from newly calved cows. It is inadvisable to use the milk from cows that have calved within 6 or 7 days.
(iv) Dirty utensils.
(v) Bad water supply.
(vi) Too high a temperature of the milk overnight, resulting in the over-development of acidity, which is difficult to control during the making process.
(vii) Too low a temperature of the milk overnight, causing a very “slow” cheese. This can be prevented by covering the milk or putting a few pails of water at 80F in the jacket of the vat.
(viii) Impure starter.
(ix) Bad rennet.
2. Faults in Body and texture.
(i) Chalky Body may be due to (a) the use of milk with a low fat-percentage; (b) cutting the curd too finely; (c) scalding too quickly or to too high a temperature, or stirring too long at pitching; the curd must be firm, but not hard.
(ii) Open Texture may arise from (a) lack of acid, especially at running of the whey; (b) too much moisture being retained in the curd, due to cutting too coarse; (c) insufficient stirring and scalding of the curd; (d) use of colostrum or milk from cows on pasture that is deficient in lime; (e) insufficient pressure, or too high a temperature at pressing.
(iii) Gas Holes are caused by using dirty milk or an impure starter.
3. Faults in Finish.
(i) Cracked Skins may be due to (a) over-acid curd; (b) insufficient pressing; (c) neglect to turn the cheese, especially on the first day of pressing: wring the cloth out with warm water and rinse out the moulds before returning to the press; (d) use of unsuitable press cloths; (e) economising in the use of lard; (f) draughts, or the air being too dry, in the ripening room; (g) neglect to bathe the cheese on the morning after making.
(ii) Chipped Edges are due to careless handling of the cheese during pressing and ripening.
(iii) Moulds are caused by (a) too much moisture and heat in the ripening room; (b) insufficient circulation of air; (c) presence of dirt on the ripening-room shelves.
To remove moulds from the ripening room, scrub everything thoroughly with warm water and soap, then rinse with a solution of 1 1/2 oz. of formalin to 1 gal. of cold water. Do not wipe with cloth but allow to dry in the air. This treatment may have to be repeated 2 or 3 times.


