


Making cheese is a good skill to have when you live on a farm in Highland, Utah
We first “met” Tara, when she wrote to us with a tip for other cheese makers which I posted in the September, 2010 Moosletter.
I asked her for a blog interview, so she became our New Cheese Maker #10 that same month.
Then, recently I was researching something and I came upon Tara’s great blog – Welcome Home Farm again. I noticed that since I last spoke with her, she had posted articles about every aspect of life on a farm. That includes tutorials about chevre, queso fresco, and the gouda post we are featuring here.
Tara told me she is not making cheese right now. Her goats will be kidding in the next 6 weeks, so she’ll have lots of milk to start cheese making again in May and June. We’ll be looking forward to more of Tara’s cheese making tutorials then..
Gouda Adventure
By Tara Tarbet at Welcome Home Farm
I went to a cheesemaking class on Saturday to learn how to make Gouda. Today is my first attempt at home. Well, I did it last Saturday, but it took me a while to get all the photos up!
I am using the recipe from Home Cheesemaking by Ricki Carroll with no adjustments. I always use a new recipe as directed. I’ll often change things a little later, but for the first time I trust the recipe.
Step 1
Heat 2 gallons whole milk to 90F. Add 4 ounces mesophilic starter or 1 packet of mesophilic direct-set starter. Cover and allow the milk to ripen for 10 minutes.
I buy my supplies from New England Cheesemaking Supply Company. There is a local cheese supply store, but they aren’t open all the time. Many of their supplies come from New England Cheese Supply, so if she happens to be open when I need something, I buy from her. But usually it is much easier to purchase something online and have it shipped right to my door.
Step 2 and 3
I don’t add calcium chloride because we use goat’s milk, but that is step 2. After waiting for the starter to ripen for 10 minutes, add 1/2 teaspoon liquid rennet that has been diluted in 1/4 cup cool, unchlorinated water. I used to ‘eye-ball’ the water, but after reading the first few chapters in American Farmstead Cheese by Paul Kindstedt, I decided it was best to measure the water accurately. I didn’t realize it would make a difference, but apparently it can!
Stir the rennet with an up-and-down motion for 1 minute. Cover and let the milk set at 90F for 1 hour.
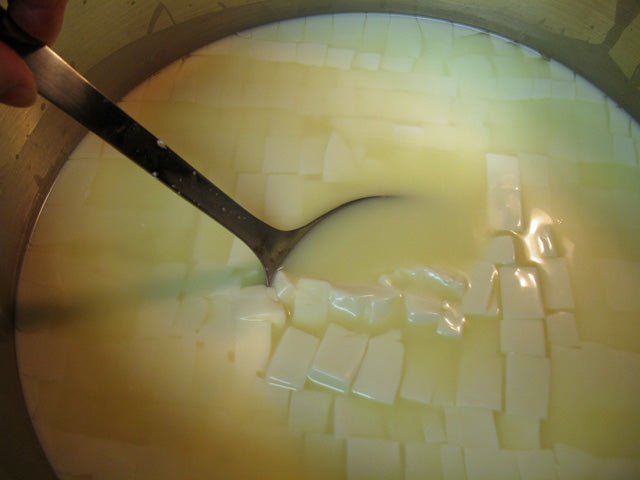
 |
| Clean break–it’s ready to cut into cubes. |
At the class someone mentioned something about stirring the rennet and how long we had to stir it for. I noticed a few months ago that I could see the swirls of rennet (it has a very, very faint oily look to it) on the surface of the milk. I generally stir until that is no longer visible, usually 1-2 minutes. Then I know that the rennet is mixed in well. The oily swirl is very, very faint and I have to have a light on the milk in order to see it.
After about 40 minutes I set a pot on the stove to heat some water to close to boiling. I’ll need some water that is 175F in Step 5 so I want to have it ready before I need it.
Step 4
Cut the curd into 1/2 inch cubes. I decided to cut the layers with my curd spoon first this time, instead of making the vertical cuts first. It seems to be just a bit easier and I ended up with fewer long curds. Let the curds sit for 10 minutes.
 |
| Right after cutting. First I make the vertical cuts with a cheese knife. |
 |
| Next I use my curd spoon to make the horizontal cuts. |
The next part is called ‘washing the curd.’
Step 5
Drain off 1/3 of the whey. I wasn’t really accurate about that. In the class she drained off enough whey so that the tops of the curds weren’t under the whey. That looked like about 1/3, so that’s what I’m doing.
 |
| Pour the whey into a colander lined with a cloth to catch any curds that might slip through. Then put the curds back into the pot. No sense wasting perfectly good curds! |
Slowly add just enough 175F water to raise the temperature of the curd to 92F.
 |
| 175F water ready to put into the curds and whey. Just add 3/4 cup at a time. I added 1 1/2 cups at first and the temperature was a little high (see the next photo). |
 |
| Whoops! A little too much hot water so the temperature went a little too high. |
Step 6
Let the curd settle again for 10 minutes. Drain off the whey to the level of the curd.
 |
| The curds are beginning to shrink at this point. |
Step 7
Once again, while stirring constantly, slowly add just enough 175? F water to bring the temperature of the curd to 100?F. Keep the curd at 100?F for 15 minutes, stiffing often to keep the curds from matting. It is kinda tricky to add water and stir at the same time! Try taking a picture, too…. oh wait! I don’t have 3 hands!
Step 8
Allow the curds to set for 30 minutes. That’s easy! I can vacuum a few rooms, or unload the dishwasher, or clean a bathroom! I try to clean house on the same day I make cheese because there are so many little bits of time that I need to wait for the milk to get to the next step.
At the cheesemaking class I learned how to see if the curd was ready. Put a few tablespoons of curd into the palm of your hand and squeeze it together. If it falls apart when you push on it with your finger, it’s ready. If it still sticks together a bit and doesn’t fall apart easily, give the curd another 5 minutes.
 |
| Test 1: Some curd from the pot…. |
 |
| Squeeze….. |
 |
| Here’s what it looks like right after I squeezed the whey out. |
 |
| Push it apart with your fingers. If it doesn’t break apart into individual curds, it isn’t ready. This curd isn’t ready yet. |
 |
| Curd test 2: Squeeze the whey out of the curds…. |
 |
| Push the curds apart with your fingers–these curds came apart fairly easily, just like in the class. I had to leave the curds for an additional 10 minutes to get them to this point. |
Step 9
Pour off the remaining whey.
Step 10
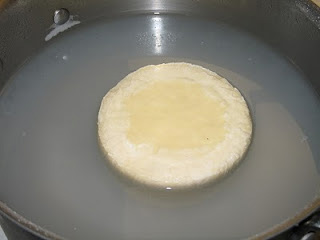
Quickly place the warm curds in a 2-pound cheese mold lined with cheesecloth, breaking them as little as possible. Press at 20 pounds of pressure for 20 minutes. This is a little different from farmhouse cheddar. Most hard cheeses that I’ve tried or read about say you have to press the curd when it is around 70?F, not when it is warm.
 |
| My hokey-pokey cheese press with all the weights on top! I like the flat weights better than the hand weights, but I don’t have enough flat ones yet… still looking at the thrift store and yard sales! |
Step 11
Remove the cheese from the mold and genly peel away the cheesecloth. Turn over the cheese, re-dress it, and press at 40 pounds of pressure for 20 minutes.
Step 12
Repeat the process but press at 50 pounds of pressure for 12-16 hours. Remove from the press.
Step 13
Make a saturated brine solution by combining the salt and water in a noncorrosive container. Soak the cheese in the brine for 12 hours. The teacher at the class said that the cheese floats, so sprinkle salt on top of the cheese, too. Here is how I made my brine, the link goes to New England Cheesemaking Supply Company’s website where they have a page on how to make a brine and how to brine cheese.
 |
| Brine solution. |
 |
| The first test (strip on the bottom) wasn’t acidic enough so I added 1/4 teaspoon of citric acid. That brought it right up into the correct pH range (strip on the left). |
This is the first cheese that I’ve put in a brine solution. All the other hard cheeses I’ve made have you adding the salt to the curd, Gouda doesn’t. The salt is soaked into the cheese from the brine solution.
 |
| Soaking overnight in the brine solution. I left it out on the patio because the weather is cool and that saves me from moving tons of stuff around the fridge. |
Step 14
(Sheesh! There’s a lot of steps to this cheese!)
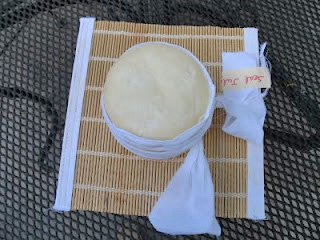
Remove the cheese from the brine and pat dry. Air-dry the cheese at 50?F for 3 weeks. I don’t have a dry spot that is 50?F–especially not for 3 weeks! The teacher at the class said to air-dry it on the counter. That will have to do for now. I just don’t have a spot like that right now.
The teacher at the class also said to turn the cheese 4-5 times a day for the first week. Then two or three times a day for the next two weeks.
The next two steps…. even though I haven’t gotten that far yet….
Step 15
Wax the cheese. Hmmmm….. do I wax or seal it in the Food Saver? I’ve still got a few weeks to decide, so no hurry on that!
Step 16
Age it at 50?F for 3-4 months, turning it 3 or 4 times a week.
Gouda-with a Crack
I made Gouda again. This time with un-pasteurized milk. I have much better success with un-pasteurized milk. The yield is higher and I have ended up with a smooth cheese, not a crumbly cheese.
Since Gouda has to be soaked in brine for a while, I decided to try to keep the cheese under the brine instead of flipping it all day.
I ended up cutting an old chop stick down so it would fit inside the plastic container that was holding the brine. I put the cheese inside the brine, pushed it down, and wedged the chopstick on top of the cheese.
 |
| No, the picture isn’t wonky and stretched. The chopstick is pushing the sides of the plastic container into an oval shape. The chopstick did a great job. It held the Gouda under the top of the brine for 16 hours without me flipping it! |
This time when I took it out of the press it had a crack in one side. The same thing happened last time and I’m not sure what I can do to prevent the cheese from sticking to the cheese cloth. I tied a white piece of cotton cloth around the outside to hold the crack into the cheese. I did the same thing last time and the crack ‘healed’ by the time I put sealed the cheese in plastic.
 |
| Here’s a photo of the Gouda with the cotton bandage wrapped around it. You can’t see the crack because the cotton is wrapped tightly enough to hold it closed. |
You can also see some masking tape on the cloth, that’s because I know I will need a reminder to tell me when to put the cheese into the plastic and age it in the wine cooler.
Waiting three months is always hard.
Maybe I’ll have to make some Feta again tomorrow. It’s faster!


