


 |
| Maggie Parkinson |
This is the first recipe in a 6 part series by Maggie Parkinson of Renton, Washington. Maggie previously authored two low carbohydrate cookbooks (as Carylton Cooper). She is a gourmet cook and a cheese maker. We featured her in the May Moosletter and in an accompanying blog article.
The idea for this series began when Maggie mentioned to me that the secret to making a good tomato sauce is to add cream cheese to it. She had other recipes involving cheese as a little known ingredient and I knew she had a great writing style, so I asked her if she would be willing to share a few of her culinary triumphs with us. She was! and here’s the first:
Part 1
By Maggie Parkinson
Introduction:
Before I go diving into any recipes I just want to say this by way of an introduction:
Cooking in the main is not an exact science; I say in the main because -when baking-you have less room for flexibility but when you are, say- making a chili, there are so MANY ways you can change a recipe, that no ONE recipe is THE recipe, if you see what I mean. I personally like my chili to have a touch of sweetness and moderate heat. Others like it super hot and use a vinegar based sauce. It’s the same with barbecue sauce, people’s tastes vary enormously. So in this and the following offerings, what I am showing you is what works for me after literally decades of experimentation, trial and yes- errors! Based on feedback, in the main it seems to please the majority.
Making Pizza
I know you guys are knocking out mozzarella like shelling peas, with the famous 30 minute recipe, so I thought I’d suggest how to use some of it up!
Next, I know that – as above, the definition of a good pizza varies by your personal tastes. What I want in a pizza is simple: a crisp thin crust and delicious toppings. I think of pizza as an edible plate and actually make a most delicious seafood one as well. SO! If you want a thick bready crust we’re done… that’s not what I am aiming for and you won’t like this version. (Pause while soggy thick pizza fans leave the stage!)
Pizza making is easy – you just need a 700 degree wood-fired oven, right? Hmmm, you don’t have one of those? Me neither. So how can we produce a really good result with a simple domestic oven? The answer comes in several ways: A good crust recipe, a good method, and some useful equipment!
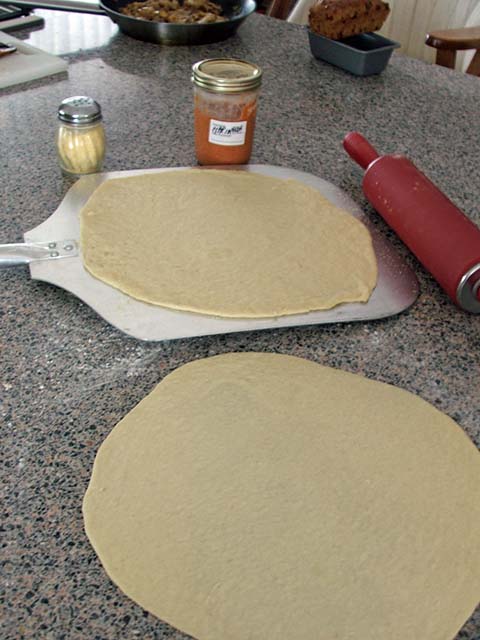
Let’s talk about the latter. I have on several occasions stood in kitchen stores watching people mull over expensive pizza stones. There is no question that a pizza stone will assist you in getting a really crispy crust, but you really don’t need to buy one! Just go to your hardware store and buy a large PORCELAIN tile – after having checked the width and depth or your oven of course. The ones I buy are about $2.50!
Tile- -check! This will get soiled and burned after a while, at which point you toss it and go buy another one. Originally, I used 9 small red brick quarry tiles… laid in a 3×3 matrix in my oven. These work, but crack more than the big porcelain tile, so that’s what I use now.
A pizza peel. This tool which can be bought at most kitchen supply stores or shops makes life SO much easier while getting your pizza in and out of the oven. They sell them in kitchen shops but they tend to be small. Mine is big and if you like making family sized pizzas, get a commercial one like I did!
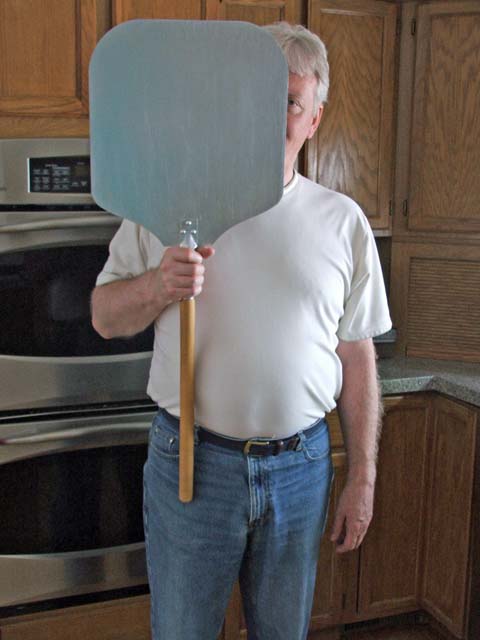
Mine looks just like this, with a long handle (which helps in not burning your face off when working with your pizza and a very hot oven). This one is listed at AMAZON for under 12 dollars. If you wonder how you could store such a thing in your kitchen, I stand mine by the side of my fridge! That’s the pirate, (see the blog article) holding it and he’s 6′ 1″ with a cookie tummy that I am personally responsible for.
Tile Check! Pizza Peel, (also called a paddle) Check!
Before we get started on an actual recipe, I should tell you a story-a brief one. Until recently Sweety loved big meaty pizzas-pepperoni, sausage, a ton of cheese and frequently I bought them from one of those big warehouse stores. I’ve eaten a lot of them but was never truly enamored of their sauce. To my mind most tomato sauces, (both the kind you put on pizza and the stuff that goes on pasta) is reminiscent of paint stripper, too spicy, too acidic and generally nasty. So, in general, I don’t buy it.
Recently I evolved a new way of making a really simple sauce, (why do we call it marinara, it has nothing to do with anything marine!) Anyway, I made this simple pizza with mozzarella using Ricki’s 30 minute method and I wanted to showcase the freshly-minted-mozz instead of pepperoni etc. In the final analysis, this pizza shunted the big meaty pies into second place and was pronounced FANTASTIC! Understand that I don’t get many fantastics as the bar is set pretty high around here…..hence my enthusiasm for this combination.
Now for the ingredients and how to put it together:
Ingredients:
The crust:
All purpose flour, semolina flour, water, salt, olive oil, and yeast.
I use instant yeast for ALL my baking, and it never fails me. You can use regular yeast and prove it in the recipe water with the sugar if you wish. Semolina flour can be found in most grocery stores on the specialty flours rack. AND WATER… oh puleese don’t cook with fluoridated water… I can’t stand the taste of water out of the tap-(BRITish word for faucet) so I use BRITa water for all my cooking except pasta and steaming stuff. Pun intended.
The sauce:
Tomatoes, fresh or canned, tomato paste or puree, (I usually use puree which is a leftover from low carbing, it’s lower than paste), onion, garlic, wine, molasses, soy sauce, Italian herb blend, pepper, cream cheese. Optional chili pepper flakes, red bell pepper, and brown sugar.
For the crust:
¾ cup semolina flour
¾ cup all purpose flour
6 oz water, (that’s ¾ cup for you Murricans)
1 tsp salt
1 ½ T olive oil, (extra virgin is ok or other grades)
1 tsp brown sugar (optional)
For the sauce:
Fresh tomatoes (about four Italian plum) or a 14.5 oz can of chopped tomatoes
1-3 T tomato puree or paste (see method)
Half an onion, roughly chopped
2 cloves garlic
¼ cup wine (red for preference but I’ve used white also-I use what’s open!)
2 T molasses
2 T soy sauce….(yes I said soy sauce)
1 ½ tsp Italian herb blend (or a mixture of oregano and basil-whatever you have and to taste.)
Freshly ground pepper
1 oz (1/8 of the block) of cream cheese
¼ large red bell pepper (optional)
2 tsp brown sugar (optional)
Optional: chili flakes or other heat factor-I don’t use them as I don’t like tomato sauce to be spicy but add a few pepper flakes or chili oil or whatever if you do! (This is a bit odd as I cook Indian, Szechuan and Mexican foods that ARE very spicy! Like I said, our tastes are so very personal!)
Toppings and cornmeal —-cornmeal-yes really!
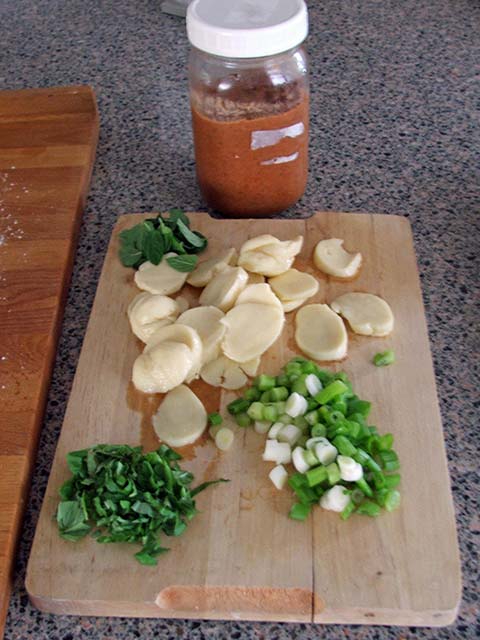
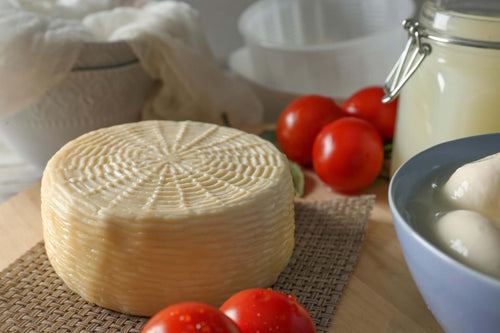
Fresh mozzarella
About three green onions, sliced
A 1/3 cup of parmesan or grated Italian cheese blend
Fresh basil leaves
Now lets put these things together:
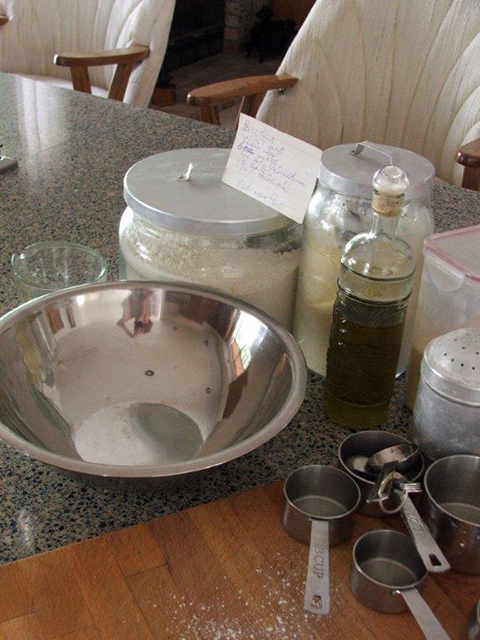
Note that for today’s culinary effort and photo taking, I gathered everything up all in one place and doing that is called MISE EN PLACE. Putting it in place is the literal translation and you know all about it. My translation to myself is: get everything out before you start moron, otherwise you’ll plaster the whole kitchen with whatever you’re cooking and have to give it a bath when you’re finished!
For the crust: You can – if you want- put the crust ingredients in bread machine and put them together that way on the dough cycle. I have a machine but don’t bother. Just stir the two flours together with a whisk, add the, sugar, yeast, (or proof it in the water with the sugar) and then add the water, salt and olive oil.

I heard a rumor once that using a wire whisk is as good as sifting flour so that’s why I do it.
The water: I am sure you know that the water must be warm to kick the yeast into a bubbly fervor but NOT HOT or you’ll kill those poor little devils. What I always say, if you wouldn’t put your baby in it, don’t put your yeast in it.
Stir the mixture until it comes together.

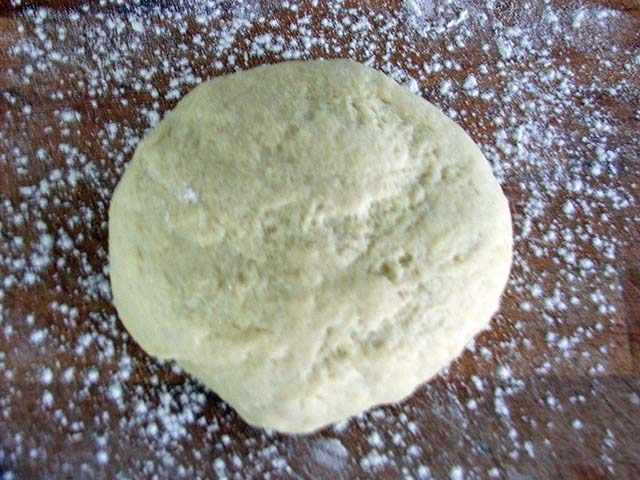
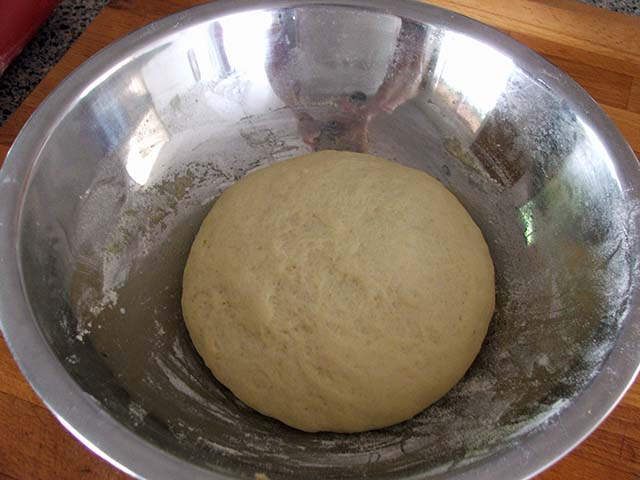
If it’s sticky, just add in a little more flour and begin kneading it gently. You don’t have to knead this for a long period, just two or three minutes is fine. It will come together to make a nice smooth ball.
Now stick it in a greased bowl and let it rise somewhere. A big rise is not critical but it does need to rest a bit like any dough. I have frozen this dough, too, so you can make it and the sauce in advance.
For the sauce:
Take the tomatoes, no need to skin fresh ones, and put them in a blender with the onion, garlic and optional chunk of red pepper. (I’ve made it both with and without. Today I used it and its one more flavor note which I prefer.) If using canned, use all the liquid from the can.
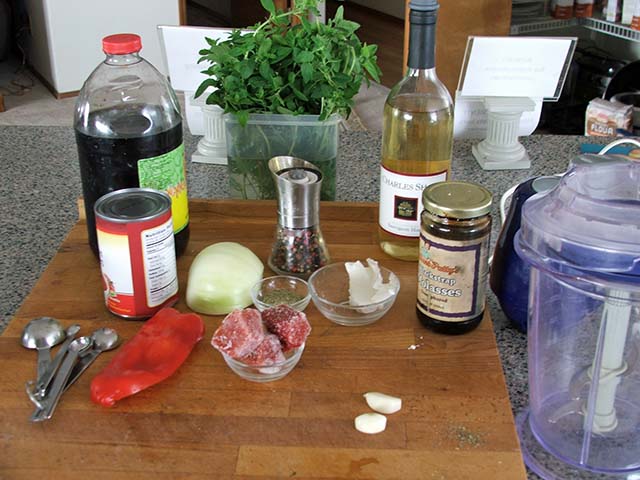
In my photo I have a nice pot of fresh oregano that I picked in my garden, and although I did not use it IN the sauce as I was testing the above recipe “eggsackilly,” if you have fresh herb by all means use it. Blend until totally smooth. Add the soy sauce, molasses, wine, Italian herbs and tomato paste/puree. Blend again.
I think 1 tablespoon of paste may be sufficient so hold back the second until you check taste later. I used 3 tablespoons of tomato puree which is not as concentrated. (Note also that my tomato puree is in lumps! ‘Splaination is below.)
Now put the blended ingredients into a microwave-safe vessel and cook it on high until it simmers, for at least five minutes.
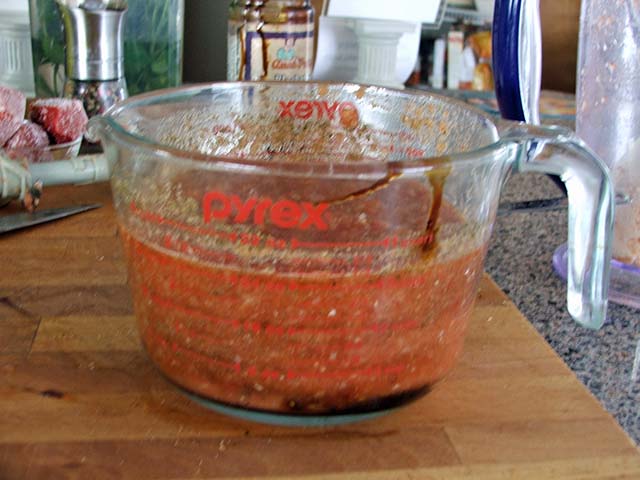
Remove, stir well and carefully check taste and seasoning. It will have started to thicken. Add more Italian seasoning if you like, and pepper flakes if you want spice.
Stir and cook further until it reaches a thickness which pleases you, tasting as you go. I microwaved mine for a total of 20 minutes stirring every five. I added the two teaspoons of brown sugar as it was still too acidic for my tummy! You may like it that way and want to add the extra tablespoon of tomato paste?
Remove from the microwave and stir in the 1 oz piece of cream cheese while the sauce is really hot. Keep stirring until it totally disappears into the sauce -taste- see how the cheese adds richness and smooths out the flavor of the sauce? Yum.
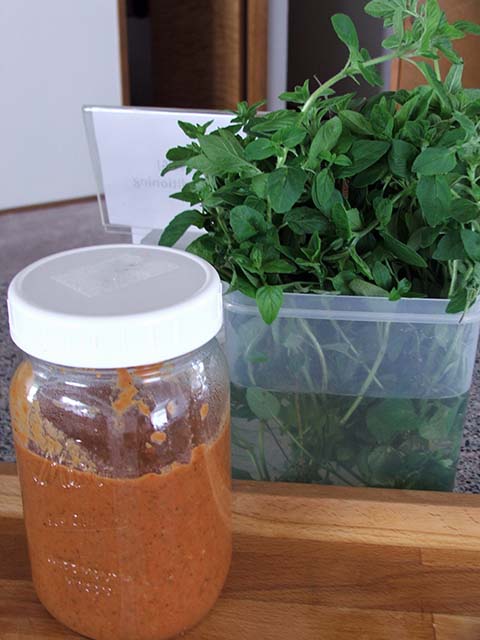
NOTE: This makes plenty of sauce for a pizza and you can (should?) use the rest for pasta. It may be frozen also. See my note about leftovers at the end.
NOTE: If you want, you can of course cook the sauce in a regular saucepan on your cook-top. But I have found that this sauce likes to sputter all over the place and decorate my bar stools which are (were) white so it’s the nuker for me!)
To assemble the whole lollapalliza: PREHEAT YOUR OVEN TO about 475 degrees. Make sure your tile is in the oven.
Using a rolling pin, roll your crust out on your counter or a cutting board that is well-dusted with flour.
You can toss it if you want ace but I’ve never found this to work for me!
Don’t try to hurry this-it’s an elastic kind of dough and it will want to spring back. Use strokes in one direction at a time to avoid the dough creasing over as you roll. You can and should get this to at least a 12 inch circle and don’t sweat if it’s not perfectly round. Pifflewhizzle, who cares if it’s irregular in shape-we’re doing this for us, not the round pizza Gods! Your tongue won’t know the difference. The crust should be about 1/8″ thick.
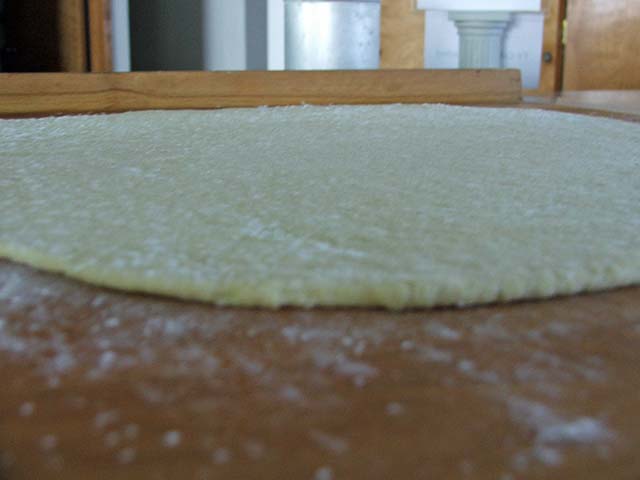
Get your pizza paddle ready and dust it well with cornmeal all over; we are going to SHIZZ this crust into the oven and it will want to stick to the paddle-the cornmeal acts like ball-bearings and assist with insertion onto the tile. Gently roll the crust onto your rolling pin and then unroll it onto your peel.
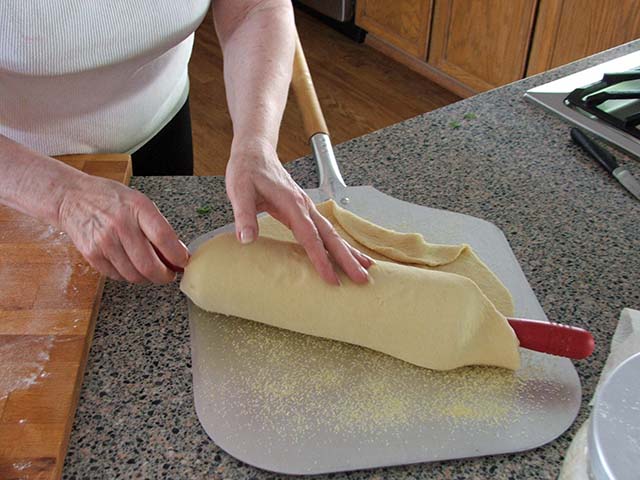
You will see that I am cooking in an undershirt and that I have been eating too many carbs!
Shake gently, (we don’t want the crust on the floor!) to ensure that it’s loose.
Open the oven door and put the peel over the tile and then quickly remove the peel with a fast forward motion. A little practice at this makes perfect.
Your crust will puff up in bubbles as it cooks; leave it for about five minutes until the bottom is turning brown. Using the peel, remove the crust and leave it on the peel while you put on the toppings. Pat down any bubbles that have come up during cooking. This may entail cracking the bubbles but that’s not a problem!
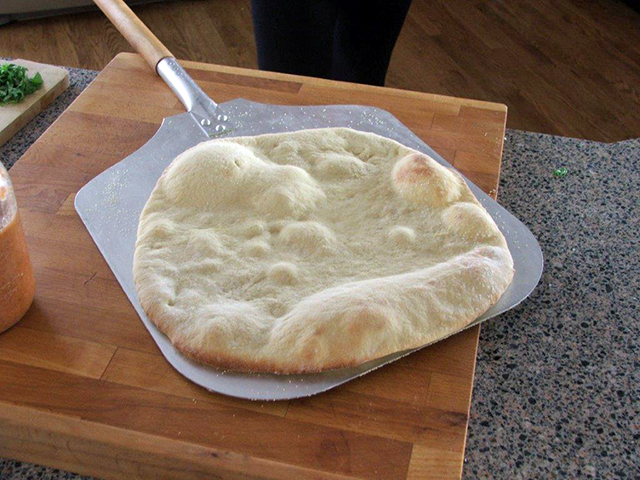
BY PREBAKING THE CRUST we ensure that the crust is not sogged up by the sauce!
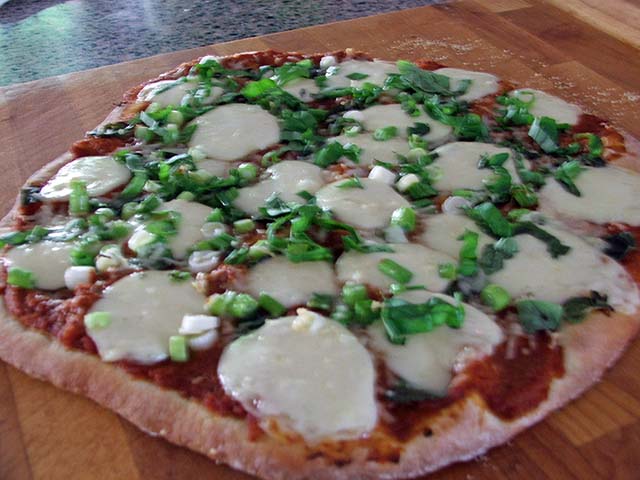
Spread over the thick and somewhat cooled sauce, top with mozzarella slices, green onions and grated parmesan. Put it back into the oven until the cheeses are all melted and the crust is crackly. I added my fresh oregano on top of the sauce and although fresh oregano has a BIG flavor it did not overpower the whole thing at all!
By the way, I had just four small balls of mozzarella which covered the pizza after I sliced them.
I made them from dried milk and after they were done I soaked them in brine for a bit and then stored them “Bocconcini” style in olive oil, garlic and basil in my fridge. They are a month old and fine!
Now add your finely sliced basil leaves, slice and Mangia!
NOTES: I have made this crust with all purpose flour, leaving out the semolina. I actually made two 11 inch crusts with the change of flours and they were pretty thin. I made them too big but I was in “mad scientist” mode and wanted to see how they came out.
I suggest that you try the semolina version and then if you -like me- wish to experiment you can reduce the amount down to ¼ or ½ cup and see how those versions work for you, keeping the overall flour quantity the same. My AP flour crusts were very thin and not quite strong enough to hold up the toppings-very crispy though!
I have even found and used Italian 00 flour but I don’t think it’s worth the time or dollars as the result for me was not significantly different. In researching that, I find I’m not the only one who thinks that!
Kitchen Notes: I buy my tomato puree in quite large quantities and after opening the can I put all the remainder in an ice-cube tray. Once frozen, I store them in my freezer, (I have three-sigh) for instant access.
NO WASTE!
Leftover tomato sauce can be frozen for another pizza or used to add richness to big meaty casseroles or soups!
So there you have it:
You should, of course, experiment with lots of toppings of your own.
There are so MANY variations; some of our favorites are:
Caramelized onions (the sauce) with cubes of stilton, and caraway seeds
Leeks and cream cooked down to a puree, (the sauce) topped with goat cheese and walnuts- Aaaah Cheese
I have made a crust of biscuit (breakfast biscuit) mix and topped it with sausage and sausage gravy and eaten it for breakfast.
For those of you who are expert at making mozzarella there is a cool video about making burrata here – http://www.youtube.com/watch?feature=fvwp&NR=1&v=oynl4bpTuAA
Thanks for reading, cheese lovers.
Remember- very few people make cheese but everybuddy loves pizza, so send this to your friends and irritate the heck out of them!
Ciao!
Maggie


