


 |
| Jessica with her 2 year old daughter and her robot scarecrow |
I love to find good blog articles about making cheese. The pictures and the first-hand accounts bring the process to life. I feel as if I’m right there in the blogger’s kitchen, having a grand time and learning a new skill.
La Dolce Duchessa writes just the kind of blog I love most, with a little of this and a little of that – recipes, household tips, even some movie reviews and a writer’s corner. In her recipes, she gives her readers much more information than we would get in a cookbook or a recipe website (and, of course, it’s more fun!). These are just a few of the recipes I found in her “archives:”
Brazilian Chicken Stroganoff
Salted Caramel Tart
Chocolate Bourbon Truffles
Panna Cotta with Goat Milk and Buttermilk with Lychee Rose Syrup
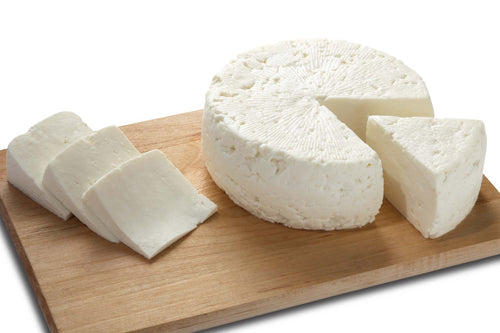
One special recipe was the one below, from 2010. The beauty of it is that anyone, anywhere can make this version of our 30 Minute Mozzarella, even if they don’t have a cow, a goat or a place to buy “good” milk.
So, thank you, Duchessa for sharing your experience with making your own Mozzarella and congratulations for being so AWESOME!!
Homemade Fresh Mozzarella
By La Dolce Duchessa

Did you know you can make your own fresh mozzarella at home? You can! I am very pleased to bring you this post with the permission of the New England Cheese Making Supply Company, benevolently ruled by Ricki, the Cheese Queen.
Ricki Carroll is also the author of Home Cheese Making, the first book (and one of the best) I have read on the subject. I bought this outstanding book seven years ago and went around telling all my friends I wanted to move to a farm and raise goats and make cheese (hey, there’s still time…). The New England Cheese Making Supply Company sells equipment, ingredients, kits, books… a veritable wonderland of cheese. Check it out, y’all!
Before we get started, I want to tell you that a) I am not a cheese making expert, I am an extreme novice and b) I did not find this to be easy-peasy- but I hope my mistakes and trial and error will help you have success faster!

To make my fresh mozzarella, I used one of the recipes that is included in ‘Ricki’s Cheese Making Kit for Mozzarella and Ricotta,’ shown here (left). I used the recipe that calls for instant non-fat milk and heavy cream. Why did I use this recipe? A few reasons- first, the non-fat instant dry milk (until you mix it with water, of course), does not take up any room in your refrigerator, second, you can have it on hand and make cheese when the mood strikes you and finally, this may be one of the most important, you may not have access to ‘good’ milk. Since this blog reaches people that live in may different areas, I thought it would be best to use ingredients that would be the easiest and most realistic for everyone.
If you are interested in using fresh milk, however, here’s the 411. What do I mean by ‘good’ milk? A few things- home cheese making requires milk that has not been pasteurized at a high temperature. You may have noticed on your grocery shelves many dairy products that are “ultra-pasteurized.” This is bad news for the home cheese maker- pretty much everything marked “ultra-pasteurized” is unusable (with the very small exception of the heavy cream that can be used in the instant non-fat milk recipe).
Why is this? It’s because the heat changes the milk proteins and they will no longer do what they need to do in the cheese making process- basically your curd won’t form properly. What can you do about this? A few things- some grocery stores, Whole Foods is a good example, make an effort to carry locally produced, low-temperature pasteurized (and non-homogenized) milk. Purchase milk that is either labeled ‘low temperature pasteurized’ or just ‘pasteurized,’ but keep in mind that without knowing the temperature range for the pasteurization, it’s possible the temperature was still too high. Unfortunately, you’ll just have to find out by trying!
What’s the deal with homogenization? That just means that the milk particles have been passed through very fine holes and that the fat particles in the (cow) milk were made smaller and therefore it no longer separates. Goat milk has finer particles, but that’s another story (keep an eye out for the goat milk panna cotta recipe I’m working on). Non-homogenized milk is also called ‘cream-top.’ Homogenization does not have an impact here- you can use homogenized or non-homogenized milk.
Let’s begin! Here’s what you need:
Large, stainless steel pot with a lid

Stainless, wide ladle with holes (I got mine at Harris Teeter, shown at left, but http://www.cheesemaking.com/ has one too)
Heavy rubber gloves, new (like for washing dishes that can withstand high heat)
A very fine wire mesh sieve or cheesecloth draped over a larger mesh sieve
Non-chlorinated water (16 1/4 cups)
Dairy thermometer (has a lower range than meat thermometers, you need something that will show you from 80-105 degrees Fahrenheit)
Here’s the recipe using the instant non-fat milk:
Fresh Mozzarella from Scratch
15 cups instant non-fat milk (made using non-chlorinated water)
1 cup heavy cream (ultra-pasteurized ok)
1 cup non-chlorinated water with 2 tsp. citric acid dissolved
1/4 cup non-chlorinated water with 1/4 rennet tablet dissolved (or 1/4 tsp. liquid rennet)
1/2-1 tsp. cheese salt or kosher salt (optional)
(recipe used with permission of New England Cheese Making Supply Company)
Don’t mix your citric acid or the rennet yet- wait until it’s time in the recipe! Here we go! Following the directions on your instant non-fat milk’s box, make 15 cups of milk using non-chlorinated water. How important is it to use non-chlorinated water? Well, it won’t work if you don’t! Chlorinated water renders rennet useless and basically nothing will happen… Ok! Moving on! Let this milk sit in the refrigerator either overnight or for at least 6 hours.
Pour the milk into the large, stainless steel pot you are going to use and place on the stove, but don’t turn on the stove yet. Mix in the 1 cup of heavy cream. With the ladle you have, one of the most effective ways to mix is to keep the ladle underneath the surface and move it in an up and down motion. Because of the holes and wide area, this is very effective. It’s also the technique you’ll you use later when you add the rennet. Ok! So we’ve mixed our milk and heavy cream well. Now, in a measuring cup, combine the 1 cup of non-chlorinated water and the 2 tsp. citric acid, stir until dissolved. Pour into the milk and cream, stirring well. Turn on the stove and heat at a medium-low heat, while stirring, to 90 degrees Fahrenheit.

This will take a little while- stir often and take the temperature every couple of minutes to see how it’s progressing. I wait until I’ve hit 80 degrees to mix the rennet and the water- the reason being that if you mix rennet with water (either the tablet or the liquid form) it will loose its effectiveness after 30 minutes. Ok! So you’ve been stirring and the milk and cream have been heating up and when you hit 90 degrees, remove from the heat source, take the rennet that has been mixed with the water and pour in, vigorously mixing with the up and down motion discussed earlier for 30 seconds only. A few thoughts on this step- if you’re using a rennet tablet piece, make sure it is fully dissolved and do NOT stir more than 30 seconds, you’ll be tearing the curds into small pieces as they form and effectively making ricotta looking curds…
Cover the pot and let sit for at least 5 minutes, I let mine sit for about 30 minutes since the curds were somewhat soft at first. So here’s the deal with curds… if it’s working, after 5-30 minutes your pot will look like a large thing of custard with fairly clear liquid on the sides. You can check if your curds are firm enough in two ways, the first, just use your (clean) fingers to touch it on the side to see if you can separate it gently from the whey (that’s the liquid) or, second, take a long narrow knife and insert it into the curd at an angle and lift up. If the curd separates with a distinct line and doesn’t kind of crumble wetly, that’s called a clean break and you are in business my friend! What if your curds are not that firm? A few things- first, let them sit a while longer. In this example I’ve photographed for you, I used liquid rennet and my curds were not super firm. They were acceptable enough, however, to separate from the whey and stretch into a ball of mozzarella. You’ll have to make that distinction for yourself. You can try two things if your curds are not very firm, let them set longer, or start over and use more rennet.

So let’s assume you are AWESOME and you have outstanding curds (I know you will), take a long, narrow knife that will reach to the bottom of the pot (I use a bread knife) and cut your curds in a grid pattern (left). Each grid piece should be about an inch and a half long. They kind of look like tofu floating around. Next you are going to return the pot to the stove and heat until it reaches 105 degrees. Stir it a little, but not much and very carefully, because you don’t want to cut the curds apart. Taking the temperature of this now is effectively taking the temperature of the whey, that is ok!

Alright, so we’ve reached 105 degrees- I think methods can vary a little for this next step, what I found effective was to place a very fine mesh sieve over a bowl and using my ladle, scoop up some curds and place them in the mesh sieve. If the curds are large enough and holding together, the whey will probably drain without any help. If the curds are not super firm, you may need to press a little with your hands or the back of the ladle. Press gently and make sure your mesh sieve is very fine, otherwise little pieces of curd may be forced through. Don’t have a fine mesh sieve? Use some cheesecloth lining a colander over a bowl to achieve the same thing. Place your curds, once sufficiently drained, into a microwavable bowl. You’ll probably need to drain the curds in batches, so once they are all drained and in the bowl, microwave for 1 minute.
Time to put on your cheese gloves! My cheese gloves are the same type of rubber gloves I use to wash dishes, but, they are new, have only been used for cheese and I’ve labeled them with a sharpie so I don’t get the gloves mixed up. After the curds have been microwaved for 1 minute, remove them from the microwave and either using the fine sieve drain them again, or, if they are holding together enough, just drain the whey from the bowl, the curds will have released a little more whey while heating. Add the cheese (or kosher) salt to the curds and mix either with your gloved hands or a spatula. I like 1/2 tsp. of salt. Place the curds back in the bowl and microwave for 30 seconds.

You are now ready to stretch your cheese!!! The cheese should now stretch and pull easily, like taffy. Stretch it several times- mozzarella is a ‘pulled’ cheese and without these motions, your finished product won’t have the right texture and bounciness. Stretch and either a) form into one or two large ovals or b) form into small bit sized balls (called boccaccini). I’ve read that you can also form a braid, I’m not skilled enough for this yet, but if you can, excellent work and you have my extreme admiration! Take your cheese and place in water that is 50 degrees for 5 minutes. After 5 minutes, place it in ice water for 15 minutes. Either eat immediately or store in plastic wrap or an airtight container in the refrigerator.
Congratulations! You are a cheese maker!!! You are so awesome!!!
Where can I buy a cheese making kit? You guessed it- https://cheesemaking.com/
Your cheese making kit will include: citric acid, rennet tablets, cheese salt, dairy thermometer, cheese cloth and recipe booklet. Remember to keep your rennet tablets in the freezer! If you have liquid rennet, remember to refrigerate it! The citric acid and cheese salt may be stored at room temperature.
How do I know if my water is chlorinated? I think most water is- so buy some spring water at the grocery store.


