


Are you ready?
All around the world and for thousands of years, folks have made their own cheese without pH testers. Yet, many cheese makers in the forums and blogs recommend them and some even go so far as to say that you can’t really make cheese without them! What’s up with that?
What’s up is that most of us are not making cheese the way our forefathers did. Our recipes were not passed from generation to generation and we did not start stirring the pots before we could even walk. Our tribe did not stay on the same land with the same animals for generation after generation. And, we did not make the same exact type of cheese, suited to those exact conditions, year after year after year.
In other words, nowadays, we need all the help we can get! And, having the right tools is a big, big help. Here is the main reason why it’s helpful to know the pH targets when making cheese:

Consistency
Once you have made the cheese of your dreams, you want to make it again and again the same way. The problem is that even if you are using milk from the same cow, conditions change with the weather, the time of year, the stage of her lactation, the side of the stall she got up on in the morning, etc, etc. Everything effects the milk and hence the cheese.
That’s fine when you don’t care and you like the surprise of never knowing exactly what your cheese will taste like. But, the kicker is when you finally make that fabulous, unique, heavenly cheese of your dreams and you can never make it again!!! That’s when you want to take your curd knife and, well, you know…
Even if you took the most scrupulous notes and duplicated all the exact conditions when you made your fabulous cheese, you will still be taking a big chance if you don’t know the right pH at certain points. I’m sorry, but that’s just the way it is.

So, why, you ask, don’t we give you the pH targets in our classic Home Cheese Making? Well, for one thing – you would not be ready to go that extra step if we hadn’t started you out the easy way. You would have dropped the book and run for your life if we had hit you with that information right off the bat.
You know that’s true. You had to see that it was possible to turn milk into curds before you got to the point you’re at now. If it wasn’t going to be fun, you weren’t going to try it. Our mission has always been to make home cheese making easy and fun (prime example- 30 Minute Mozzarella, which you have to admit is one good time!)

But, we have always managed to sneak a little pH medicine in with the sweet stuff and now we have more help than ever for you:
1. The Joy of Cheesemaking (2011) is a great new book with the pH targets included in the recipes.
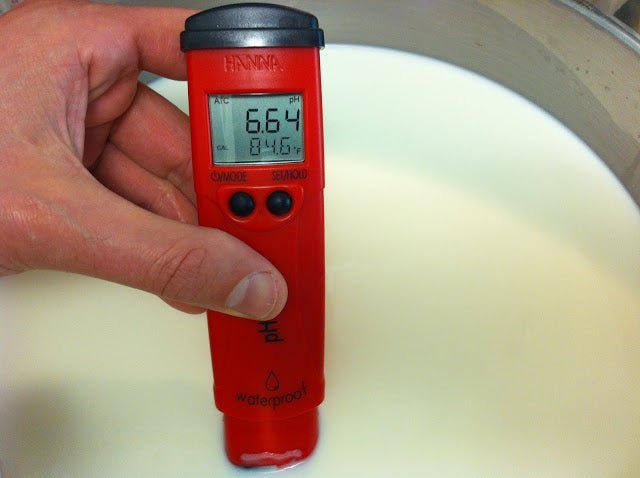
2. The Hanna pH tester is an easy way to take your measurements.
With those two tools, the sky will be the limit for you.
Our friend, Andrew Wilder at I Make Cheese and his new site, Eating Rules, bought his first pH tester last year (before the Joy of Cheesemaking came out).
August 22, 2010
My new pH tester!
By Andrew Wilder at I Make Cheese

Gosh, it’s been an embarrassingly long time since I’ve posted here. I’ve been quite busy over at Eating Rules, and I’m thrilled to be back in the kitchen making cheese once again.
A few months ago, my favorite pickler (Matty Sterenchockbought at I Make Pickles) gave me a Hanna Waterproof pH Tester for my birthday, and today we’re finally giving it a whirl.
This thing is awesome. Dip it in the milk or whey, and about 10 seconds later, Blammo! you’ve got a pH reading! (okay, there isn’t actually any explosion, unless you yell “Blammo!” yourself, which I highly recommend).
It’s as easy as using a thermometer (and actually includes a thermometer, since pH readings done in this manner must be temperature-calibrated).
Of course, without knowing exactly what pH we’re supposed to hit and when, this cool little device won’t actually be much help. None of my recipe books reference pH numbers — just times and temperatures.
I’ve been sifting through my copy of Paul Kindstedt’s American Farmstead Cheese, which is by far the most technical book in my library. He discusses pH in depth — but since the book doesn’t include any specific recipes, that only helps so much.
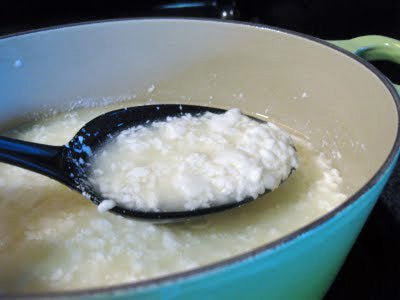
I did find a table on page 155 where he indicates “optimum” pH — with some timing — for making Cheddar. Already it’s been a bit of a help: Heating the curds (bringing them up from 86°F to 100°F) went slower than I would have liked, but keeping an eye on the pH still let me know we were making progress.
As the pH slowly worked its way down, I decided to drain the curds at 6.15 — based on Kindstedt’s table. This took more than an hour longer than Ricki’s recipe, but less time than indicated in the table.
As I write this, the curds are cheddaring comfortably in the pot. After only 15 minutes, on the first flip, the pH was down to 5.80. If all goes according to plan, at the end of the requisite two hours we’ll be at exactly 5.35, and then we’ll mill the curds (translation: break them into small cubes), and proceed with the next steps.
If we hit 5.35 a little early, I might actually decide to stop cooking and mill them sooner than Ricki calls for.
I’m excited to start using the pH tester every time — building my own reference library — and hopefully with a bit of diligence I’ll be able to solve my texture problems once and for all.
Do you have any experience with pH readings? Please post in the comments with any questions and/or advice!

3 comments:
Chillindamos said…
More cheese, much more cheese! Welcome back. I would strongly suggest you remove a small sample from your pot to test the pH. After testing, discard the sample. Your electrode likely sits in a storage solution and you probably don’t want any of that in your cheese. Its not uncommon for mold and other funky stuff to sit in your storage solution too. Even with rinsing your electrode before taking each reading (which I’m sure you do), you may risk some contamination.
Does pH only affect process timing in cheese making? If pH adjustments are necessary, there’s food safe adjustments you can make during your procedure. Understanding pH and how to adjust it can lead to lots of potential (pun intended!).
August 23, 2010 11:47 AM
Andrew Wilder said…
Good advice. I was rinsing the tester between samplings – but yes, for most of the process I could certainly pull out some whey and then discard after testing.
I haven’t figured out how to test the curd once it’s stopped expelling (most of) the whey. Ideally it would be good to know the pH of the cheese as it goes into (and comes out of) the press — but with my current tester I can’t think of a way to do that (since it can only test liquids).
As for adjusting, I’m not yet sure what adjustments can be made. I think adding Calcium Chloride at the time of renneting is one strategy — and I think that is often done based on the seasonal changes of the milk (so it would be on the *next* batch that you adjust). For the current batch, the only thing I can think of is to increase or decrease some of the time between steps.
August 23, 2010 2:58 PM
jorgen said…
Knowing the PH of the Whey gives you a very close idea of the PH of the Curd.
The PH of the Cheddar curd may easily go down to PH 5. The Cheddar has a slightly more sour taste than most other cheeses
September 27, 2010 12:24 AM


