


Yoel with his pottery container
Creating Small Sub-Environments for Cheese Aging
By Yoel Blumberger*
1. Introduction – Aging
In the cheese making process, the aging stage is quite calm, compared to the intensive preparation stage, but it is important and affects the taste and character of the final cheese. It is also the longest stage by far for most of the cheeses. The cheese maker’s role in the aging stage is to control, to wash, clean etc., but most of the work is done by mold, yeast enzymes and time. The usual environment for aging is the “cave” which provides stable parameters of required temperature and humidity.
To bring more interest and fun into my cheese making, I looked for more aging environments. Some of the ideas came from Italian “affinatori” (cheese aging professionals). They travel all over Italy to purchase the finest cheeses and age them in their own caves and cellars.
I was lucky to visit three Italian affinatori some years ago (pre Covid era…), and I recommend that you visit their websites (below). If you are in Italy, it is worthwhile to have a real visit if you are close. They deserve credit, as I further developed some of their ideas and after that adapted them to the home cheese maker’s environment scale.
These are the links to their sites:
https://guffantiformaggi.com/en/
https://www.demagi.it/en
https://www.degust.com
There are fantastic aging facilities also in the US:
https://www.jasperhillfarm.com/cellars
https://www.crownfinishcaves.com/
Obviously, in France:

The cave at Guffanti Formaggi in Arona, Italy

The cave at Degust Affineur in Varna, Italy
There are different intervention levels during the aging stage. Some of the cheeses are only controlled and handled by cleaning, washing (with bacteria solutions) and flipping, and some are also being manipulated, sometimes quite extremely, adding things to the cheese and changing it a lot. One kind of intervention is putting the cheese into a sub-environment, which is, for example, a barrel or pottery with materials that add some quality to the cheese.
The special aging sub-environments in my home dairy are inside the main cheese refrigerator and therefore are limited in their size, unlike in professional aging sites where there is large controlled space that can contain big sub-environments. Therefore, adjustments were made that mainly allowed the use of the dairy refrigerator in terms of volume as well as in terms of sterility.
I try these environments and use them mostly with Pecorino and Gouda cheeses made from sheep milk, aging them for two months. For me it is the most responsive and convenient platform. You can also try softer or harder cheeses.

Working in a dairy in the UK during an educational cheese trip
Here are three examples of aging sub-environment that I use. They are in order of complication. From the most complicated to the less. I am sure that some of you have environments you have created and it would be nice if you would share your ideas in the comments section.
2. Used Whisky Barrel – The Alcoholic Sub-Environments
Used whisky barrels retain a strong aroma that varies depending on the type of whisky aged in the barrel. Used whisky and wine barrels are sold in the US in several places and are easy to obtain.
Whisky barrels come in different volumes – some are smaller than a wine barrel, which is an advantage. Those that are relevant for us are probably with volumes of: 5, 10, 15 gallons. I use the barrel to give the cheese an alcoholic whisky aroma and to use it for producing cheese in pomace. (Pomace is the solid remains of grapes, olives, or other fruit after pressing for juice or oil. It contains the skins, pulp, seeds, and stems of the fruit. See recipe for Tomme-au-Marc cheese: https://cheesemaking.com/collections/recipes/products/tomme-au-marc-cheese-making-recipe
Before having the barrel, I made a fantastic cheese, Appenzeller, using this recipe: https://cheesemaking.com/collections/recipes/products/appenzeller-cheese-making-recipe
It will be interesting to age this cheese in the barrel as it is being washed (rubbed) with a strong alcoholic based emulsion. I assume that slowly the barrel will get a special aroma that will be a mixture of the original aroma with the aromas of the pomace, the Appenzeller and more.
Make sure that the barrel you purchase is corked because you need the aroma and if the barrel is uncorked, it will be useless (for our purposes).
For getting basic knowledge about the fascinating process of making barrels (cooperage) before starting to mess with them and taking them apart, you may watch one of the many videos about it. A nice one with quite an interesting story is here: https://www.youtube.com/watch?v=kaXvFw8ve_I
There are three options to adjust the barrel to your “cave.” It depends on the space you have in the cheese fridge.
A. The whole barrel fits inside the refrigerator.
I assume it will be a small 5 gallon barrel. An opening should be cut so that the two bilge hoops remain on the part of the door to keep the staves connected. It is also recommended to connect the door staves on the inner side as well. The “door” is then reconnected using hinges. It is quite easy to install 1-2 shelves for the cheeses that will be aged inside. In Fig 1 you can see how it was made using a big wine barrel, but the same goes with the small whisky barrel.

Fig 1 – Whole barrel with door
An easier option to open the barrel is by cutting most of one of its sides and making a lid out of it.

Fig 2 – Whole barrel with upper lid
B. The barrel does not fit into the refrigerator.
This is the situation in my dairy. I reduced the volume of the barrel by cutting (using a jigsaw, see Fig 3-5) it to create a smaller open barrel about one third the size of the original one. The lid is made of plywood. There is an option to use the upper side as part of the lid, as I did.

Fig 3 – Whisky barrel sawing height

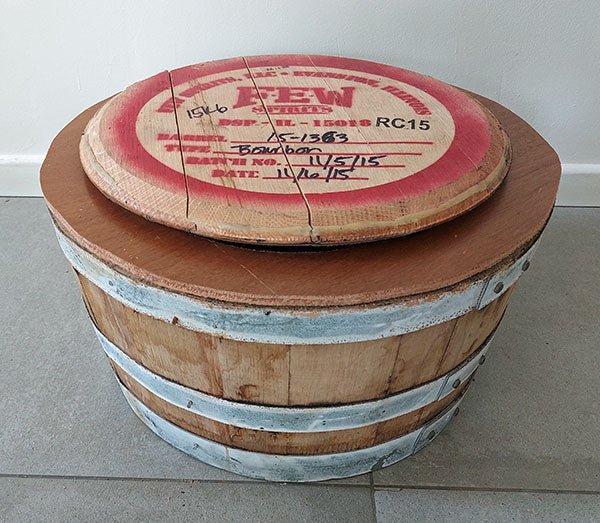
Fig 4 – The whisky barrel after cutting (left part is for the cheese aging)

Fig 5 – The whisky barrel with the lid

Fig 6 – Pecorino in the barrel inside the “cave”
The barrel’s final dimensions are height 9,” maximum diameter 17.” The barrel is heavier than the usual stuff that goes into the fridge, so a check is needed to verify that the shelf can hold it. If smaller barrels are used (5, 10 gallons) I assume the weight will not be an issue.
In the first 2 weeks, I put the cheese directly on the bottom of the barrel on the black, burned, caramelized wood. It gives the cheese a pale grey color and maybe some small black pieces will be incorporated into the rind. If, by now, you have some knowledge about cooperage you already know that this environment is very clean, so there is no problem. Of course, those who are worried can use a cheese mat or an elevated surface from day one, to keep a distance from the wood.
This option leaves you with plenty of free staves that are not needed. One use of a stave, in context, is converting it to a mini cheese tray for serving cheese. Clean the surface from the black ash, sand it a little bit, and clean it so it is ready for use. Fig 7 shows a stave from the whisky barrel and fig 8 a stave from a wine barrel (this is where the red color comes from) with Saint Maure cheese.

Fig 7 – Stave from the whisky barrel

Fig 8 – Cheese on tray made out of wine barrel stave.
C. Converting a whole barrel into refrigerator.
This option may be a possible one for adventurers with technical ability. I have not tested it yet. A barrel can be turned into a refrigerator at a low cost and simply by using cooling modules based on the almost miraculous Peltier–Seebeck thermocouple effect. There are some good DIY videos, which guide how to use these modules to build your own refrigerator.
However, there are some problems. These cooling components are not so efficient. They dry the cooled space making it less adequate for a cheese “cave.” Added humidity will tend to freeze on the cooling component, which is a problem. (If you are a cool reader, who knows cooling, it would be good to hear your opinion.)
Using options A and B, we are putting into a sterile environment part of a barrel that may be dirty and can bring into the fridge harmful things that we do not want. It can even infect the cheeses that are already in. Anyone who is very anxious and strict about the matter may give up. Those who still want to try should put lot of effort into cleaning the exterior side (maybe even painting it with water-based varnish) before the first use.
The cheese aged in the barrel does have a delicate, alcoholic aroma. I sometimes strengthen it with a coating (already at the stage of transfer to the mold) made of spelt flakes or oat flakes soaked in whisky for several hours. After soaking, you can simply spray the whisky left inside the barrel. In the picture (Fig 9) there are two baby Goudas. The one on the right is coated with spelt flakes being soaked in whisky and ready to enter the barrel.

Fig 9 – On the right, still young whisky baby Gouda
3. Pottery – Organic Sub- Environments
Pecorino cheeses made in Italy are introduced into various aging environments in wood barrels and pottery. I use pottery. It is clean, and made to measure.

Fig 10 – Pottery
Mine was made by a friend, but you can easily find one made from unglazed terracotta in cookware stores or elsewhere. It’s size allows you to put it into the refrigerator and to contain 1-2 big cheeses with the other ingredients needed. I use different kinds:
- A. Hay and straw. Aging in straw and hay adds a light earthy aroma, which can be strengthened by wetting the hay. The straw, which sticks onto the skin, makes the cheese look great.

Fig 11A

Fig 11B – Pecorino aged in hay and straw
- B. Branches of an olive tree, cut into small pieces with many leaves, preferably with the fruit. Higher aroma is achieved by crushing or cutting the olives.

Fig 12

Fig 12B – Gouda cheese aged in olive leaves and branches
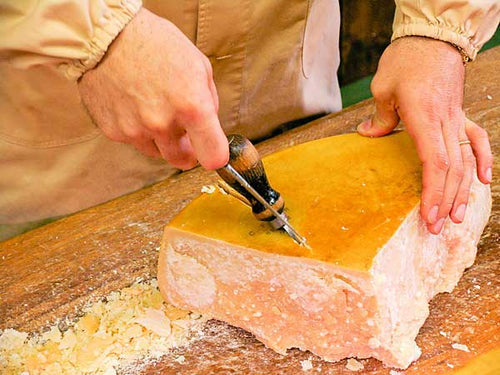
C. Ash – not the usual ash powder you use for your cheeses but one you produce with clean (natural, unpainted) wood, making a rough and grainy ash. The ash dries the internal humidity of the Pecorino, bringing the consistency to a more crumbly paste.
I lay part of the organic material on the bottom, then the cheese which I cover with another organic layer (straw, olive tree branches, etc.) on top and sides. The cheese is entered into the pottery straight after the removal from the mold because this is the stage where it will get the best effect. There are two approaches to treat the organic ingredients.
A. Careful scalding and cleaning.
B. Minimal cleaning by rinsing with water.
I have tried both and from my experience, the second method is preferable, since a thorough scalding and cleaning take from the organic ingredients large parts of their aromatic qualities. It is true that from time to time I get interesting colors on the skin of the cheese (see Fig 13), but this should not scare a home cheese maker … and yet, it is advisable to consume the cheese without the skin.

Fig 13 – Colorful Pecorino
Of course, the handling of these cheeses is a little more challenging than the usual ones since it has to be taken out of the pottery, and returned after cleaning.
The pottery must also be cleaned. It should be noted that it was intentionally made without glazing, which allows it to “breath” and absorb various aromas. It makes cleaning a little bit more difficult. The pottery should be cleaned between cheeses – first with warm water and then with boiling water. I use all the cleaning materials I usually use in the dairy.
4. Any Container – the Sweet Sub-Environment
This sub-environment is really a piece of cake to produce. The idea started after reading some articles regarding pairing cheese with sweet ingredients, mainly jam (apricot jam is the favored one) and honey. However, all were limited to drizzling on the cheese. I could not find any cheese that has honey in it’s recipe for use during the production stage. However, I found the Boer’n Trots, a Dutch Gouda cheese, which is washed with honey or maple syrup. I went on searching for a way to bring the cheese and the honey together in a sub-environment. A visit to this web site brought the honeycomb into the story.
It is very simple. Any small plastic container will do. Honeycombs contain different amounts of honey. For the cheese, a dry honeycomb with minimum honey is needed, so, let the honeycomb drip until all or most of the honey is gone, see fig 14.

Fig 14 – Dripping honeycomb
Put the honeycomb into the refrigerator so it will stop dripping and will cool to the temperature of the cheeses inside. Make a semi-hard lactic goat cheese (for example Saint Maure, maybe without the ash). One day after the cheese is transferred to the fridge; lay on the bottom of the container a honeycomb. Put the cheese on the honeycomb. Put the container into the fridge. Age for 2-3 weeks. Fig 15 demonstrates two options with one and with two honeycombs.

Fig 15A – Lactic cheese based on Saint Maure

Fig 15B – Cheese on honeycomb – Lingotto d’oro
Using a rectangle mold makes life easier while handling the cheese and the cheese is sweeter, as the contact surface between the cheese and the honeycomb is bigger. Treating the cheese during aging is a little bit messy and sticky but very rewarding when you lick your fingers after the treatment… The final cheese is moderately sweet.
Controlling the contrast between salt and sugar is achieved by one of two ways – add less salt to the cheese or use honeycomb with less honey inside it. The cheese is best served with a piece of honeycomb aside, on the stave from the whisky barrel!
Credits, again…
Many credits go to the masters that inspire us and, by this, help to make our cheeses better!

The cellars of De’ Magi. On the right, potteries and barrels with cheeses inside.
*We interviewed Yoel in June, 2019 – Yoel Blumberger in Tel Aviv, Israel
Since then, he has shared his expertise with us in 3 other articles:
Yoel’s DYI Cheese Drying Box
Yoel Blumberger’s Humidity Control System
How to Make a Peg Mill by Yoel Blumberger


