


We would like to thank Kurt Denke in Seattle, Washington for sending us this recipe. We will be interviewing Kurt soon, so stay tuned for more about him and his many other cheeses.
Disclaimer: We have not had the chance to test this cheese ourselves. Be sure to let us know if you make it.
Keynes – The only Blue Cheese with Cockney Rhyming Slang
By Kurt Denke
To me Stilton cheese is one of the greatest farmhouse-food pleasures of the world. I have adored it for decades, and when I started making cheese, this was the cheese I wanted most to be able to make. But some of the literature on it scared me a bit – it certainly sounded a bit more troublesome than other cheeses, and references to having to scrape “slime” off the cheese while aging were at least a bit off-putting. I am happy to say that I have yet to see anything I could possibly describe as “slime” in my attempts at a Stilton.
I based my approach upon a recipe written by Pav Cherny which I found on the website of the Washington Cheese Guild (which is now inactive). While I have made some changes, his recipe is recognizably still the core of my recipe, and so I want to be sure to give credit where credit is due and thank him for sharing his knowledge.
A few initial notes:
(1) I like to make a fairly large cheese – we do an eight-pound wheel which is a “baby” size compared to the usual commercial wheel of about 14 pounds. This is because the rind does tend to wind up drier than the rest of the cheese, and the larger the cheese, the less rind relative to weight! Also, Stilton traditionally is sort of “self-pressed,” with the weight of the curd as the source of pressure. If you do scale it down, you may find the need for a bit more pressing than I call for here. The recipe can, of course, be scaled down as much as one wishes, but the cheese is enough trouble to make that it’s lovely to have a lot of it when you’re done.

Cheese being pressed oh-so-lightly with three pounds of canned food – just enough to help form the ends, not enough to significantly close up the texture.
(2) On that volume issue, you’ll need, if you follow my eight pound sizing, to think about equipment. I use two five-gallon stainless cooking pots for the milk, and I keep them in a water bath in a very large picnic cooler to hold the temperature steady. Four gallons in each pot gives me enough headroom not to spill, but keeps the pots light enough to lift. If you can’t lift that, keep a teenager handy!

This is eight pounds of curd, after having sat overnight to fully drain. You can sort of tell that it’s a soft, pliable curd just from the look of it.
The good news is that you won’t need a press, nor, after getting the milk to temperature, will you need to raise the temperature to cook the curd. The possibly slightly-difficult news is that you may want a cheese mold somewhat larger than the usual. I made mine by cutting the bottom and top off of a pharmaceutical-grade polyethylene bottle (bought new – not ex-pharma use!) and drilling holes through the sides. My mold is 7 1/2 inches wide and about 9 inches tall, and this is enough – barely – for this cheese. (If you use 6 gallons of milk and adjust the recipe accordingly, you can use our Blue Cheese mold – click here)

An image of the cheese top viewing down into the mold, after a few “flips” have formed the ends.
(3) The trickiest bit for me, equipment-wise, was a cheese cave that would do the job of keeping the atmosphere extremely humid. I did one of these with the humidity at about 90% and found the cheese too dry – this is definitely a cheese that needs high, high humidity. I am sure there are many good solutions, but mine was this: a thermocouple-type wine-chilling fridge made to hold about twelve bottles. We removed the shelves, put a tray in that covers the whole bottom, filled the tray with water, and then hung half a dozen microfiber-towel “wicks” from the ceiling, reaching all the way to the water. Even this was not quite enough, so we put a small computer fan in as well – that, blowing across another wick, keeps it thoroughly humid – not dripping-wet, but very humid, and perfect for this cheese. Blue mold gives off a bit of ammonia, so it doesn’t hurt to change out the water a few times while aging in order to reduce the intensity.

A cheese which has just been removed from its mold after four days. It’s been put into the fridge, and so is surrounded by little “curtains” of microfiber towels which are wicking water from a tray at the bottom to keep the humidity extra-high.
(4) This is a bit of a time-eater, and in particular, there is a stage with a wait of about six to ten hours. So look at this schedule before you start! You’ll probably want to start the cheese one day, then sleep, then finish it when you get up in the morning. You could, alternatively, start it VERY early one day and stay up late.
(5) This is a very texture-sensitive cheese, and you’ll have to use a certain amount of judgment all along. If the curd is too soft, it’s going to press itself together into a mass without air pockets, and you’ll have inadequate mold development.

A cheese where the curd was a bit too soft. The spaces closed up too much, resulting in reduced veining. Still, lovely to eat, but not 100% on-target.
If the curd is too hard, you’re going to wind up with a cheese that crumbles and may have a lot of mold, but is too dry and hard for the style.

A cheese where the curd was a bit too hard. Accordingly the spaces didn’t close up as much, and there’s very heavy veining. Lovely cheese, but a bit dry for the style.
The texture issue is a matter of hitting a balance. I’ve generally not found this too difficult, but it clearly does involve a certain amount of subjective judgment and if you don’t at first succeed, keep some photos and notes so that if you try again, you know which direction to tweak it in. For myself, I can say this: it’s easy to think your cheese has far too open a texture when you are first putting it in the mold. Resist the urge to give it a bunch of pressure – the cheese really does press itself and the open texture does close up somewhat.

Cheese after a few weeks, with a complete covering in mold.
(6) Controlled appellations being what they are, technically a cheese is not a Stilton unless it is made in one of a few counties in the UK. We call this cheese Keynes, in homage to cockney rhyming slang. In rhyming slang, one substitutes an expression which rhymes with the word intended, and so “look,” for example, becomes “butcher’s hook.” Then – and this is the lovely bit – one drops the actual rhyme and just uses the rest. So, to “have a butcher’s” is to take a look. If you’ve ever wondered where the expression “raspberry” for a certain impolite sound comes from, think of “raspberry tart.” As the town of Milton Keynes is a well-known place in England, this cheese is known as Keynes.
All right, then.
Ingredients. You’ll need:
Eight gallons of whole milk, plus enough cream to raise the milkfat to about 4.5% — with our supplier, that’s about an additional quart of whipping cream. (We use a cream-top pasteurized milk from a family dairy in Washington called Twin Brook Creamery.)
Calcium chloride, 2 tsp.
Aroma B culture, 3/4 tsp.
Mesophilic culture, two packets
Vegetable rennet, 1 tsp.
P. roqueforti culture, 1/4 tsp. (we use the PV strain)
Cheese salt, 5 1/2 Tbsp
Bear in mind that everything – except the salt, which comes later on – covers TWO pots of four gallons of milk each, so you’ll divide the quantities above in halves, one for each pot, as you proceed.
It’s probably good to have a pH meter and base your progress on that. But if you don’t, these times are about right. Your mold culture may want rehydrating beforehand, but if you forget to do that – well, it’s always worked fine for us even when we forgot!
Directions:
1. Raise the milk to 86F.
2. Add the calcium chloride, the Aroma B and Mesophilic cultures, and the P. roqueforti, stirring to mix well.
3. In about an hour to an hour and a half, you should find pH at about 6.45 (from an initial value closer to 6.6). Add the rennet.
4. When you’ve stirred in the rennet, start a timer and float a small plastic cup in the milk. This will help you ascertain the “surface gel time.” When the cup, if nudged, doesn’t move through the milk, you’ve reached surface gel point. Multiply the amount of time this took by 4 to get the time to cutting curd – typical times are about 15 minutes for surface gel, ergo, 1 hour total from renneting to curd cutting, though we’ve had it take only half that once or twice. pH at curd cutting should be around 6.3.
5. Cut the curd into 1-inch cubes. Stir gently from time to time to prevent matting – but the curds will be very soft and so some care is essential.
6. In about an hour and a half, pH should be at about 6.0. Drain the whey. At this point, if you’ve been using two four-gallon batches as we do, you should be able to combine them. It’s helpful, at this point, if you have some kind of false-bottom arrangement, such as a large colander (and I do mean large), so as to allow the whey to continue to drain from the curd. You may find that some of the curds are still pretty large and watery-looking. Not a problem – the curd will continue to lose whey during the night. And remember, you’re STILL at 86F – if you use our large-cooler method, you’ll find that the temperature is very easy to maintain all night long, especially if your cooler will shut tightly.
7. Time to sleep! Let the curd sit – perhaps draining the whey again once or twice in the night if you can’t sleep – for about 6 to 10 hours. The pH of the curd should have reached 4.6 to 4.8.
8. Mill the curd – 1/2 to 1 inch pieces. I wouldn’t use knives for this as you want the curds to be irregularly shaped for good veining. Mix the salt in thoroughly.
9. Put the curds into the mold. At this point the texture is liable to look too open, and this will tempt you to press. Small amounts of pressure can help form the ends nicely, but I limit myself to putting about three pounds on top of a follower – that very light pressure is the most you will need, and perhaps makes up a bit for the fact that this is a “baby” wheel rather than a big 14-pounder.
10. Flip the mold over every fifteen minutes four times, then every half an hour four times, then every hour four times. Keep the cheese, still in its mold, in a humid room-temperature environment (I simply put a bucket over it to keep the moisture from the cheese from evaporating away) for four days, flipping once or twice a day.
11. Remove the cheese from the mold. You’ll probably find that it’s got a bit of a color-tinge from the mold growth that’s begun. Use a warm cake spatula or similar implement to smooth the surface – if your texture has come out just right the outside should be a bit smearable (especially if the spatula is good and warm/hot), and you can use this to close up some of the more open points. Move the cheese to your aging environment. This should be about 55F and VERY humid – my wine-cooling fridge environment pegs my humidity meter sometimes at 100%. You don’t want a drippy environment where the cheese is being wetted, but you do want so much humidity that the cheese cannot begin to dry out.
12. Pierce the cheese with a skewer in multiple places (I do about 15 pokes fully through) after about a week, again after about three weeks, and again after about six weeks.
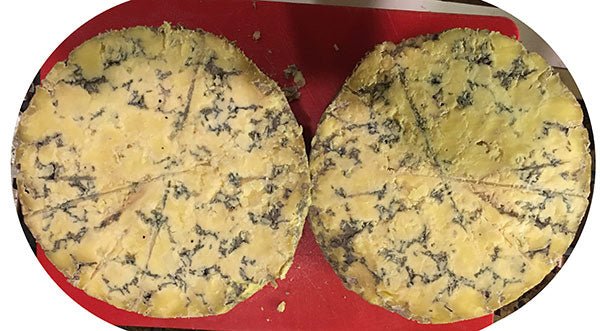
13. At about ten weeks, you’re ready. A slice right through the middle will, if the fates are kind, show lovely blue veining. One small initial tasting note: the cheese can have a bit of an ammonia note at the beginning, which may come across as a bit of bitter aftertaste, but this will dissipate – if it’s an issue, try to give the cheese a bit of room to rest in fresh air – not so long as to let it dry!
The right balance of techniques will yield a cheese of superb quality. It’s fussy; it may take a couple of tries to get everything just where you want it; but the result is worth the trouble.


