


From one of our favorite guest bloggers, Jayne Maker (The Barefoot Kitchen Witch)
It’s been 2 1/2 years since I first interviewed Jayne (New Cheese Maker #4) when she was just learning to make cheese. She caught on fast and, since then, she has shared with us her fabulous tutorials on making Farmstead Cheddar, Feta and Smoked 30 Minute Mozzarella.
When Jayne tackles a new recipe, she takes lots of pictures and she shares every moment with her “followers.” Sometimes, things do not go as smoothly as she would like, but she always ends up with a pretty darned good cheese.
When I first saw her article below, I realized that we have posted 9 tutorials about making 30 Minute Mozzarella and zero about making it the traditional way. Yet, it’s in our book (Home Cheese Making) with 2 different recipes – one with goat’s milk and one with cow’s milk. Jayne used the one on page 192 of the third edition.
Goat’s Milk Mozzarella
By Jayne Maker
I’ve been making cheese for a few years now, but not as frequently as I’d like, and certainly not as many varieties as I’d like. I’m hoping to kick myself into a higher gear as this summer flies by, and maintain that gear through the rest of the year.
Originally I’d planned to make another cheddar next, as I’ve only made a few, and I’d really like to make a whole bunch of them and age them for different lengths of time. So that was the little plan in my head. That and making parmesan. And Saint Maure and Camembert – both white mold ripened cheeses.
But an email from a reader nudged me in a different direction. And my own scatterbrained way of proceeding sent me off on a tangent that I didn’t need to go on, but sometimes that’s okay. You know, the whole “two roads diverged in a wood and I took the one less traveled by…” thing.
But you don’t really want to hear all that stuff, do you?
You’re here for the cheese.
So here we go.
First, here is Milk Maid Julia, all ready to help out with the
making of some cheese.
Getting her apron on was about the most she did. Making cheese just wasn’t exciting enough for her, waiting for milk to get to the proper temperature and then stirring in starter.
So that’s the last you’ll see of my little helper in this post.
The recipe I used is actually portions of a recipe for goats’ milk provolone. Provolone is kind of like a brined, aged cousin of mozzarella. It’s cooked, whereas the mozzarella is not. And the provolone is aged as well.
I’d like to make provolone, too…have to add that to my list.
Okay, I started with 2 gallons of goats milk, and I pasteurized it.
That’s not very exciting to watch or photograph, so I’ll skip ahead to the other stuff that goes into making this cheese.
We’ve got half a packet of direct-set thermophilic starter. This will get the milk ready by converting lactose (milk sugar) into lactic acid, and acid helps rennet coagulate the milk.
Next, lipase. Lipase is an enzyme that adds flavor to the cheese.
Next, citric acid. Another acid to help coagulate the curds.
And, last but certainly not least, the rennet. I
ordered liquid rennet this time around – it’s much easier to use than the tablets, especially if you only need a small amount. No more slicing tablets and hoping the amount is truly one half or one quarter.
Okay now, I’d pasteurized the milk, which meant I held it at 145F for half an hour.
Next, I had to drop the temperature down to 86F for one gallon and all the way to 35F for the other gallon.
I put the whole pot in an ice water bath and brought both gallons down to around 90 something, then I ladled out one gallon to put in a separate pot.
This would be the 35F gallon. I stuck it in the fridge while I worked with the other gallon.
I got the “warmer” gallon down to 86F, at which point I stirred in the starter and the diluted lipase powder. Then I put the lid on and let it sit for about 45 minutes.
Then, I got to work on the gallon that needed to get REALLY cold.
Of course, I chose to make this cheese on one of the hottest days of summer (so far)…hot AND humid, so it was really difficult to get the milk cold enough.
In fact, I didn’t get it down to 35. That would have taken forever, and I was running out of ice. Ideally, I would have pasteurized the milk the day before and then had it in the overnight. Then all I’d have needed to do would have been to heat up the one gallon, and slightly cool the other – already cold – gallon. Ah well, next time.
I only got the milk down to around 55 F. I kind of gave up at that point. In other recipes, the citric acid is added at this temperature, so I decided to just go with it. So I stirred in the diluted citric acid.
So. Time for the next step. Here we’ve got (in addition to a great big mess of dirty dishes and things), the gallon of cold(ish) milk with the citric acid, and, in the larger pot, the milk with starter and lipase that’s been sitting and ripening for 45 minutes.
Time to combine the two.
And then it was time to bring the milk temp back up to the magical 86F.
Once I’d accomplished that – it didn’t take long, probably because the air temperature in the house was close to 90 already – I added the diluted rennet, stirred that in gently, and let it set for fifteen minutes to coagulate.
Yay – separation!
And here’s where I had problems.
After letting the milk set, it was curd-cutting time.
I’m still working on my curd-cutting technique.
Ideally you want your curds to be uniform in size.
The thing is, curds don’t sit still while you cut them. They’re like small children. They wiggle. They squirm. They try to scoot away.
The first round of cutting is the easiest – just a series of parallel cuts. In this case, I needed 1/2” curds.
I started in the middle and slid the blade (actually it’s a really large cake icing spatula) all the way to the bottom of the pot and then toward me in a straight line. Then back into the curds a half inch to the right of the first line. And so on. But I found that as I got to the “end” of each side, the curd would duck down into the whey. It made the cutting difficult, to say the least.
I’m thinking now that maybe I should have removed some of the whey, just so the curds wouldn’t slip around as much. Maybe next time.
And then – it was time to slice across the first slices. The curds curled away from my blade, ducking below the surface of the whey and probably making faces at me as my slices became less and less precise, more and more haphazard.
And after that round of slicing – when, in the illustrations in the book, you have a lovely checkerboard pattern on the top of the well-behaved curds – it’s time to go in at an angle and slice these (theoretically) tidy vertically cut curds into cubes.
To that I say: Ha!
Didn’t happen. I did what I could, but frustration (and humidity) had set in and I was rather sick of the damn curds and their shenanigans.
And that’s where I think I sort of screwed things up. Not entirely, but…well, I’ll explain that part when I get to it.
Okay, now once the curds are cut into cubes or wedges or rhomboids or whatever you can do, you let them sit for five minutes. During this time, the curds should be releasing more of the
whey.
And this is where the process of making the mozzarella departs from the process of making provolone.
If you were going to make provolone, you’d cook the curds, which would continue the separation of curds and whey, and the curds would get smaller and tighter as more whey was expelled.
But since you’re not making provolone, you don’t do that. You skip the cooking and go right to draining.
So I ladled the curds out and saw how few of them were actually 1/2” cubes.
They were more like 1” or 2” globs.
But they were pretty, shiny globs, so I stubbornly (or foolishly, take your pick) continued on. I’m thinking that would really have been a good time to slice the curds better and let them sit another five minutes, but I’m thinking that NOW; I wasn’t thinking it then. THEN I was probably thinking $*^%##$%^&*(__)(*&%$##@!!!!!!
The cubes, such as they were, went into a colander to drain for about fifteen minutes.
I shifted them around a bit while they were matting together and shedding liquid, just to help get rid of as much liquid as possible.
Next – I sliced the curds into 1” cubes. Sort of.
The texture was that of soft tofu, I think.
Oh, and those little dots on the surface of the curds? That’s from the little holes in the colander.
I took a look at one of the curds – it reminds me of bread dough a bit.
Okay, once the curds were cut (and while I was cutting them they “bled” milky whey all over the counter) it was time for the kneading and stretching.
I heated a pot of water to 145 F and then took small handfuls of curds, squeezed them together a bit, and then put them in the hot
water.
The recipe says to let the curds soak until they reach an internal temperature of 130F. I tried taking the temperature of a curd, but I quit that and just went by feel.
I knew that when the curds were hot enough, I could knead them and stretch them. So, when they were so hot that I wanted to toss them back in the water, that’s when I started shaping the matted curds into small balls of cheese.
But.
The stretching wasn’t as elastic as I’ve managed to achieve when making the 30-minute mozzarella.
I’m blaming my failure to cut uniformly sized curds.
Lesson learned.
Still, though, the cheese tasted good – mildly “goaty” and almost the same texture as the other batch of mozzarella I’d made earlier.
But you can see in the picture below that the cheese is still weeping milk. I don’t think that’s a desirable trait in a fresh mozzarella.
I dropped all the balls of mozzarella in an ice water bath.
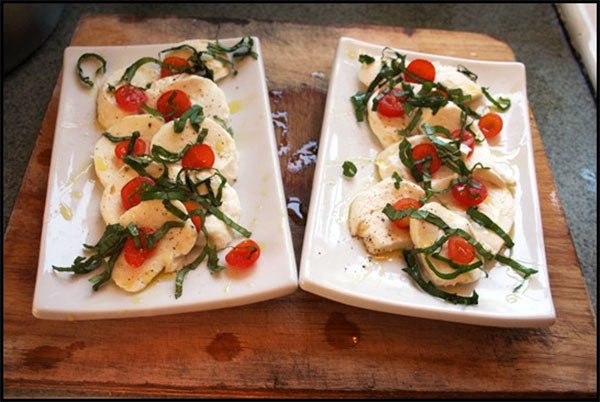
Later, I made two little mini caprese salads, using 6 little ripe cherry tomatoes and some fresh basil from the garden.
One plate (on the left) was made with the goats’ milk mozzarella, and the other was made with cows’ milk mozzarella.
Both versions were equally yummy.
Texture-wise, the goats’ milk mozzarella was definitely a bit loose, a bit watery.
But, with the tomatoes and basil, a drizzle of olive oil, a sprinkling of kosher salt, and a few grinds of fresh black pepper, both versions made for a very yummy antipasto.
And I’m thinking that today (because I don’t have enough to do), I might give the 30 minute mozzarella a try with goats’ milk.
Just to see how that one comes out.
And next week?
I’m moving on to the hard cheeses. It’ll be either a cheddar or Parmesan (Parmesan-like. I realize I’m not in Parma, so it wouldn’t be a TRUE parm. It’ll be a cheese-made-in-the-style-of-Parmesano-Reggiano.)
It’ll give me a chance to practice my curd-slicing technique. I need it!


