


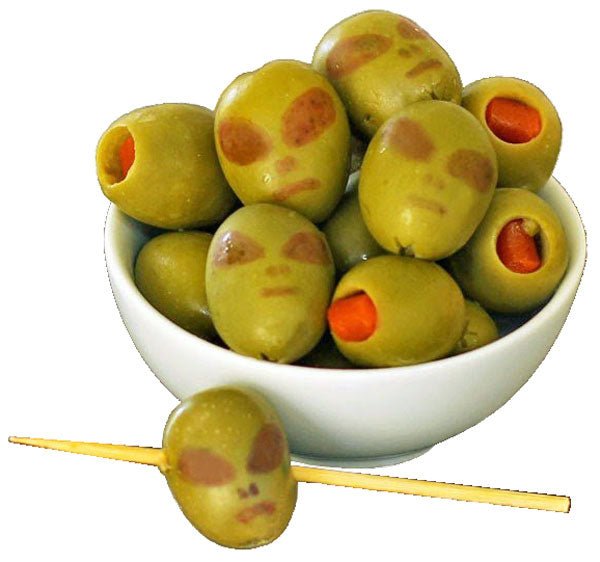

Olive Aliens from Hungry Happenings. Draw faces with black food coloring marker and soak in the brine for a few minutes until they look otherworldly. Serve with cheese (of course!).
Creativity Abounds!
Cream cheese seems to be the main building block in most holiday appetizers and, the good news is – you can easily make your own with our simple recipe – click here. All you really need is rennet, buttermilk culture, and calcium chloride.
We have chosen a few of the coolest and easiest Halloween appetizers we could find. If you have your own to share, send it along with a picture to info@cheesemaking.com.

Photo from Jo and Sue
Guacamole Dip from Jo and Sue
Ingredients:
3 avocados, halved & pitted
juice of 1 lime
pinch salt & pepper
1 tsp green food coloring
8 oz container chive & onion cream cheese spread
1/2 cup salsa verde
small onion, finely chopped
Eyes – yellow pepper & black olive slices
Eyebrows – very thin slices of purple onion
Lips – roasted red pepper (from a jar)
Hair – carrot sticks
Hat – black tortilla chips
Directions:
Line a face mold with plastic wrap and set aside. (We set it in a bowl to stabilize it and keep it from tipping over.)
In a mixing bowl, scoop the avocado flesh from the skin and place in bowl. Using a fork, mash the avocado with the lime juice, salt & pepper, and green food coloring until smooth.
Stir in the cream cheese spread, salsa verde, and finely chopped onion until well combined. Set aside.
To make the face – cut the yellow pepper into oval shapes and place in the eye slots of the mask.
Place the thinly sliced purple onions slices where you would like your eyebrows to go.
Cut a roasted red pepper into a lip shape and place in the lip slot of the mask.
Gently spoon the guacamole dip into the mask, being careful not to move the eyes and lips out of their place.
Cover and chill in fridge for at least 3 hours – up to overnight.
When you’re ready to set up – carefully flip the mask over onto a serving platter and remove the mask from the dip. Then, carefully remove the saran wrap from the dip.
Place the 2 olive slices on top of the yellow pepper for pupils.
Place the carrot sticks in a single layer across the forehead for bangs and then in piles to the side of the head for extra hair. (We cut the bangs into pointed tips to look more hair-like.)
Finally, place the black tortilla chips on top of the carrot sticks, near the top, and continue up in a point to make a witches hat. Serve with extra tortilla chips and carrots to dip.
Note- If you find it too difficult to place the facial features into the mold then you can certainly place them on AFTER you have un-molded the dip. Simply place them on top of the face, in the proper places, just before placing the hair and hat.
![]()

Photo from KQED Food
Fiendish Roasted Butternut and Goat Cheese Mummy Tartlets by Kim Laidlaw and Wendy Goodfriend at KQED Food
Makes 9 mummy tartlets
Ingredients:
small butternut squash (about 1.5 lb), trimmed, peeled, seeds scooped out, and cut into 1/2 inch cubes
olive oil
kosher salt
17.3-oz package frozen puff pastry sheets, thawed (ideally overnight in the refrigerator)
large egg, beaten with 1 tsp water
3 oz fresh goat cheese
18 sliced black olives
Directions:
Preheat the oven to 450°F. Cut squash into 1/2 inch cubes.
Spread the butternut squash cubes onto a large rimmed baking sheet, then drizzle with olive oil and sprinkle with salt. Toss to evenly coat, then roast the squash, turning occasionally, until browned and tender, about 25 minutes. Transfer to a bowl and roughly mash the squash with a fork. Let cool completely.
Reduce the oven temperature to 400F. Line the (cooled) baking sheet with parchment paper. On a lightly floured surface, roll out one puff pastry sheet into a 13-inch square. Using a 4-inch round biscuit cutter (or a ramekin of the same size and a sharp paring knife), cut out 9 rounds. Transfer the rounds to the baking sheet. (If you have any scraps you can cut them into strips; discard the remaining.) Brush the rounds with the beaten egg.
Leaving a 1/2 inch border, divide the mashed butternut evenly over the pastry rounds. Then, sprinkle the butternut with goat cheese, dividing it evenly. Place two olive slices on top for eyes.
Roll out the remaining puff pastry and cut it into thin strips with pizza cutter. Using the 4-inch cutter, cut out 9 rounds of strips. Brush the pastry strips with the egg. Decorate the tops of the tarts with the strips, egg side down, placing them haphazardly over the filling, and covering the filling entirely, so they look like mummy heads. Press the edges down to adhere to the bottom pastry round. Place the baking sheet in the freezer for about 20 minutes.
Bake until the puff pastry is crisp and golden brown, about 25 minutes. Let cool slightly then serve.
![]()

Photo from The Girls of Gourmet Cooking
Mini “Pumpkin” Cheese Balls from The Girls of Gourmet Cooking
Ingredients:
8 ounces cream cheese, softened
¼ cups finely chopped roasted red peppers
½ teaspoons garlic powder
1 pinch cayenne pepper
1 cup finely grated sharp cheddar cheese
paprika, for dusting (You can use a mixture of normal paprika and smoked paprika)
2 whole green onions
Directions:
Beat cream cheese, red peppers, garlic and cayenne until well blended. Stir in cheddar cheese. Refrigerate 2 hours or until firm enough to handle.
Roll into 1-inch balls and then coat in paprika.
Make indents in the sides of each one with a knife to make a pumpkin shape (refrigerate longer if needed before shaping with a knife).
Slice green onion into 1-inch pieces (green parts only). Stick into the top of the cheese ball for a stem. (If they are larger green onions, you may slice each piece in half lengthwise).
Roll each half back into a circular shape and stick into the top of the cheese ball to make it the appropriate size. Refrigerate until serving.
![]()

Photo from Eating Richly
Cheese Mummy by Diana Johnson at Eating Richly
Ingredients:
2 cups Swiss cheese finely shredded
2 cups sharp cheddar cheese finely shredded
2 cups cream cheese softened (or can sub half with goat cheese), 16oz
1/2 cup light sour cream
1/2 yellow onion finely minced
1/2 a red bell pepper roasted and chopped (How to Roast a Red Pepper)
1/4 cup crumbled or chopped cooked bacon
1/4 cup chopped fresh Italian parsley
1/4 cup slivered almonds
3 TBS milk
2 peppercorns
sliver of red pepper
Directions:
Use a stand mixer to beat one cup of cream cheese and sour cream until fluffy.
Add the swiss and cheddar cheeses, onion, roasted pepper, bacon, and nuts, beating the mix between each addition.
Refrigerate the cheese mixture until firm (about 1 hour).
Shape into a body on a pan or cookie sheet.
Mix the second cup of cream cheese and milk. Spoon into a pastry bag with a flat or basket weave tip and pipe bandages onto the mummy body.
Use peppercorns and red pepper to make eyes and a mouth.
Serve with crackers for scooping or bread to spread it on.
Note- Vegetarian/Gluten free: You can leave out the bacon to make it vegetarian, and it’s already gluten free.
![]()

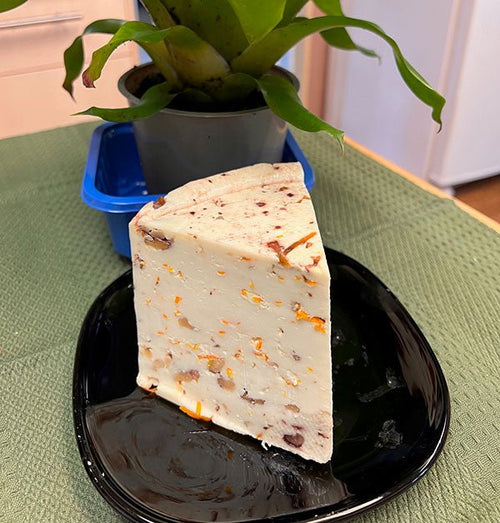
Photo from Land O’Lakes
Cheesy Witch Hat by Land O’Lakes
Ingredients:
Spread
8-ounce packages cream cheese, softened
1/2 cup butter, softened
.7-ounce package dry Italian salad dressing mix
10 ounces (2 1/2 cups) shredded Cheddar cheese
4-ounce jar chopped pimentos, well-drained
1.25-ounce package (1/4 cup) poppy seed
Decorations:
1 large carrot, peeled, sliced thin
Directions:
Combine all spread ingredients except poppy seeds in bowl. Beat at medium speed until creamy. Reserve 2 tablespoons cheese mixture in another bowl. Cover; refrigerate.
Divide remaining cheese mixture in half. Spread one-half into 6-inch circle in middle of serving plate to form brim of hat. Shape remaining half of cheese mixture into 4-inch ball. Wrap each in plastic food wrap; refrigerate 1 hour.
Assemble hat by centering cheese ball in middle of hat brim. Shape ball into cone to form top of witch’s hat. Sprinkle or press poppy seeds over entire hat to cover.
Attach carrot slices to form hatband by using reserved cheese mixture. Carefully cover with plastic food wrap; refrigerate at least 2 hours.
Remove from refrigerator about 30 minutes before serving. Serve with assorted crackers and vegetables.
Note- Sliced olives, zucchini or small round crackers may also be used to form hatband. This fun hat can be made 1 day ahead. Wrap in plastic food wrap; refrigerate. Attach hatband just before serving.
Healthier Options
These are some pictures we found on Pinterest. We couldn’t trace the sources, but we think they’re simple enough to make without detailed directions:

These look easy enough, although the trick is probably to get the chocolate chips to stay on the bananas.

It looks like they made little cream cheese balls and rolled them in flax seeds.

Blackberries and cantaloupe

Carrots, cream cheese and black olives

Carve out a watermelon, using the spare skin for the ears. Then, add grapes for the eyes. Cube the watermelon and add honeydew melon and more grapes.


