There’s snow in Appalachia, but our “Chick in the Road” is still moving forward with her quest.
As you know, Suzanne McMinn has accepted our challenge to make a new “hard” cheese every month until she dies and goes to cheese heaven. Her first test came last month when she absolutely nailed Monterey Jack which is, admittedly, a fairly easy cheese to make. (See Cheese Challenge-Monterey Jack.)
This month, she chose a more complicated cheese and, again, she rose to the challenge. Could it be that making cheese is easy? Or, is Suzanne a one-in-a-million culinary genius? Here’s her post as it appears on her wonderful website- “Chickens in the Road.”
Making Munster
By Suzanne McMinn of “Chickens in the Road”
Stinky cheese! I love stinky cheeses, but I was a little bit (or a lot) intimidated by the idea of making them. The process involves weird ingredients and new (to me) methods. I started this cheese challenge series for New England Cheesemaking to push myself out of my comfort zone, though, and Munster was a big enough threat to make a fine adversary.
Perhaps the “scariest” part of the whole thing is the red bacteria. Brevibacterium linens. WHAT IS THAT?! And you have to brine the cheese. I’ve never made a brined cheese before. It’s also a washed curd cheese–the cheese is “washed” or wiped with salt water during a 10-14 day ripening period before waxing. And you press it under its own weight in a mold sandwich. WHAT IS THAT?! You have to spray the red bacteria on the surface of the cheese with an atomizer. Seriously, I thought finding an atomizer would stop me from making this cheese. I only needed a little atomizer. Not some big spray bottle. Finally it hit me that I could use one of the body spray misting bottles that I ordered to make scented body sprays. They are 8-ounce size with a fine misting pump. (A 4-ounce atomizer would be perfect, if you’re getting one specifically for stinky cheese purposes, by the way.)
Munster cheese is one of a family of cheeses known for their strong smell from the red bacteria. The flavor varies from mild to strong, depending on how long you age the cheese. Other cheeses in this dysfunctional cheese family with odor issues include Brick and Limburger. There is a difference between Munster and Muenster, by the way. Munster is a deli-style cheese while Muenster is a soft and butter-like cheese with a yeasty red rind.
I held a meeting with the staff and told everyone we were going to make stinky monsters.
You just can’t get good help anymore.
To get this cheese from starting the milk in the pot to the time you’re finished flipping the mold sandwich and ready to let it sit overnight is 3 1/2 hours. The best time to start this cheese is around 6 or 7 in the evening.
There’s more than one way to make Munster. You can find another method for Munster-making
here. The recipe below comes from Ricki Carroll’s
Home Cheese Making. (My personal cheesemaking bible!)
Here’s what you need to make Monster Munster cheese:
2 gallons whole milk
1 gallon water for brine
Note: Prepare your red bacteria FIRST, right before you start your milk in the pot. It should be rehydrated at least 10-15 hours before using. Brevibacterium linens is an odor-producing bacteria and is, in fact, the same bacteria that makes your feet stink. Isn’t that weird??? That is red bacteria’s ugly side. Its pretty side is its contribution to the fermentation of cheese. The bacteria comes in a dry powder form. I tried to sterilize an atomizer by dropping it in boiling water but it melted the atomizer. Let that be a lesson to you. I ran the next one through the dishwasher instead. It was from a box of 12 brand new body spray atomizers I had ordered, so it had never been used, but I made my best attempt to further sterilize it. (The atomizer cost $1.05.)

I boiled the water I used to rehydrate the powder, cooling it after boiling then mixing with the powder. I poured it into the atomizer bottle using a small funnel. (I stored the red bacteria in the atomizer bottle in the fridge between uses. One bottle is enough to use for multiple cheeses.)
1. Heat the milk to 90 degrees (88 for goat milk).
Add the starter; mix well. Cover the pot and let ripen at 90 (or 88 for goat milk) for 15 minutes. Add the cheese coloring. I used all 8 drops. (Munster isn’t supposed to be a highly colored cheese, but cheese coloring is pretty subtle, so I usually add on the high end of the suggested amount.) Cheese coloring can hamper the coagulating power of rennet, so it must always be added before adding rennet and mixed in thoroughly before proceeding with the rennet. If you forget the coloring and add the rennet first, forget the coloring. You missed it!
2. Add the diluted rennet and stir gently using an up-and-down motion for 1 minute. Cover and let sit at 90 (88 for goat milk) for 40 minutes or until the curd gives a clean break.
3. Cut into 3/8-inch cubes and let set for 5 minutes.
4. Raise the heat by two degrees every 5 minutes, until the curds reach 100 degrees (98 for goat milk). This should take about 25 minutes. Stir gently to keep the curds from matting.
Do NOT raise the temperature too quickly–that can trap whey inside the curds. Don’t stir too wildly as that can cause a loss of butterfat. The more I work with cheese curds, the more I realize how the little details of this process effect the result. Don’t be afraid of the process, though–the more experience you have with curds, the better your cheeses will become. I’m still learning, and every cheese I make is more experience.
While you’re in the process of raising the temperature of the curds and letting them sit (in Step 5), put a large pot of water on to boil to prepare for Step 6.
A watched pot never boils.
Do yourself a favor and get your pot and your materials sterilized during Step 5 so you aren’t freaking out waiting for the water to boil while your curds ruin.
5. Maintain the curds at 100 degrees for 30 minutes. You should just be able to put the lid on the pot and keep the curds at a level temp, taking the lid off periodically to stir the curds gently to prevent matting. After 30 minutes, let them sit undisturbed for 5 minutes.
6. Sterilize in boiling water one cheese mold, two cheese mats, and two cheese boards.
I have a
2-pound mold and a
4-pound mold. I tried the 2-pound mold and couldn’t fit all the curds in there so I ended up using the 4-pound mold. Cheese mats are cute little
bamboo mats–you can get them from a cheesemaking supplier. I got mine from
New England Cheesemaking. They’re also handy for other hard cheeses for the air-drying process.
For cheese boards, I used a small wooden cutting board and a small platter. Rather than sterilize them in boiling water (which seemed a tad difficult!), I wrapped them in foil. The cheese doesn’t actually touch the cheese boards, so I figured this was good enough if not ideal.
Now you have to figure up your setup for the “mold sandwich” you’re about to prepare. Bacteria- and mold-ripened cheeses press under their own weight rather than in a cheese press. The cheese drains through the holes in the sides of the mold and through the cheese mat underneath it. You set the whole thing over a sink or a pan (to catch the whey drainage).
Place a cheese mat on top of a cheese board and set the mold on top of the mat. You should be preparing all of this for Step 6 during Step 5 so that you are prepared immediately to move through Step 6 and get on with Step 7. Otherwise, your curds will be sitting and sitting in the pot–and you may ruin your curds.
7. Drain the whey down to the level of the curds. Transfer the curds to the mold that is sitting on top of the mat. Place another cheese mat on top of the mold and the other cheese board on top of that. Now the cheese is pressing under its own weight alone.
8. Let drain for 30 minutes then carefully–very carefully!–flip it. (The most whey drains out during the first 30 minutes. Each time I have made Munster using a pan for drainage catching, I temporarily set the mold sandwich on the counter and emptied the pan then put the mold sandwich back on the pan.)
9. Repeat the process 5 more times, flipping the mold sandwich every 20 minutes. Flipping the mold sandwich is a real balancing act. You have to be quick! Or the cheese will go sideways in the mold and mess up.
Here is my mold sandwich situated over the sink. I used a large baking rack to set it over the sink. I didn’t like this setup. It was a bit rickety and it almost fell into the sink a couple times.
Here is my mold sandwich over a 9 x 13 pan, using another baking rack. This was much easier to deal with, and is how I did my setup after the first time and forever after.
10. Let the cheese rest (in the mold) overnight at room temperature.
11. Make a saturated brine solution with 2 pounds of cheese salt and 1 gallon of cold water. Remove the cheese from the mold (just lift the mold up from the cheese, it will come right up) and place it in the brine.
Keep it soaking in the brine at 50 degrees for 12 hours. Flip it over several times. Munster, like a number of other cheeses with a short aging time, isn’t salted before pressing but is instead soaked in a brine.
12. Remove the cheese from the brine and pat dry with paper towels. Reserve the brine for other uses. You can store the brine in the fridge and use it over and over. To re-use it, boil it, add additional salt (until the salt no longer dissolves in the brine–that’s how you know it’s saturated) then cool and refrigerate.
13. Lightly spray the surface of the cheese with the red bacteria. I wasn’t sure what lightly spray meant exactly, but what I did was spray the surface all over (including the sides) twice using the fine misting pump on my atomizer.
14. Flip the cheese and spray the other side.
15. Let the cheese ripen at 60 degrees and 85-95 percent humidity for 10-14 days. To create a humid environment for my cheese, I placed the cheese on top of bamboo skewers (to keep it up off the surface of the container and let air circulate) in a 9 x 13 storage container and put on the lid.
16. Check the cheese every other day and gently wipe the surface with cheesecloth or a paper towel dampened in lightly salted water. This is the “washing” process. It helps spread the bacteria evenly over the surface and inhibits unwanted bacteria, yeast, and mold from developing. The surface will gradually develop a reddish-brown color. The longer the bacteria develop, the stronger the taste of the cheese will be.
Remember to be attentive to your Munster. After 10 days, my Munsters started developing a slight red cast to the surface. I have been washing them with salt water every other day and will be waxing them soon.
17. Air-dry the cheese at 50 degrees and 95 percent humidity for several days.
18. Wax it! Age it at 45-50 degrees for 6 weeks.
Yield: Two pounds of stinky treasure.
My experience: I was surprised and delighted by the process of making Munster. It was FUN. And fascinating. It presses under its own weight! How weird is that?! I always think dealing with a cheese press is a little bit of a hassle, so I loved that part. Flipping the mold sandwich can be a tricky balancing act, but it’s kinda fun, too. The mold sandwich, the brine soak, and spraying bacteria were all new to me, but they aren’t difficult. It’s just the initial hurdle of trying something new. For me, the most difficult part of making cheese continues to be building my experience in working with the curds. Time and temperature are so important in making cheese of any kind. I’m not a perfect cheesemaker–yet! But making cheese is a journey. I may never think I’m perfect at it, but I am getting better.
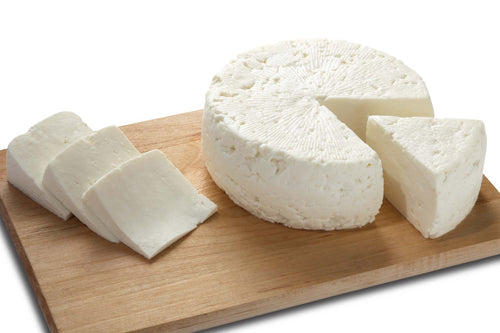
Here’s my first Munster, out of the mold and ready to go into the brine soak:
I thought it was a work of art! I think I did pretty good with the curds. They’re knit together fairly well. NOT PERFECTLY. But for me, as a beginner, this isn’t bad.
Here’s my second Munster, out of the mold:
Fail! And I know exactly what I did wrong. I was involved in a few other projects at the same time I was making this cheese. I was heady with my success from my first Muenster and I didn’t pay enough attention to time and temperature and I let my curds sit way too long while I finished something on another project. Big mistake. My curds went into the mold too dry, having set in the pot too long and expelled too much whey.
This cheese wasn’t worth the cheese wax it would take to put on it. I cut it open out of curiosity. Big holes inside because it didn’t press.
I gave it to the dogs.
Coco thought it was a tasty treat.
Here’s my third Munster, out of the mold and ready to go into the brine soak:
Pretty good! Worth continuing! I paid attention to my time and temperature and got my curds into the mold immediately. I still don’t have my curds knit together perfect and smooth, but it’s not terrible, either. (See Munster #2 for truly terrible.)
The main thing I need to continue working on, with every cheese, is getting my curds right. Since my curds, even in my best efforts in Munster #1 and Munster #3 weren’t knit perfectly smoothly, that means my curds were still a little dry. Cheese expert Jim Wallace from New England Cheesemaking gave me this advice on my Munster adventure: “This cheese should have a moist enough final curd that it easily forms a nice smooth surface after the first turn or so with very little weight. The dry curd can be caused by temps running too high, too much stirring, or even too much acid development caused by excessive milk ripening. I also find that sometimes it is also caused by too much culture addition. For my work here I normally use 1 pack for 3 gallons of store milk or 4 gallons of raw milk. Different milks will behave differently as well.”
On my next hard cheese, I’m going to do a trial using only half a packet of mesophilic starter (per 2 gallon recipe) and see if that improves my curds. That’s something you can try, too. I make all the mistakes so you don’t have to!
I can’t completely pinpoint why, but making Munster is the most fun I’ve ever had making cheese. I know I’ll be making more of it. I’d make Munster every day if I could, it’s that much fun! For next month’s cheese challenge, I’ll be making another brine-soaked cheese, but soon I want to try more mold-ripened cheeses. I want to try it all. I love making cheese! My Munsters are still ripening in the storage containers, by the way, and I’ll report on them as they progress. Soon, I’ll be breaking into my Jack cheeses, too, and will show you how they came out.


