This is the third of a 5 part series. The first part (click here) outlines all the reasons why you, as a new cheese maker can make this fabulous cheese. The second (click here) goes over the supplies and ingredients you will need, so you can order them in advance.

There are hundreds of different recipes for making Camembert online, in books and on videos. Our company (New England Cheesemaking Supply) has two different recipes – an intermediate recipe by Jim Wallace (click here) and another in our book Home Cheese Making. There are also several different recipes (including one for Sheep’s Milk Camembert) here in this blog.

Sara Hunt’s Sheep’s Milk Camembert
The recipe below is a very simple one for which there are many possible variations. We will go over these variations in the next part of this series, so you can go on to create your own “signature” Camembert.
Important note: Print these directions (at the end of the article) so you can make notes as you go. You can use these notes the next time you make this cheese to “tweek” the recipe. (If you can’t print it, use a notebook to keep track of your times as you go.)
Review of Part 2:
Ingredients
More info about these ingredients are included in Part 2 (click here).
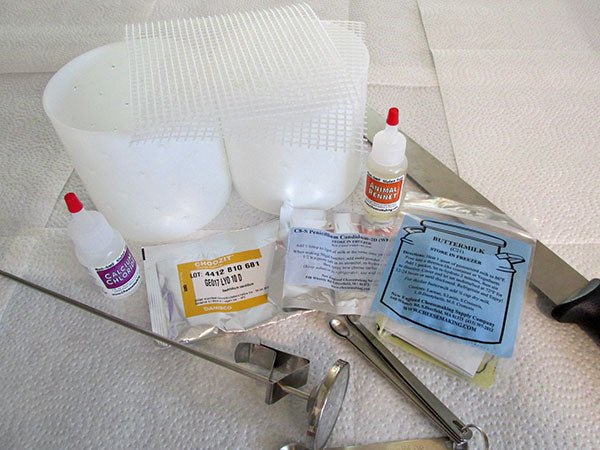
Starter culture – Buttermilk (C21) (1/8 tsp which is 1/2 pack), Mesophilic (C101) (1/8 tsp which is 1/2 pack), Mesophilic (MA11) (1/8 tsp), Flora Danica (C11) (1/8 tsp), Aroma B (C64) (1/8 tsp). You can use Fresh Starter (C3) if you want to make a mother culture, but you will have to determine for yourself how much to use- for example, you could try one ice cube worth.
1/16 teaspoon Penicillium Candidum (C8)
1/64 teaspoon Geotrichum Candidum (C7)
1/8 teaspoon single strength rennet (R7)
1/8 teaspoon calcium chloride (C14)
1/2 cup of non-chlorinated water (distilled is fine).
4 teaspoons cheese salt (S1)
1 gallon milk (if you have access to raw milk, that’s great, but, if not, get the freshest store-bought milk you can and don’t worry– some of the best cheeses in the world are made with pasteurized, homogenized milk). Do not use ultra-pasteurized milk and be careful about this because many brands of organic milk are ultra-pasteurized.
Supplies
Alternatives to these supplies are discussed in Part 2 (click here).
Sanitizer (food grade)
2 Camembert molds (M7)
4 fine-mesh plastic mats (MATFINES)
2 medium mesh mats (MATMEDS-S)
Cheese thermometer (E4)
Pot or bowl big enough for 2 gallons of milk. (Do not use aluminum.)
Curd cutter (E8)
Cheese skimmer (E15)
Curd Scoop (E17)
Mini measuring spoons (E20)
Cheese Wrap (MRPS)
Gloves(E40-S) to wear when sterilizing supplies
New sponge or sterilized cleaning cloth
Ripening Box
Directions:
Total time: Plan to be near your kitchen for the next 4 hours, although a lot of that time will be spent waiting.
Preparation: Plan to spend about an hour preparing your tools and work area.
Bring a large pot full of water to a boil for sterilizing your utensils.

Sterilize another pot for your milk by boiling water in it and pouring it out while rotating the pot to get the sides completely wet from the boiling water. Wear your gloves for this.
You can use the same pot you sterilized your supplies in to hold your milk, but it’s good to have the pot of hot water on hand when you realize you forgot to sterilize something later. You can also use a little of this water in your sink if you need to warm up the water around your pot of milk.
Pour your gallon of milk into the sterilized pot and add 1/8 tsp calcium chloride (diluted in 1/4 cup of distilled water). Set aside while you do the rest.

Mix up your sanitizer and sanitize the counter where you will be drying your sterilized supplies. Add sanitizer to water- not the other way around!

Sanitize your ripening box and rack.
Sterilize your utensils, including your mats, molds, thermometer, scoop, skimmer, cleaning cloth, cup you use to mix up your rennet and calcium chloride. You can use tongs to lift them out of the boiling water onto the sanitized counter.

The make:
Place your pot in the sink and surround it with warm (not hot) water. Wait until the milk slowly reaches 90F. This should take around 20 minutes. It usually climbs to room temp fairly fast, then you can add a little hot water to the sink for the final push to 90F.

When the milk reaches 90F, sprinkle your cultures onto the surface of the milk. That includes your starter culture, P. Candidum and Geotrichum. Make a note of what starter culture you used.

Use your mini-spoon to measure culture from the pack, then quickly close the pack of remaining culture and put it back in the freezer.
Wait approximately 3 minutes, then slowly stir the cultures into your milk. This allows the granules of culture to re-hydrate after being dormant.
Keeping the pot in the warm water and holding it at 90F, cover it and let it set undisturbed for 30 minutes. It should stay at 90F during this time with no fuss from you.

After the 30 minutes have passed, dilute your rennet in 1/4 cup distilled water, slowly pour it into your milk and use your skimmer to slowly stir in an up-and-down motion for 20 seconds.

Cover the pot and holding the temperature at around 90F, let set undisturbed for 90 minutes. Unless your room is very cold, the milk will stay close to 90F. But, check it every 30 minutes and if the temperature is going down, add a little warm water to the sink.
Now, you will use your first new cheese making technique – “checking for the clean break.”
Make a shallow cut into the curd with your curd knife. Move the knife a little from side to side to see if the curd breaks cleanly. If you have any doubt at all about whether the curd is breaking cleanly, let the curd set another 1/2 hour or so or until it’s ready. If, after 2 hours, your milk isn’t forming a good strong curd, there’s no point proceeding. Check to see if you used ultra-pasteurized milk or if you forgot one of the steps above. The milk is perfectly fine to drink or use in baking, but it isn’t going to make cheese. Use a different kind of milk next time and know that you have our deepest sympathies!


You can also check the side of the pot to see if the curd breaks cleanly.
Now, for your second technique- “cutting the curds.”
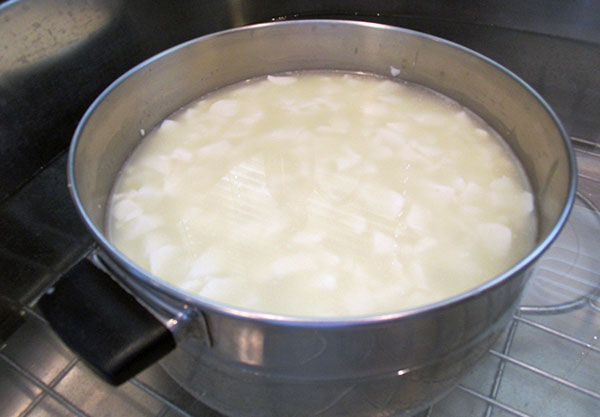
Cut the curds using the method illustrated below. Your goal is to end up with little square cubes of curd approximately 1/2 inch wide. Some people use a skimmer or a whisk to cut the curds, but we prefer the method below. Some pieces of curd will be bigger than others, but you can use your skimmer to break them up in the next step.


When you have finished cutting the curds, use your cheese skimmer to bring the curds up from the bottom of the pot slowly, breaking up any large pieces. Do this very slowly (for 5-10 minutes).

Let the curds settle into the bottom of the pot for 5 minutes.


While you’re waiting, set up your plastic box with rack, fine mesh mats and molds on top of the mats. If you don’t want the mats to overlap, you can trim them down with scissors.

Pour off the whey on top of the curds or scoop it out, saving it for baking, pets, etc. if you want. (For the many uses for whey-click here).
Using your cheese scoop, scoop the curds into the molds. (Depending on your milk, the molds will be full to the brim and then some, or they will not be quite full. If you have to, wait for some of the whey to drain off until you have gotten all of the curds into your molds.)

Draining: Plan to drain the curds for a total of around 24 hours.
Leave the curds to drain on the rack. Cover them with your second set of mats. Do not let the whey in the bottom of your box reach the curds – check it periodically to drain off the whey because there will be a lot of whey at first.

Wait 2-3 hours and flip. If curds escape during this, just put them back in the top of the mold. Flipping at first will be very awkward. Some people use little boards to help with this. The good news is that if any curds escape, you can put them back in the mold and all will be fine in the end!

If, when you’re flipping, the mats that were on the bottom have a lot of curd in them, you can rinse them off and put them back on top of the molds.

Wait another hour (or 2) and flip again. Do this several times until you’re ready for bed.

Let the cheeses set overnight. (Be sure your pets can’t get into this!) You want to keep the temperature around 70F while the cheeses are draining, so, don’t put them in your aging space yet. You can keep them out on the rack with the mats on top of them, or keep them on the rack in the box with the mats on them. If you want to loosely put the top on the box, you can.
By this time, the cheeses should be around 1/3 their original size and they should come away from the sides of the mold easily.

Salting:
When the cheeses have drained at least 24 hours, take them out of the molds and rub salt on the sides and both surfaces.

1st Ripening:
Put your cheeses back in the box on the rack (but not on the fine mesh mat). This time use the medium mesh. You can use the fine mesh, but the mold will grow in it and it will be very difficult to clean.

Put your ripening box and cheeses in the place you have chosen to age your cheese. The ideal temperature is 50-55F but you can do this in your fridge if necessary (as close to the bottom as you can get).
Close the lid of your box. Check it after a few hours to see if moisture is accumulating on the inside top of the box. You don’t want this because it might drip onto your cheese. Wipe off any moisture with a paper towel.
Flip your cheeses once/day until they are completely covered with white mold. This usually takes 5- 10 days. (It can take up to 2 weeks if your cheeses are in a regular refrigerator.)

Final Ripening:
Wrap your cheeses and put them either back in your box at 50-55F which will take about 3-4 weeks or in the lowest bin of your refrigerator which will take about 6-8 weeks. You do not flip them during this time.


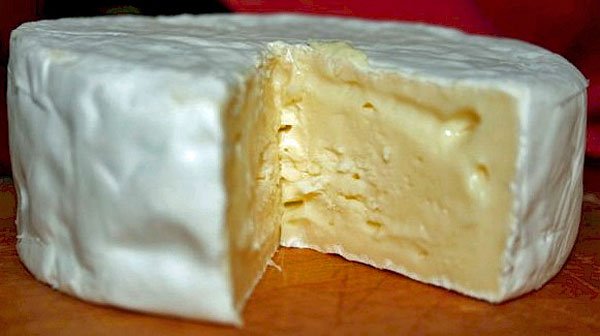
You will know they are ready when the centers feels soft as you press on them lightly.

Now, you can finally eat your cheese! Make notes about how it tastes and how you would like to improve it next time.

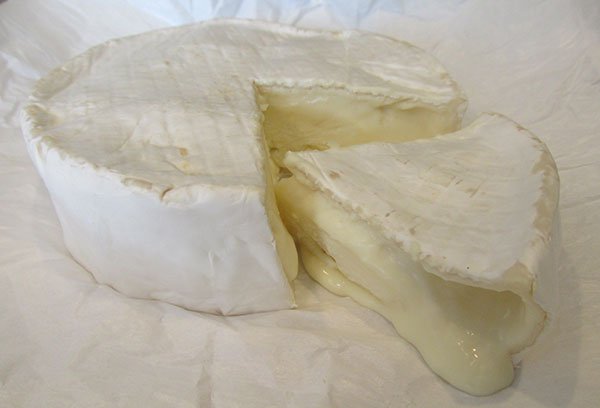
This cheese just came out of the refrigerator, so it isn’t oozing yet.

After being at room temperature for 2 hours.
Print this:
Preparation:
Bring a large pot full of water to a boil for sterilizing your utensils.
Sterilize another pot for your milk by boiling water in it and pouring it out while rotating the pot to get the sides completely wet from the boiling water. Wear your gloves for this.
You can use the same pot you sterilized your supplies in to hold your milk, but it’s good to have the pot of hot water on hand when you realize you forgot to sterilize something later. You can also use a little of this water in your sink if you need to warm up the water around your pot of milk.
Pour your gallon of milk into the sterilized pot and add 1/8 tsp calcium chloride (diluted in 1/4 cup of distilled water). Set aside while you do the rest.
Mix up your sanitizer and sanitize the counter where you will be drying your sterilized supplies. Add sanitizer to water- not the other way around!
Sanitize your ripening box and rack.
Sterilize your utensils, including your mats, molds, thermometer, scoop, skimmer, cleaning cloth, cup you use to mix up your rennet and calcium chloride. You can use tongs to lift them out of the boiling water onto the sanitized counter.
The make:
Place your pot in the sink and surround it with warm (not hot) water. Wait until the milk slowly reaches 90F. This should take around 20 minutes. It usually climbs to room temp fairly fast, then you can add a little hot water to the sink for the final push to 90F.
When the milk reaches 90F, sprinkle your cultures onto the surface of the milk. That includes your starter culture, P. Candidum and Geotrichum. Make a note of what starter culture you used.
Wait approximately 3 minutes, then slowly stir the cultures into your milk. This allows the granules of culture to re-hydrate after being dormant.
Keeping the pot in the warm water and holding it at 90F, cover it and let it set undisturbed for 30 minutes. It should stay at 90F during this time with no fuss from you.
After the 30 minutes have passed, dilute your rennet in 1/4 cup distilled water, slowly pour it into your milk and use your skimmer to slowly stir in an up-and-down motion for 20 seconds.
Cover the pot and holding the temperature at around 90F, let set undisturbed for 90 minutes. Unless your room is very cold, the milk will stay close to 90F. But, check it every 30 minutes and if the temperature is going down, add a little warm water to the sink.
Now, you will use your first new cheese making technique – “checking for the clean break.”
Make a shallow cut into the curd with your curd knife. Move the knife a little from side to side to see if the curd breaks cleanly. If you have any doubt at all about whether the curd is breaking cleanly, let the curd set another 1/2 hour or so or until it’s ready. If, after 2 hours, your milk isn’t forming a good strong curd, there’s no point proceeding. Check to see if you used ultra-pasteurized milk or if you forgot one of the steps above. The milk is perfectly fine to drink or use in baking, but it isn’t going to make cheese. Use a different kind of milk next time and know that you have our deepest sympathies!
Now, for your second technique- “cutting the curds.”
Cut the curds using the method illustrated below. Your goal is to end up with little square cubes of curd approximately 1/2 inch wide. Some people use a skimmer or a whisk to cut the curds, but we prefer the method below. Some pieces of curd will be bigger than others, but you can use your skimmer to break them up in the next step.
When you have finished cutting the curds, use your cheese skimmer to bring the curds up from the bottom of the pot slowly, breaking up any large pieces. Do this very slowly (for 5-10 minutes).
Let the curds settle into the bottom of the pot for 5 minutes.
While you’re waiting, set up your plastic box with rack, mesh mats and molds on top of the mats. If you don’t want the mats to overlap, you can trim them down with scissors.
Pour off the whey on top of the curds or scoop it out, saving it for baking, pets, etc. if you want.
Using your cheese scoop, scoop the curds into the molds. (Depending on your milk, the molds will be full to the brim and then some, or they will not be quite full. If you have to, wait for some of the whey to drain off until you have gotten all of the curds into your molds.)
Draining: Plan to drain the curds for a total of around 24 hours.
Leave the curds to drain on the rack. Cover them with your second set of mats. Do not let the whey in the bottom of your box reach the curds – check it periodically to drain off the whey because there will be a lot of whey at first.
Wait 2-3 hours and flip. If curds escape during this, just put them back in the top of the mold. Flipping at first will be very awkward. Some people use little boards to help with this. The good news is that if any curds escape, you can put them back in the mold and all will be fine in the end!
If, when you’re flipping, the mats that were on the bottom have a lot of curd in them, you can rinse them off and put them back on top of the molds.
Wait another hour (or 2) and flip again. Do this several times until you’re ready for bed.
Let the cheeses set overnight. (Be sure your pets can’t get into this!) You want to keep the temperature around 70F while the cheeses are draining, so, don’t put them in your aging space yet. You can keep them out on the rack with the mats on top of them, or keep them on the rack in the box with the mats on them. If you want to loosely put the top on the box, you can.
By this time, the cheeses should be around 1/3 their original size and they should come away from the sides of the mold easily.
Salting:
When the cheeses have drained at least 24 hours, take them out of the molds and rub salt on the sides and both surfaces.
1st Ripening:
Put your cheeses back in the box on the rack (but not on the fine mesh mat). This time use the medium mesh. You can use the fine mesh, but the mold will grow in it and it will be very difficult to clean.
Put your ripening box and cheeses in the place you have chosen to age your cheese. The ideal temperature is 50-55F but you can do this in your fridge if necessary (as close to the bottom as you can get).
Close the lid of your box. Check it after a few hours to see if moisture is accumulating on the inside top of the box. You don’t want this because it might drip onto your cheese. Wipe off any moisture with a paper towel.
Flip your cheeses once/day until they are completely covered with white mold. This usually takes 5- 10 days.
Final Ripening:
Wrap your cheeses and put them either back in your box at 50-55F which will take about 3-4 weeks or in the lowest bin of your refrigerator which will take about 6-8 weeks. You do not flip them during this time.
You will know they are ready when the centers feels soft as you press on them lightly.
Now, you can finally eat your cheese! Make notes about how it tastes and how you would like to improve it next time.


